
4 Tips for Taking the Best Foliage Photos in New England
In the last five autumns I’ve spent chasing the foliage in New England and upstate New York, I’ve come up with a handful of tips through…
When I moved to New England, I didn’t know what I was getting myself into with seasons. In Texas, we’re either in summer or a chillier version of summer. What I wasn’t ready for is just how stunning fall can be. Contrastly, it can also be very difficult to decipher how to photograph such beautiful scenes.
In the last five autumns I’ve spent chasing the foliage in New England and upstate New York, I’ve come up with a handful of tips through long drives, failed hikes, and hidden gems of how to find the best photos of foliage. My pictures below are from the Adirondacks, which isn’t technically New England as it’s in New York, but given the proximity to the other mountains I frequent, the foliage timing and tips are very similar.
Here are my tips for how to take the best fall foliage photos in the Northeast:
1. If the weather is gloomy, it’s still worth making the trip.

The rain stopped when I reached the summit of Baxter Mountain and the clouds were sweeping through the layers and layers of mountains.
I used to only hike in what I considered ideal weather conditions. It had to be a sunny or clear sky, or absolutely no chance of rain. You wouldn’t catch me hiking in the rain. Wet socks, potentially wet camera gear – not my idea of a good time.
Last weekend, I was eager to get back to the Adirondacks. The only setback was a 100% chance of showers from when I arrived late Friday night to when I was leaving Sunday afternoon. I could’ve canceled. I could’ve stayed in western Massachusetts and shifted gears.
Instead, north I drove. Rainy weather has a unique way of bringing out foliage. It’s the weather of autumn and I’m embracing it this year, instead of turning away from it. Rain brings moodiness to the mountains with low moving clouds. I’m gravitating more toward this moodiness over bluebird days because you can’t plan for this scenery. It just happens because you went out and took a chance.

A cloudy day when the clouds break to let the sunlight in makes for one of my favorite views.
2. Hike lower elevations.
You don’t need to pick a 16-mile, 2,000 foot elevation gain hike to see the foliage. A drive through Lake Placid will easily give you the fall vibes! I highly recommend finding short hikes in the area you want to explore. Often times, they may not be as popular as most people are chasing a hiking list of the high peaks.
If you’re looking at the White Mountains, find a hike in the Lakes region or a less popular hike like Welch and Dickey. Shorter hikes often have parking more available as hikers head in and out at a faster pace. If you’re looking at the Adirondacks, the Lake Placid 9 (9 peaks around Lake Placid) are definitely worthwhile.

When I say hike low, I mean you don’t need to aim for 4,000 footers. Unless you want to! I decided to chase the foliage this year, and not the high peaks for autumn views.

Aerial views provided by reaching the summit of Baxter Mountain.
Don’t be fooled at these lower elevation hikes. The gain is still sweat-breaking! On some of the Lake Placid 9 hikes, you’re gaining 700-800 feet in a mile. Impressive for a 2-3 mile roundtrip hike.

Incredible views after a short hike up Mt. Van Hoevenberg.
3. Pull over when you see a worthwhile view.
There are so many incredible spots around the mountains to pull over safely and snap a photo. Think: rivers, trees, and small towns. Two weekends ago, as I was driving from Lake Placid to Wilmington, I saw a fishing spot that looked scenic.

A beautiful view of Whiteface Mountain from a parking spot at a fishing spot.
I pulled over next to a few fishermen, headed down the bank, and snapped a few shots of falls with foliage galore.

Lake Placid added a new lookout point along Mirror Lake. I stopped when I saw this view while driving by.
4. Don’t expect the perfect shot.
Most photographers edit their photos with fancy programs, so don’t go in thinking you’ll have an incredible aerial view of a mountain lake from a summit. Professional photographers are very good at their jobs – and editing is part of that!
The weather during fall is also very unpredictable. Even if the forecast calls for clouds, you may end up with constant downpour. If it calls for rain, you might get sunburnt because the sun will come out. You never know what you’re going to get – so get out there and be prepared!
Autumn is the perfect season for those moody mountain pictures. In these last couple trips, I’m more and more welcoming of clouds and rainy weather!

A rainy day led to an opening of the skies at the summit of Big Crow mountain.
Last weekend, I planned to call it quits early because of the nonstop rain. Instead, I tied my laces and headed up one of the Lake Placid 9 in Keene, New York. The rain had miraculously ceased and from the skies the clouds parted. I was enamored with foliage views for miles. And mountains immersed in the clouds. Had I just headed home early, I would’ve missed this view.
It wasn’t planned. It wasn’t the view I had seen when researching this hike. To me, it’s the perfect shot to remember the awesome feeling of a new experience hiking solo in new places.

Do you go leaf peeping? What tips would you offer someone trying to see all that foliage has to offer?

Have You Visited This Off-the-Beaten-Path Gem in Massachusetts?
When you think of outdoors adventures in Massachusetts, your mind may wander to the Cape, or hikes in the Berkshires. But have you ever heard of the…
When you think of outdoors adventures in Massachusetts, your mind may wander to the Cape, or hikes in the Berkshires. But have you ever heard of the Quabbin Reservoir?

Although the boats are intended for fishing, they also serve the purpose of pure relaxation.
I visited this reservoir my first year in Massachusetts and wasn’t too impressed. I drove about an hour northeast from Springfield, Massachusetts, to find the Quabbin Reservoir. I parked in the Visitor Center parking lot and got out of my car, eager to hike. Clearly, I didn’t do my research.
As I walked, I realized there wasn’t much hiking at the reservoir. I gazed out at the reservoir, took a few pictures, and left. It wasn’t until last weekend that I realized that the Quabbin Reservoir has way more to offer than I ever thought. And it’s an affordable adventure!
The Quabbin is actually manmade and serves as drinking water for over 3 million people. Boston friends - here’s where your water comes from!
The disheartening part of this park is that in the 1920s, Boston looked westward for a water source, and dis-established four towns in these valleys to create their water source. 2,500 residents in this part of Massachusetts lost their homes as a result.
Since millions utilize the Quabbin Reservoir as their drinking water, there are several restrictions on activity: Dogs, grilling, and swimming aren’t allowed. You might wonder what there is to do at the Quabbin then. What I didn’t know about the Quabbin Reservoir is that the Department of Conservation and Recreation (DCR) provides boat rentals (and kayaks!) for fishing. Now I’m not an avid fisherman, but after trying out my hand at flyfishing in Idaho, I thought I’d give it a try.
I headed out to the Fishing Area 1 parking. If you visit the Quabbin after 12:30 PM, boat rentals are $36 (including a $6 parking fee).

A view of the Quabbin Reservoir once you jet off in your motorboat.
You need a flotation device, but they provide one if you forget yours or don’t have one.
The beauty of the Quabbin is that it’s untouched since you can’t swim in it and there aren’t many hiking opportunities. There is a walking path around the Visitor Center, as well as two viewpoints at the Enfield Look Out and the Quabbin Tower. Otherwise, the Quabbin is really known amongst fishermen.
The motorboat fits three adults or two adults and two children. I hopped into one and set off deep into the Quabbin on a gorgeous, bluebird day. The only other boat I encountered was the DCR reminding me to return the boat an hour and a half before close.
Where else will you find pristine, clear blue water like this without a soul in sight? It felt like I was back in the alpine lakes of Idaho or Montana. The best part was I was only a half hour drive from home and spent $36 for a new afternoon adventure.

Clear water and views for miles with no boat in sight.
Boats are available to rent during the Quabbin Fishing Season, which this year is from Saturday, April 17th to Saturday, October 16th. Can you just imagine the foliage colors in a couple weeks contrasting with this water? I may need to go back sooner than I planned.
Have you ever considered visiting a reservoir for a day trip? Is the Quabbin Reservoir on your list of places to visit in Massachusetts now?

How I Traveled Across the U.S. for Less Than $1,000
Almost anyone can rent a cargo van, throw a mattress in the back, and travel the U.S. with a little planning…

A few days into van life and still smiling!
When planning our summer road trip, we set our eyes on what we believe to be a hidden gem in this country: the Sawtooths mountain range. One glance at these peaks will leave you mesmerized. And so began our planning phase. The trip was originally going to start with a flight from Boston to Boise and back. Below is how we brainstormed from there, while remaining budget-conscious.
Our final trip took us from Western Massachusetts to Idaho and back home. Here are all the places we explored or stayed in:

Columbus, Ohio > St. Louis & Kansas City, MO > Southern Colorado > Southeastern Utah > Twin Falls, Boise, and Sawtooth Mountains, ID
How to Start Planning Your Trip
We initially wanted to fly out to Boise and try out the RV or van life via renting. Flights from Boston to Boise hovered around $500. We were going to bite the bullet: purchase the flights to Boise and rent a renovated van or small RV for around $140-$200 a day. As I started to get to the final page of payment for the van, the numbers added up. Big time.
Not only is there a charge each day of renting, there is an additional required insurance (understandable of course), as well as a hefty fee for driving more than 100 miles per day. Crunching those numbers led to a few thousands of dollars spent on housing, transportation, and flight for a two-week trip. One website we researched was Wander Vans, which for a two-person van for 14 days totaled to $2,200. Additional mileage over 125 (for this specific company) was 35 cents per mile. That total doesn’t include insurance, which was an extra requirement. These vans were sold out for the dates we wanted, but was one of the cheapest options we found. Others grew exponentially from there.
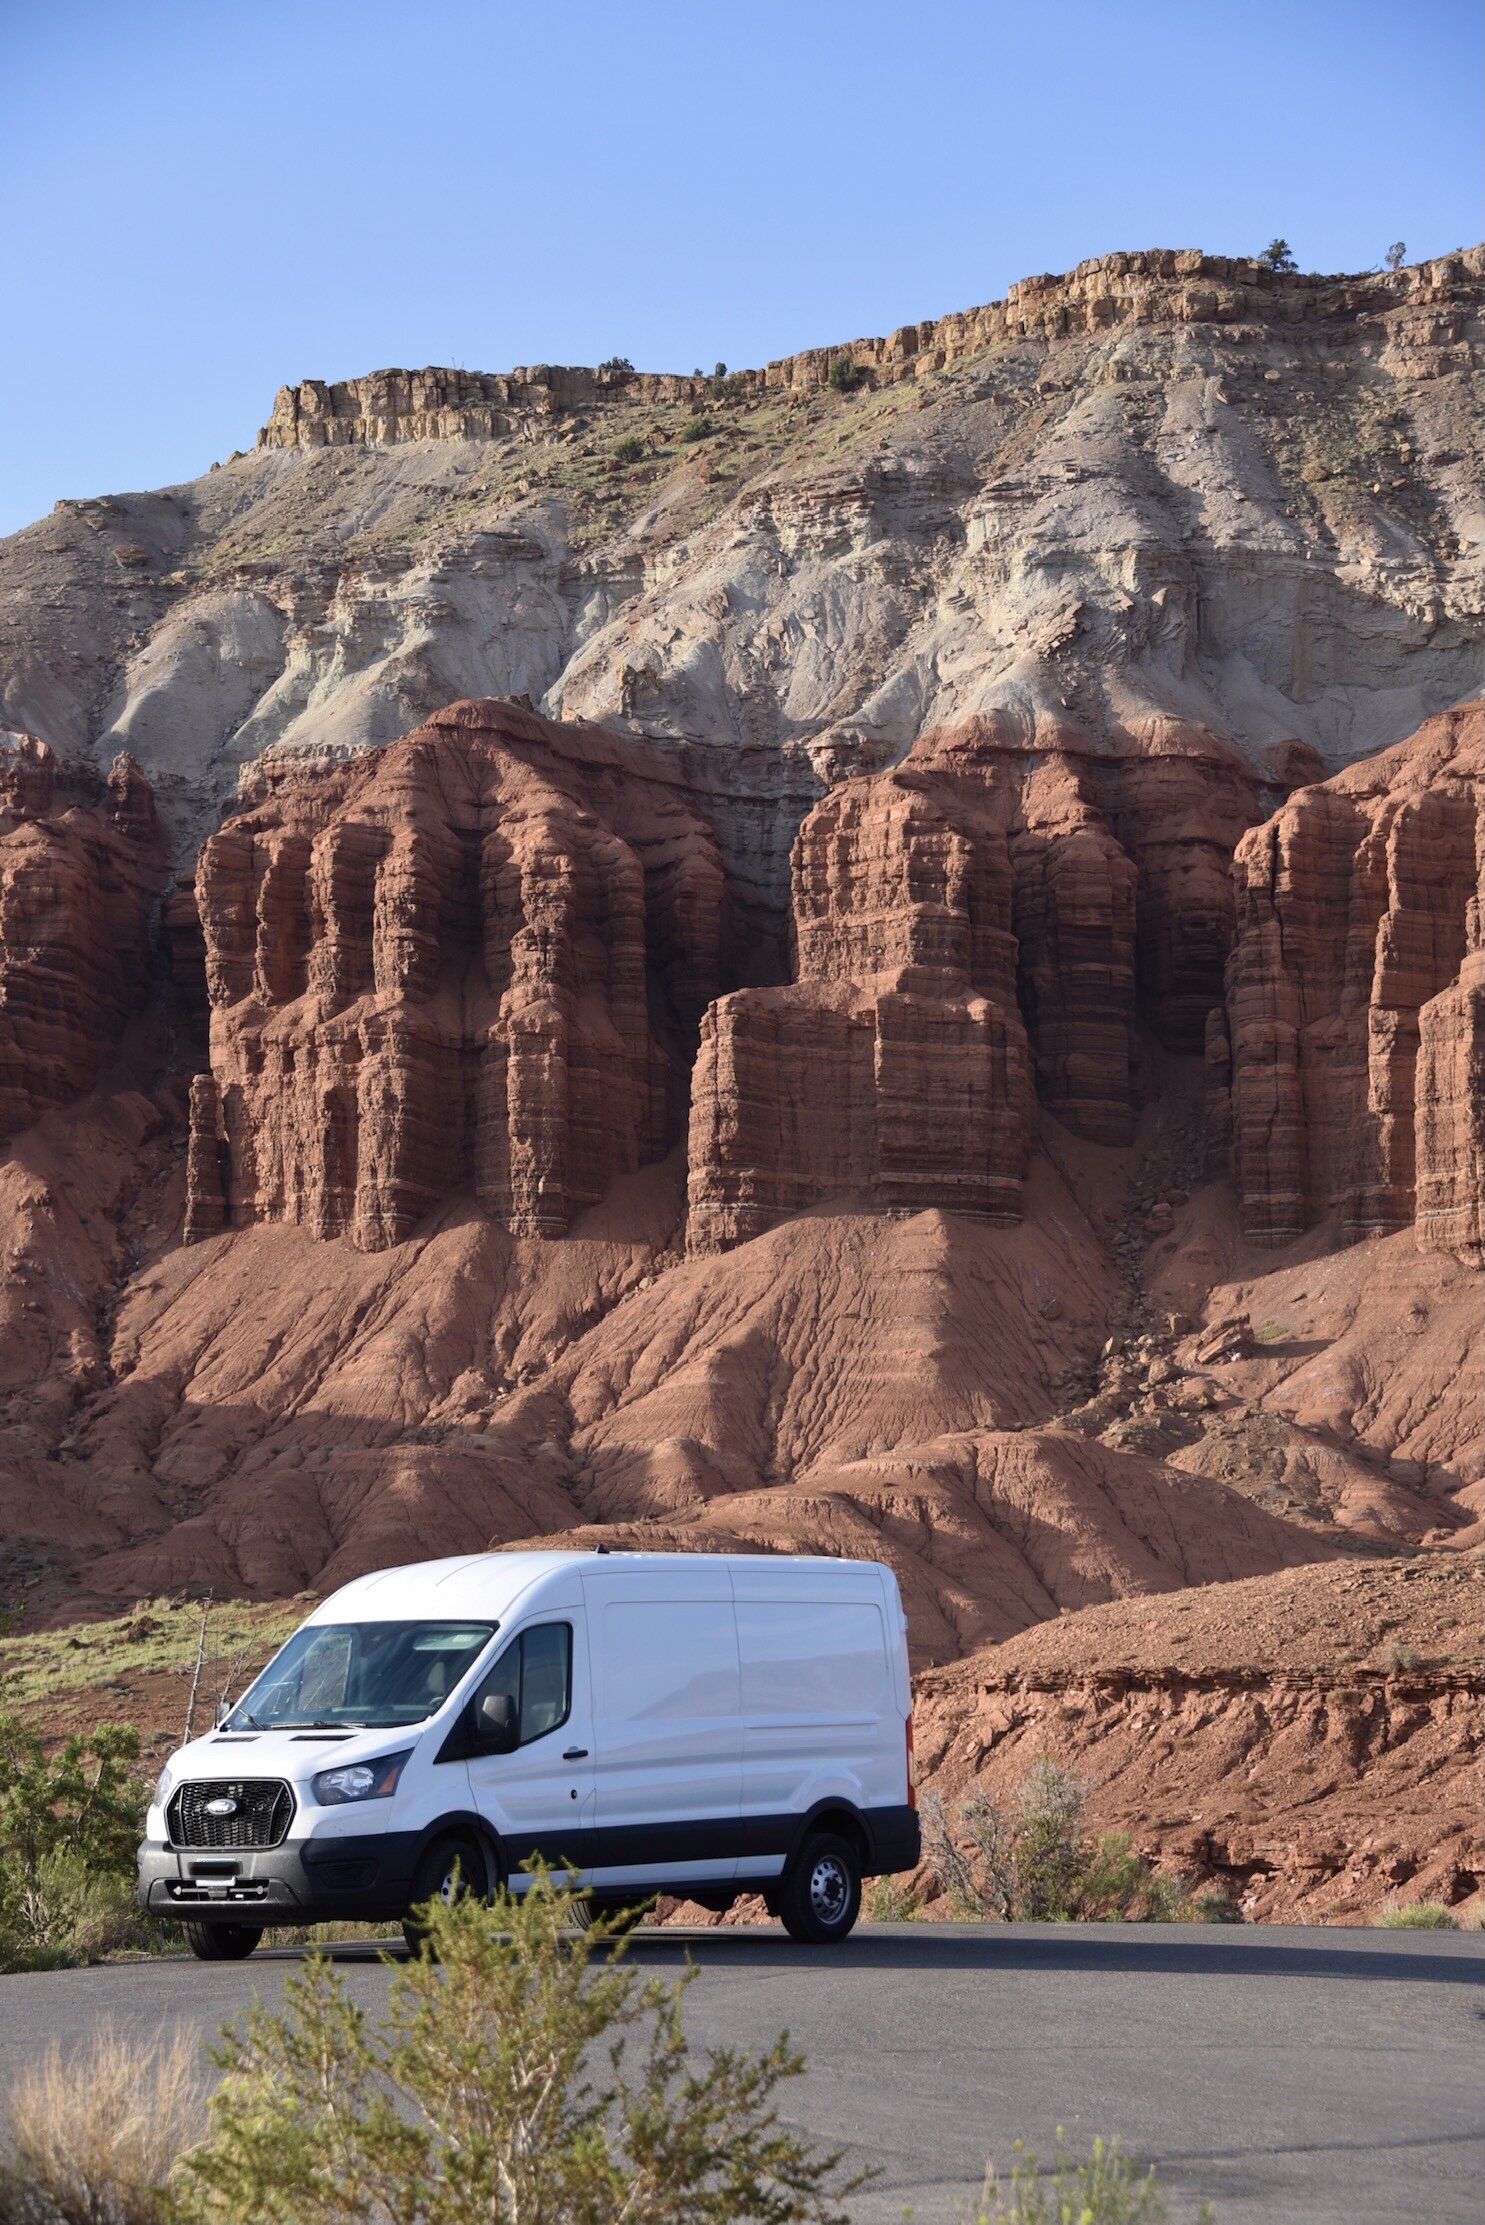
Not a bad spot to enjoy the sunset in Capitol Reef National Park, Utah.
We loved the idea of having a car and housing in one, and of course insurance and cleaning fees are part of that when renting. We tried to justify the expenses by pointing out the van is both the mode of transportation and place to crash each night, but ultimately decided there had to be a cheaper way.

The van’s traveled to some neat places so far like the Black Canyon of the Gunnison National Park in Colorado.
And thus, the road trip idea took a different turn. I used Priceline this time around to book a rental car. When selecting an option (I usually get an SUV to fit all of our camping necessities), I came across a cargo van option. I may be late to the game (or never really had to move things around), but cargo vans are an option? And cost less than an SUV? Not sure where I’ve been this entire time, but I’m glad I came across it.

Making our way through the Southeastern corner of Utah.
The total cost for a two-week rental was $612, but we added in an extra day for $60. The taxes and fees came out to $110, so the total cost for renting a cargo van in Western Massachusetts was $785. We split up travel costs, so my half came out to slightly under $400.
If you’ve read my previous post, 7 Lessons I’ve Learned Road-Tripping Across the U.S., you’ll know I never skimp out on rental car insurance. Of course it’s up to you, but it did add $500 to the total trip. Again, $250 on my end.
Where to Stay
Now that transportation was secured, we needed a place to stay everywhere we traveled. At first, as I mentioned, we looked at transportation that included a stay (i.e. an RV or van). When we threw that out the window and added in the cargo van, we considered Airbnbs. We love a good Airbnb, but for 14 nights, the cost would add up swiftly. So that was out.
With the cargo van, we knew we had two seats in the front and a large space for our needs in the back. The idea for a DIY renovated van was born. We borrowed two air mattresses and an air pump, so the sleeping aspect was covered.
Sure a renovated van with a built in bed, along with ventilation and a heating system would be ideal, but it’s very expensive. Almost anyone can rent a cargo van, throw a mattress in the back, and travel the U.S. with a little planning.
With our bed arrangement figured out, next up was deciphering places to sleep. My favorite option is Kampgrounds of America, or KOA. They are affordable (if you join their membership, you receive 10% off each time – it pays off if you utilize them!) and are all over the U.S. I’ve stayed in cabins and tent sites from the Adirondack mountains in New York to the suburbs of Ohio, to the Badlands in South Dakota. They are everywhere!
The tent sites range based on location. In Moab, Utah, for a tent site with electric plugs and water, it’s $50 a night. You do get a safe location to park, along with wi-fi, showers, and coin laundry at every KOA. For the peace of mind and convenience, it’s worth the price for me! Other not as popular locations, or tent sites without electric can be as low as $30 a night.
If you are budget-conscious as we are, we researched another option. Sure KOAs are great, but we wanted to see how affordable we could go. And that’s when we came across Pilot/Traveling J and Love’s.
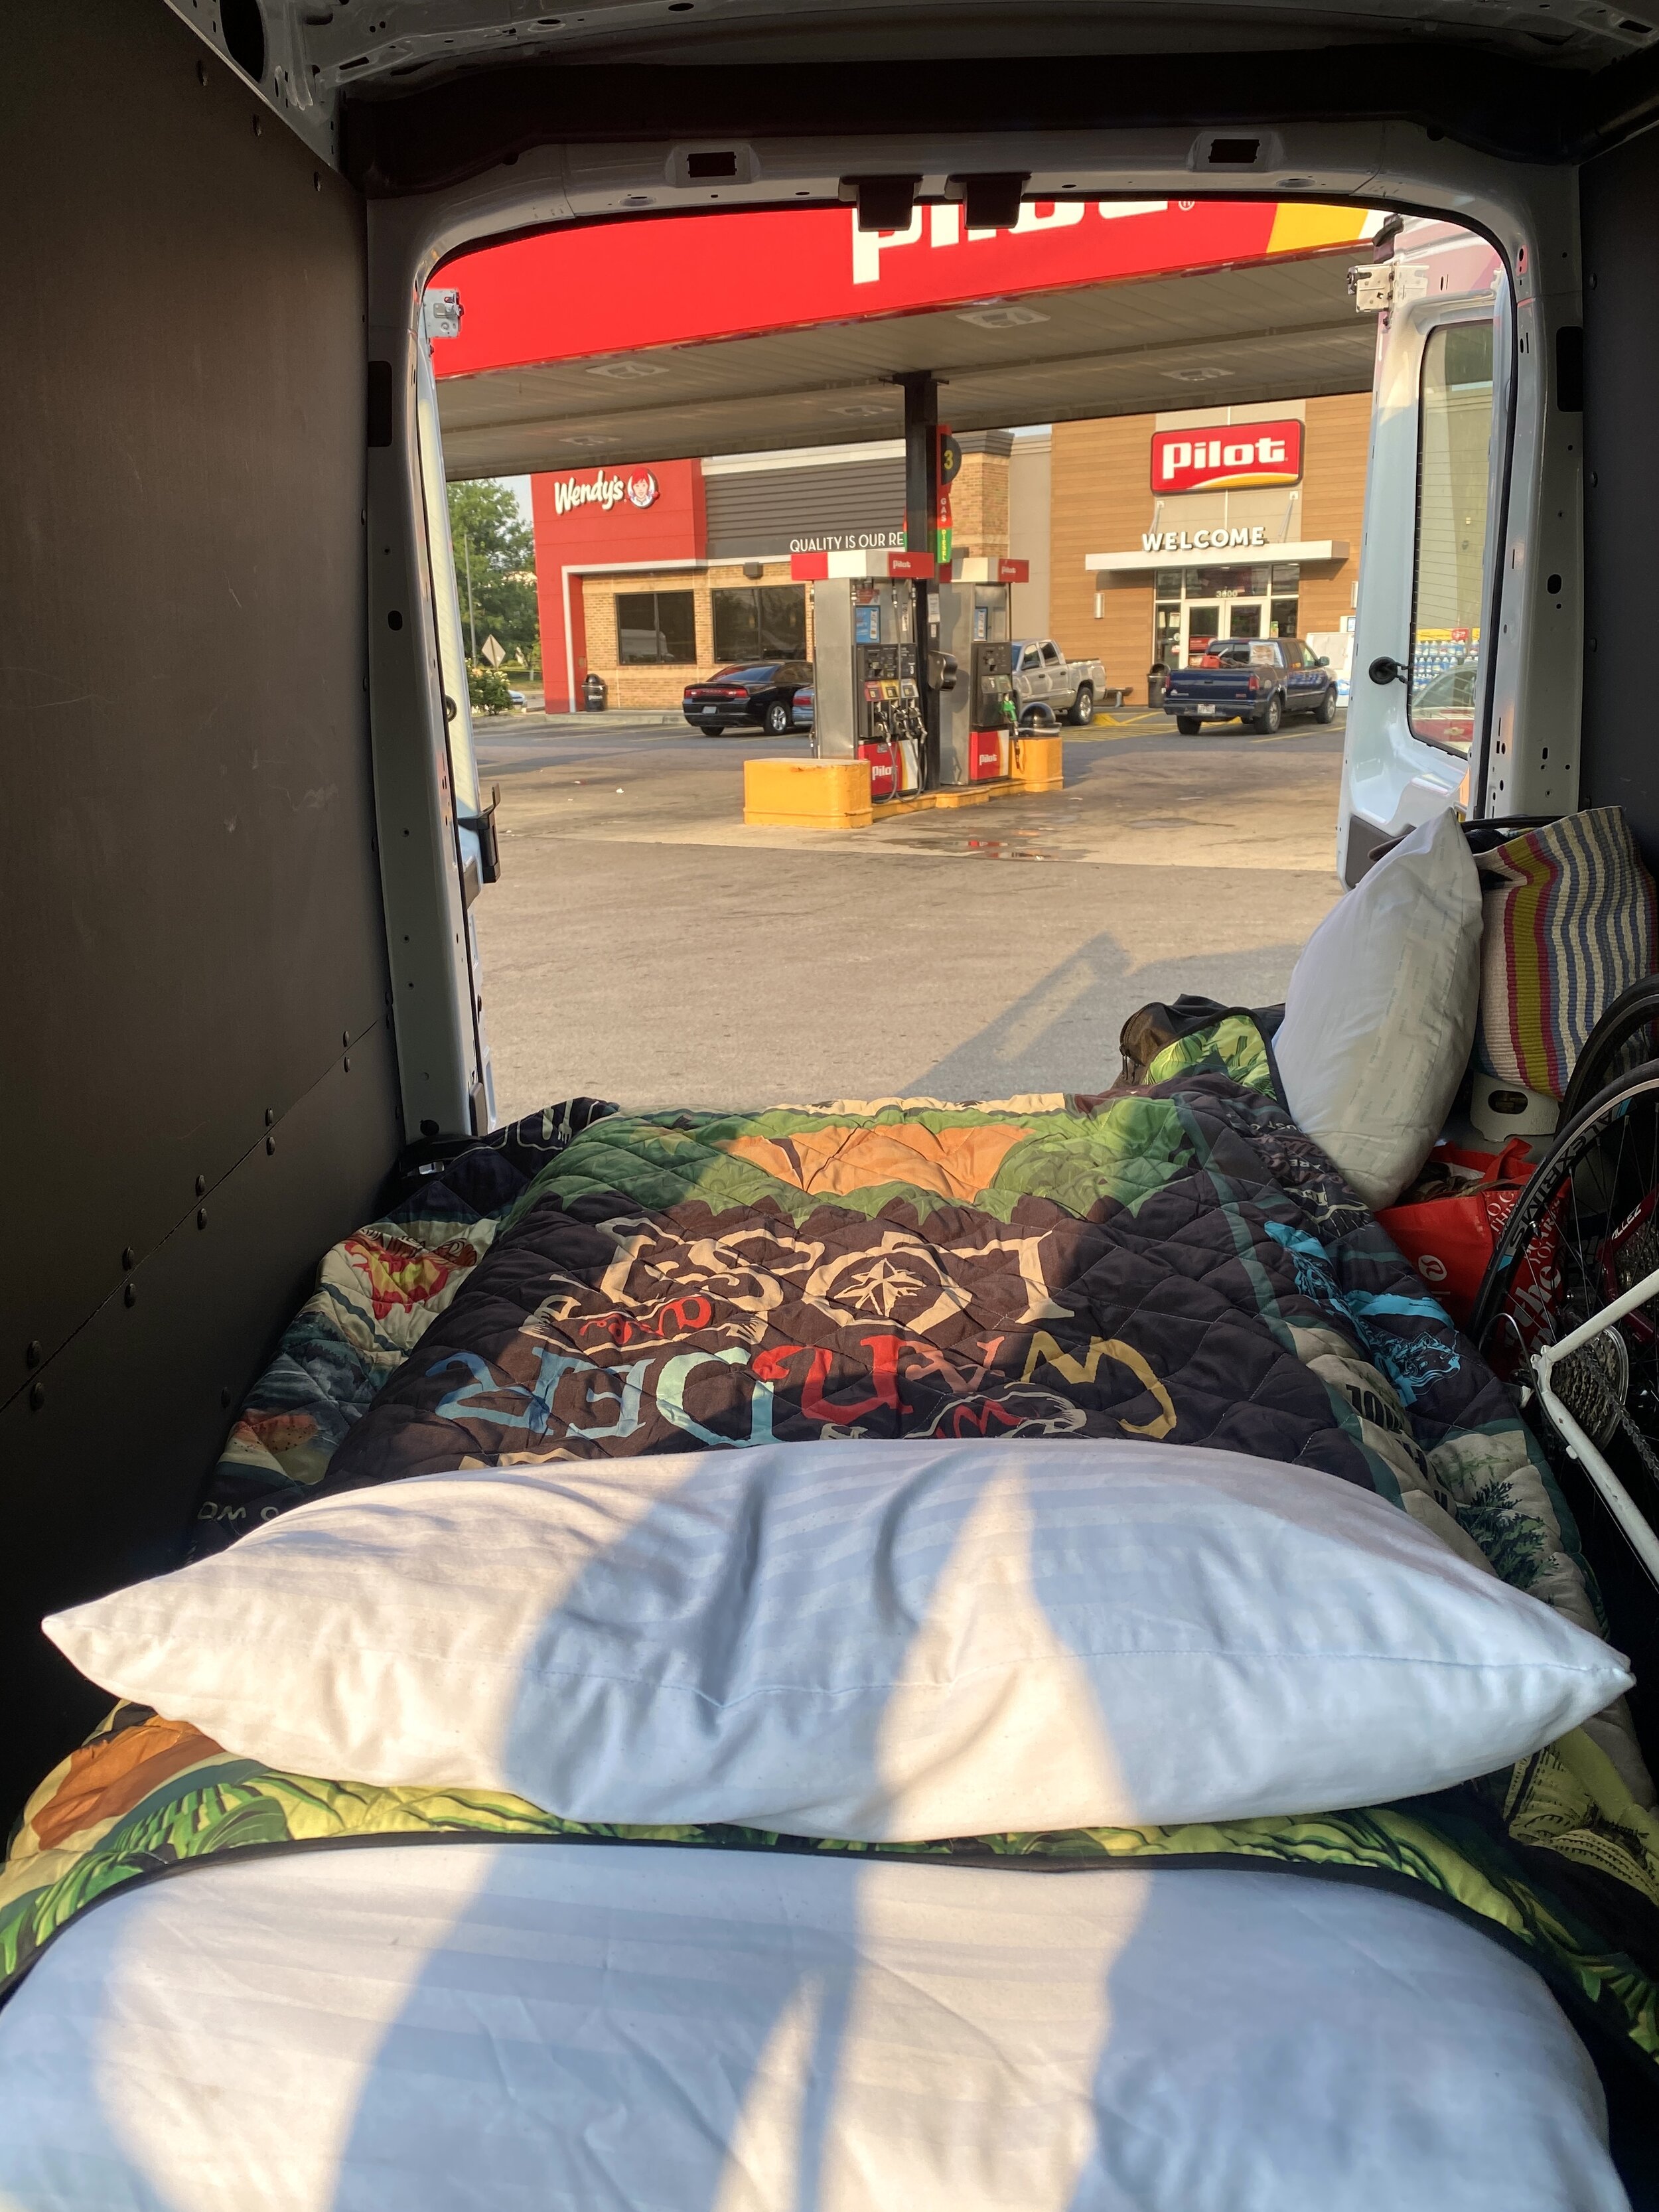
Like I mentioned, van life isn’t always Instagram-worthy, but it sure is great being on the go and saving money. Here’s one of the Pilots we stayed at.
Showers on the Road
Most people know van lifers park in Walmart parking lots overnight for a free stay, but the real gem is a Pilot, Traveling J, or Love’s traveling center. As much as I can go without a shower when on the road or on a camping trip, two weeks might be pushing my limit.
These three companies are all essentially the same: a 24-hour gas station for truckers that provides free restrooms, showers for $13-$15, and overnight parking.
The showers are extremely clean and private. One of the best parts is that it isn’t timed, and they even provide towels (though we used our own). To save even more, you can share a shower if you’re traveling with someone. One person hops in, then on the way out, you can pop in. It’s an easy way to turn a $13 shower into $6.50!
Pro tip: Download the Pilot/Traveling J app for rewards.
Costs not included: Food and Gas
The only costs not included above were food and gas. Gas prices vary based on your trip and time of year. For example, our two-week road trip to Montana last summer included wildly lower gas prices than this trip. In several places along the way we paid $4/gallon. Food can be done in a budget-friendly manner and can look like peanut butter and jelly sandwiches everyday for lunch.
We knew we’d be moving quickly between national parks in Colorado and Utah, so we didn’t always cook our own food. Food is where we splurged to try new coffee shops or the local eateries. A big money-saver is a quick Walmart trip for basics. We bring our own kitchenware, grill, and propane tank, which helps too!
The van life isn’t always glamorous, but with our budget-friendly tips, hopefully it can be accessible for everyone who wants to give it a go. Would you try it out? Do you have any questions on how to start traveling in a van?
7 Lessons I’ve Learned Road-Tripping Across the U.S.
Here’s what I’ve learned from road-tripping across the U.S.
1. Things will go wrong with…
I absolutely love travel. Maybe it’s because my parents prioritized it when I was a kid –whether it was a trip to Disney World or my dad taking us through the woods off the sidewalk path in local parks. Regardless, I love exploring new places.
I especially love being in a foreign place. A language I don’t understand, food I don’t know how to pinpoint the ingredients for, and people who look differently than I do. When it came to traveling, I often flew to new places that were walkable because I didn’t have a car myself. When I purchased my first car after graduating college, I packed up my belongings and set off on a drive from Dallas to Massachusetts with my dad.

My dad and I’s first stop on our road trip up to MA: Hot Springs National Park in Arkansas. This overlook hike is a must on your visit!
The drive itself takes a little over a day, but we split it up over a few days, staying in national parks along the way. Since then, I’ve ridden an Amtrak train from Denver back to Massachusetts, driven all around New England, and made my way around the U.S. on three longer road trips (to Missouri, Georgia, and Montana).
In all those hours spent in the car and the days spent on the road, I’ve learned a lot about preparing for a trip.

A trail view from Voyageurs National Park in Minnesota on the return home from our road trip last summer.
Here’s what I’ve learned from road-tripping across the U.S.
1. Things will go wrong with the perfect itinerary.
Anyone who knows me knows I’m a big planner. I use a color-coded Google sheet with multiple tabs varying from transportation, to housing addresses to packing lists, and sights to see. I love knowing I’ll see most of what a place has to offer by planning in advance.
However, there are things you can’t plan for. You can’t plan for forest fires to bring smoke to mountain ranges from the state over. You can’t plan for your pre-made food to go bad because the outside heat melted your ice sooner than expected. Since then I’ve learned to not pre-make several servings of mac and cheese to save time later since we ended up throwing it away.
Tip: Make a list of your non-negotiables, meaning the things you must do or places you absolutely must see. If you want to see the Mesa Arch in Canyonlands at sunrise and it’s an absolute dream of yours, then make that a priority. Maybe skip another attraction, or grab breakfast instead of cooking it if you’re short on time. Take out something in your “nice to do” bucket to ensure you fill up your “must do” bucket.

A year and a half ago, our flights to Kansas City were canceled due to the weather in Boston. We rented a car and turned the Conference Championship game into a road trip. A perfect example of how we couldn’t stick to the itinerary, yet it turned out to be an amazing weekend. We were even able to make it to Cuyahoga Falls in Ohio and the Gateway Arch in St. Louis since we drove!
2. Always add two hours to your estimated time of arrival on your GPS.
You can’t plan for NY/NJ traffic to add two hours to your drive. Okay, maybe you can because it always feels like driving through this area adds so much time.
This is just one example of something that’s gone “wrong” on my trips in the past, or not according to plan. I’ve learned to add about two hours to the GPS. You don’t realize how much time you actually spend getting gas, buying an extra snack, and using the restroom even though you thought it’d be a quick minute to use the bathroom.
3. When planning, add in filler time. Or be okay with taking a detour.
Since we’re on the topic of time and planning, it’s important to add in time for the unexpected. On one of our trips, we were driving through South Dakota and saw sign after sign for a place called Wall Drug. The signs were such a hoot, we detoured and stopped by this tiny little western town. It ended up being one of the highlights of our drive through South Dakota! Had we not planned for additional time to get to the Badlands, we would’ve felt a need to stick to the road. Thus, missing this cool little spot.

When we made it to the Gateway Arch, our only plan was to view it from the exterior, take a few pictures, and continue our drive to Kansas City. We decided to take a detour, head inside, and book the last tour of the night. The tour took us up to the top of the Gateway Arch for this incredible view for sunset and back down in forty-five minutes. Totally worth it.
4. Double check your bookings a week before your trip. Or at the very least, the night before.
You may have planned to hit the road at 10 AM as soon as you pick up the rental car. That’s part of your itinerary, so it only makes sense. That is, until, you arrive at the rental company and they tell you you booked your car for the day before and since you didn’t pick it up, they rented it out to someone else.
Turns out, you aren’t leaving at 10 AM as you planned. This could have been easily avoided if I checked with the rental company a few days earlier to confirm the dates, or reviewed the booking email confirmation. This also goes for any boat tours or planned excursions you have, along with any campgrounds you reserved. Last summer I mixed up the dates more than once, which left us car camping under the stars in the Tetons (not mad about it), but it meant our KOA campsite in Yellowstone was given to someone else so we didn’t have a home base in Yellowstone.

Here’s the view from our campsite in Yellowstone, overlooking Yellowstone Lake. Not the worst way for plans to go when you mess up reservations.
5. If you’re using a rental car, get the insurance.
Everyone tells you this and you never listen. And when I mean you, I mean me. Almost everyone I have talked to about road trips says nine times out of ten, their rental car was fine. However, there’s always that one time. Ask anyone who travels on the road and they’ll tell you the trouble they had with their car or the animal encounter they had that no one wished for.
This goes back to earlier where I mentioned you probably won’t remember paying for things you forgot to bring. You won’t look back on your road trip thinking how much money you wasted on insurance. I add in the insurance when budgeting so that I don’t get overwhelmed when it comes to the total cost of a rental.
Tip: Book your rental in advance. If possible, pay upfront so your rental is reserved if you’re late and the cost is often cheaper. I use websites like Priceline to find the cheapest option. I also always double check for two things: 1) unlimited mileage (almost all rentals are, but vans/RVs often charge over 100 miles/day) and 2) restrictions.
More on restrictions - In Maui, most rental car companies don’t cover you if you drive a specific part of the Road to Hana. On a map, that part of the road looks like it saves you a great deal of time, but the conditions aren’t ideally suitable for driving.
On the Big Island, companies also don’t cover your drive to the summit of Mauna Kea. Always read the fine print or simply ask the representative which roads or attractions may be off limits to not lead to financial issues later.
6. You will forget things. Just buy it along the way!
I used to get so stressed about forgetting something, as if there wasn’t a store along the way at some point to pick it up. In the grand scheme of your road trip, one purchase of q-tips won’t break your budget, and you surely won’t remember spending the money on it in the long run.

My very first road trip with my dad across Texas heading toward Big Bend National Park back in 2016. It’s safe to say I’ve been enjoying these drives for quite some time.
7. Embrace life on the road.
What initially was frustrating about mixing up dates and losing out on a campground in Yellowstone led to us finding out that each day Yellowstone offers first come first serve campsites. Had we had our original campground, we never would have landed a campsite directly across Yellowstone Lake, waking up to neighbors like elk casually walking past our tent.
Tip: Talk to locals or park rangers when visiting somewhere new. We pulled over to ask a ranger about campsites to snag the one I mentioned above.
These are just a handful of the lessons I’ve picked up driving across this beautiful country, and I’m sure there are plenty more for me to learn.
What lessons have you learned while traveling? Would you add any to this list?

Why Your Next Trip Should Be To West Virginia
I fell in love with West Virginia, and here’s why you will too. On your visit, you should: Take a swim in…
I’ve driven through West Virginia before and crossed it off my list of states to visit. Little did I know it was a completely hidden gem. The only reason I was trekking down to this state is because B found out it was designated a national park. And as someone who hopes to one day visit all 63, this one clearly had to be visited.
I was completely blown away by West Virginia. It’s embarrassing how little I knew about this state prior to visiting. It reminds me so much of New England, but the trafficked crowds are replaced by friendly faces. Everyone we encountered in West Virginia was kind. From the cars that moved an entire lane over while we cycled on the road, to the servers at hole-in-the-wall spots, to a passing car smiling and waving as we ate ice cream on a bench on Fayetteville’s main street.
I fell in love with West Virginia, and here’s why you will too. On your trip, you should:

Summersville Lake from an overlook spot on the drive down to the beach access parking lot.
Take a swim in Summersville Lake.
West Virginia’s largest lake is not only near Fayetteville and America’s newest national park, but it’s absolutely stunning as well. We stumbled upon this dreamy reservoir when B was researching a body of water for us to swim in as we train for our triathlon races coming up.
Parking at the lake is amble and only $5, which felt like a steal for the gem that it was. It’s a popular spot for swimming, relaxing, and boating. There’s a kayak launch as well!
Stroll through historic Fayetteville, WV.
One of my favorite things to do in a new town is walk around the main street. I’m a sucker for a charming small town, and Fayetteville is exactly that. There is a cathedral-turned-café in town, along with local shops. There is an incredible pizza place (Pies and Pints) that exceeds the hype. Parking here is also very accessible.


Learn how grist mills work by visiting the Glade Creek Grist Mill.

This mill may look familiar because it’s one of the most photographed ones around. A quick drive from Fayetteville to Babcock State Park brings you to a large parking lot and epic views of this mill.
Tip: Visiting during operating hours to see this mill in action!
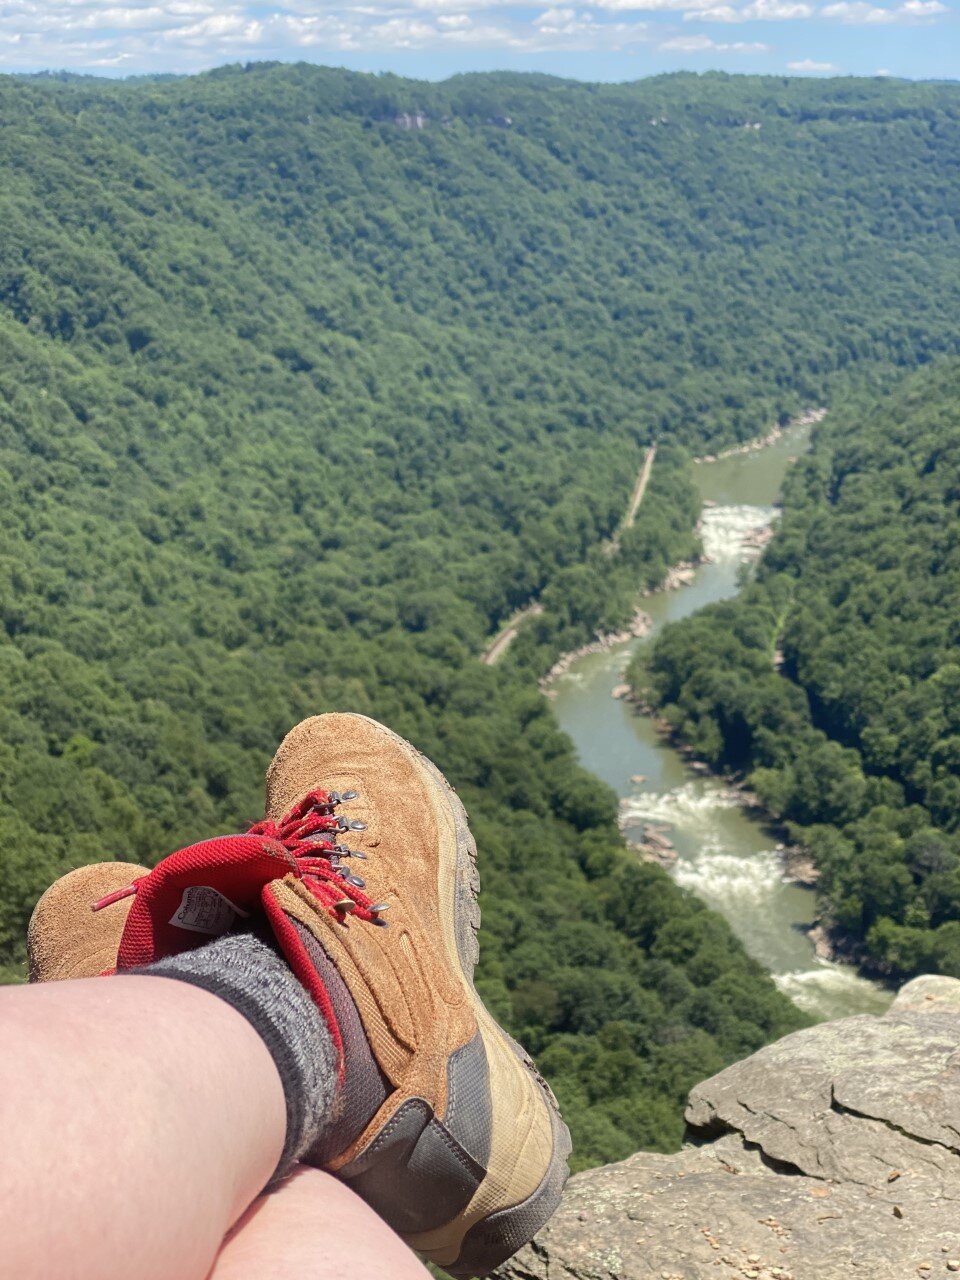
Hike in New River Gorge National Park.
Y’all know I love a good hike and even better views and boy does this park not disappoint. I felt like within a half mile of every hike I went on, there were views, if not sooner, of the New River Gorge. The hikes also all were less than a fifteen minute drive away, most were less than 10 from Fayetteville.
Here are a few of my favorite hikes (I even did a couple of them twice!):
Long Point

An iconic hike that’s viewable from the bridge itself. It’s truly a spectacle to drive across the bridge and peer out to see a tiny, exposed cliff. The hike up is mostly flat and downhill for a little over 1.25 miles. It’s a quick one and ideal for sunsets. We had the summit to ourselves for sunset. Unreal. The last half mile requires some ascent to return, with about 350 ft gain on your way back.
It’s a busy hike during the day, so plan accordingly. There is a good amount of parking here.
Endless Wall
The parking lot for this trailhead fills up swiftly, but because the hike is short, hikers also exit the lot almost as frequently. I did this hike twice and scored a spot both times. If you go out and back, it’s a little under two miles, but I suggest hiking a loop and you’ll end up at another parking lot. This also serves as a great backup parking lot if you don’t want to wait for a spot at Endless Wall.
If you decide to hike the loop, it’s about three miles and almost 400 feet of elevation gain, though you don’t really feel it. This is also a popular climbing spot, so you may get lucky and see a few climbers rocking it on the ledges.

Beauty Mountain
This hidden hike doesn’t have an official parking lot, but it does have a trailhead. As soon as you step onto the trail, you have views. Instantly. It almost doesn’t seem fair! We hiked for about a mile along the trail and were swept away by cliffside views of the New River almost the entire way.

Soak in the beauty of Sandstone Falls.
I initially saw these falls while researching the NRG and didn’t put it on our itinerary. B wanted to go and so off we went to explore another part of the national park. Sandstone Falls is near Hinton, WV, about an hour and a half drive from where we were centrally located in Fayetteville. You drive through the mountains and there isn’t a handy bridge to connect you, so that adds to the driving time. It’s a scenic drive and leads you to a boardwalk hike that’s accessible by all. The falls are striking. I felt like I was exploring newfound land, not West Virginia.
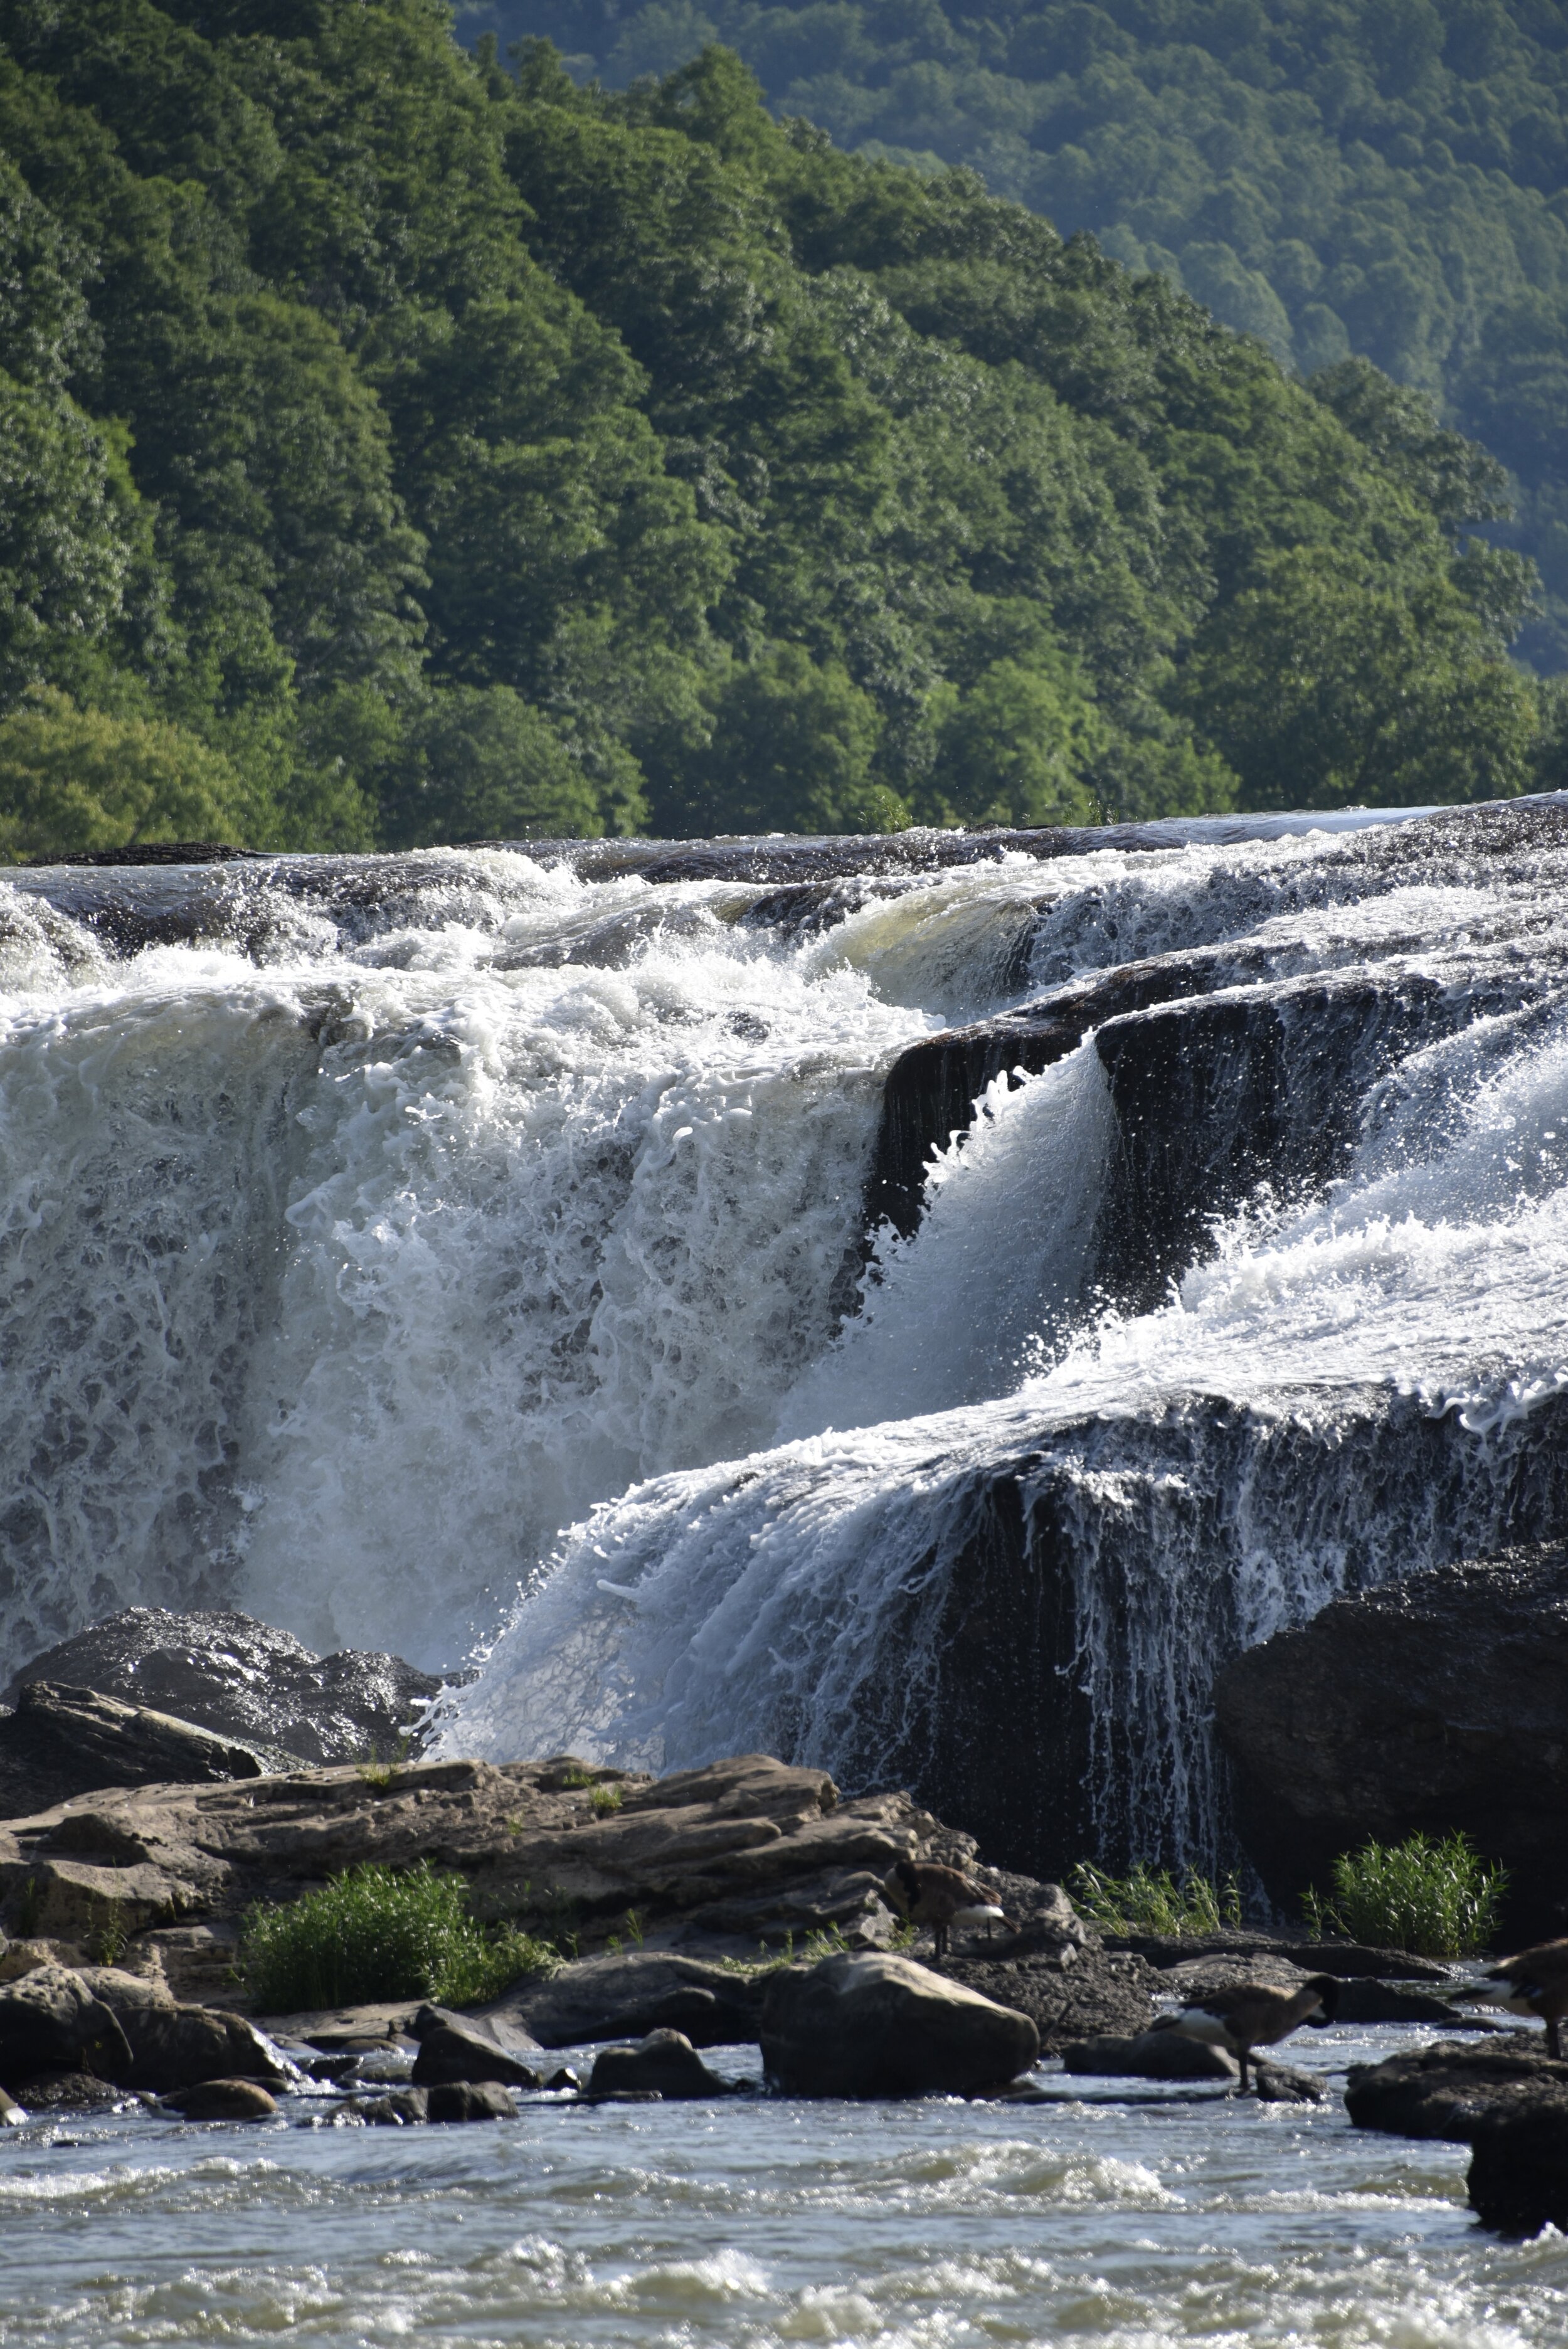
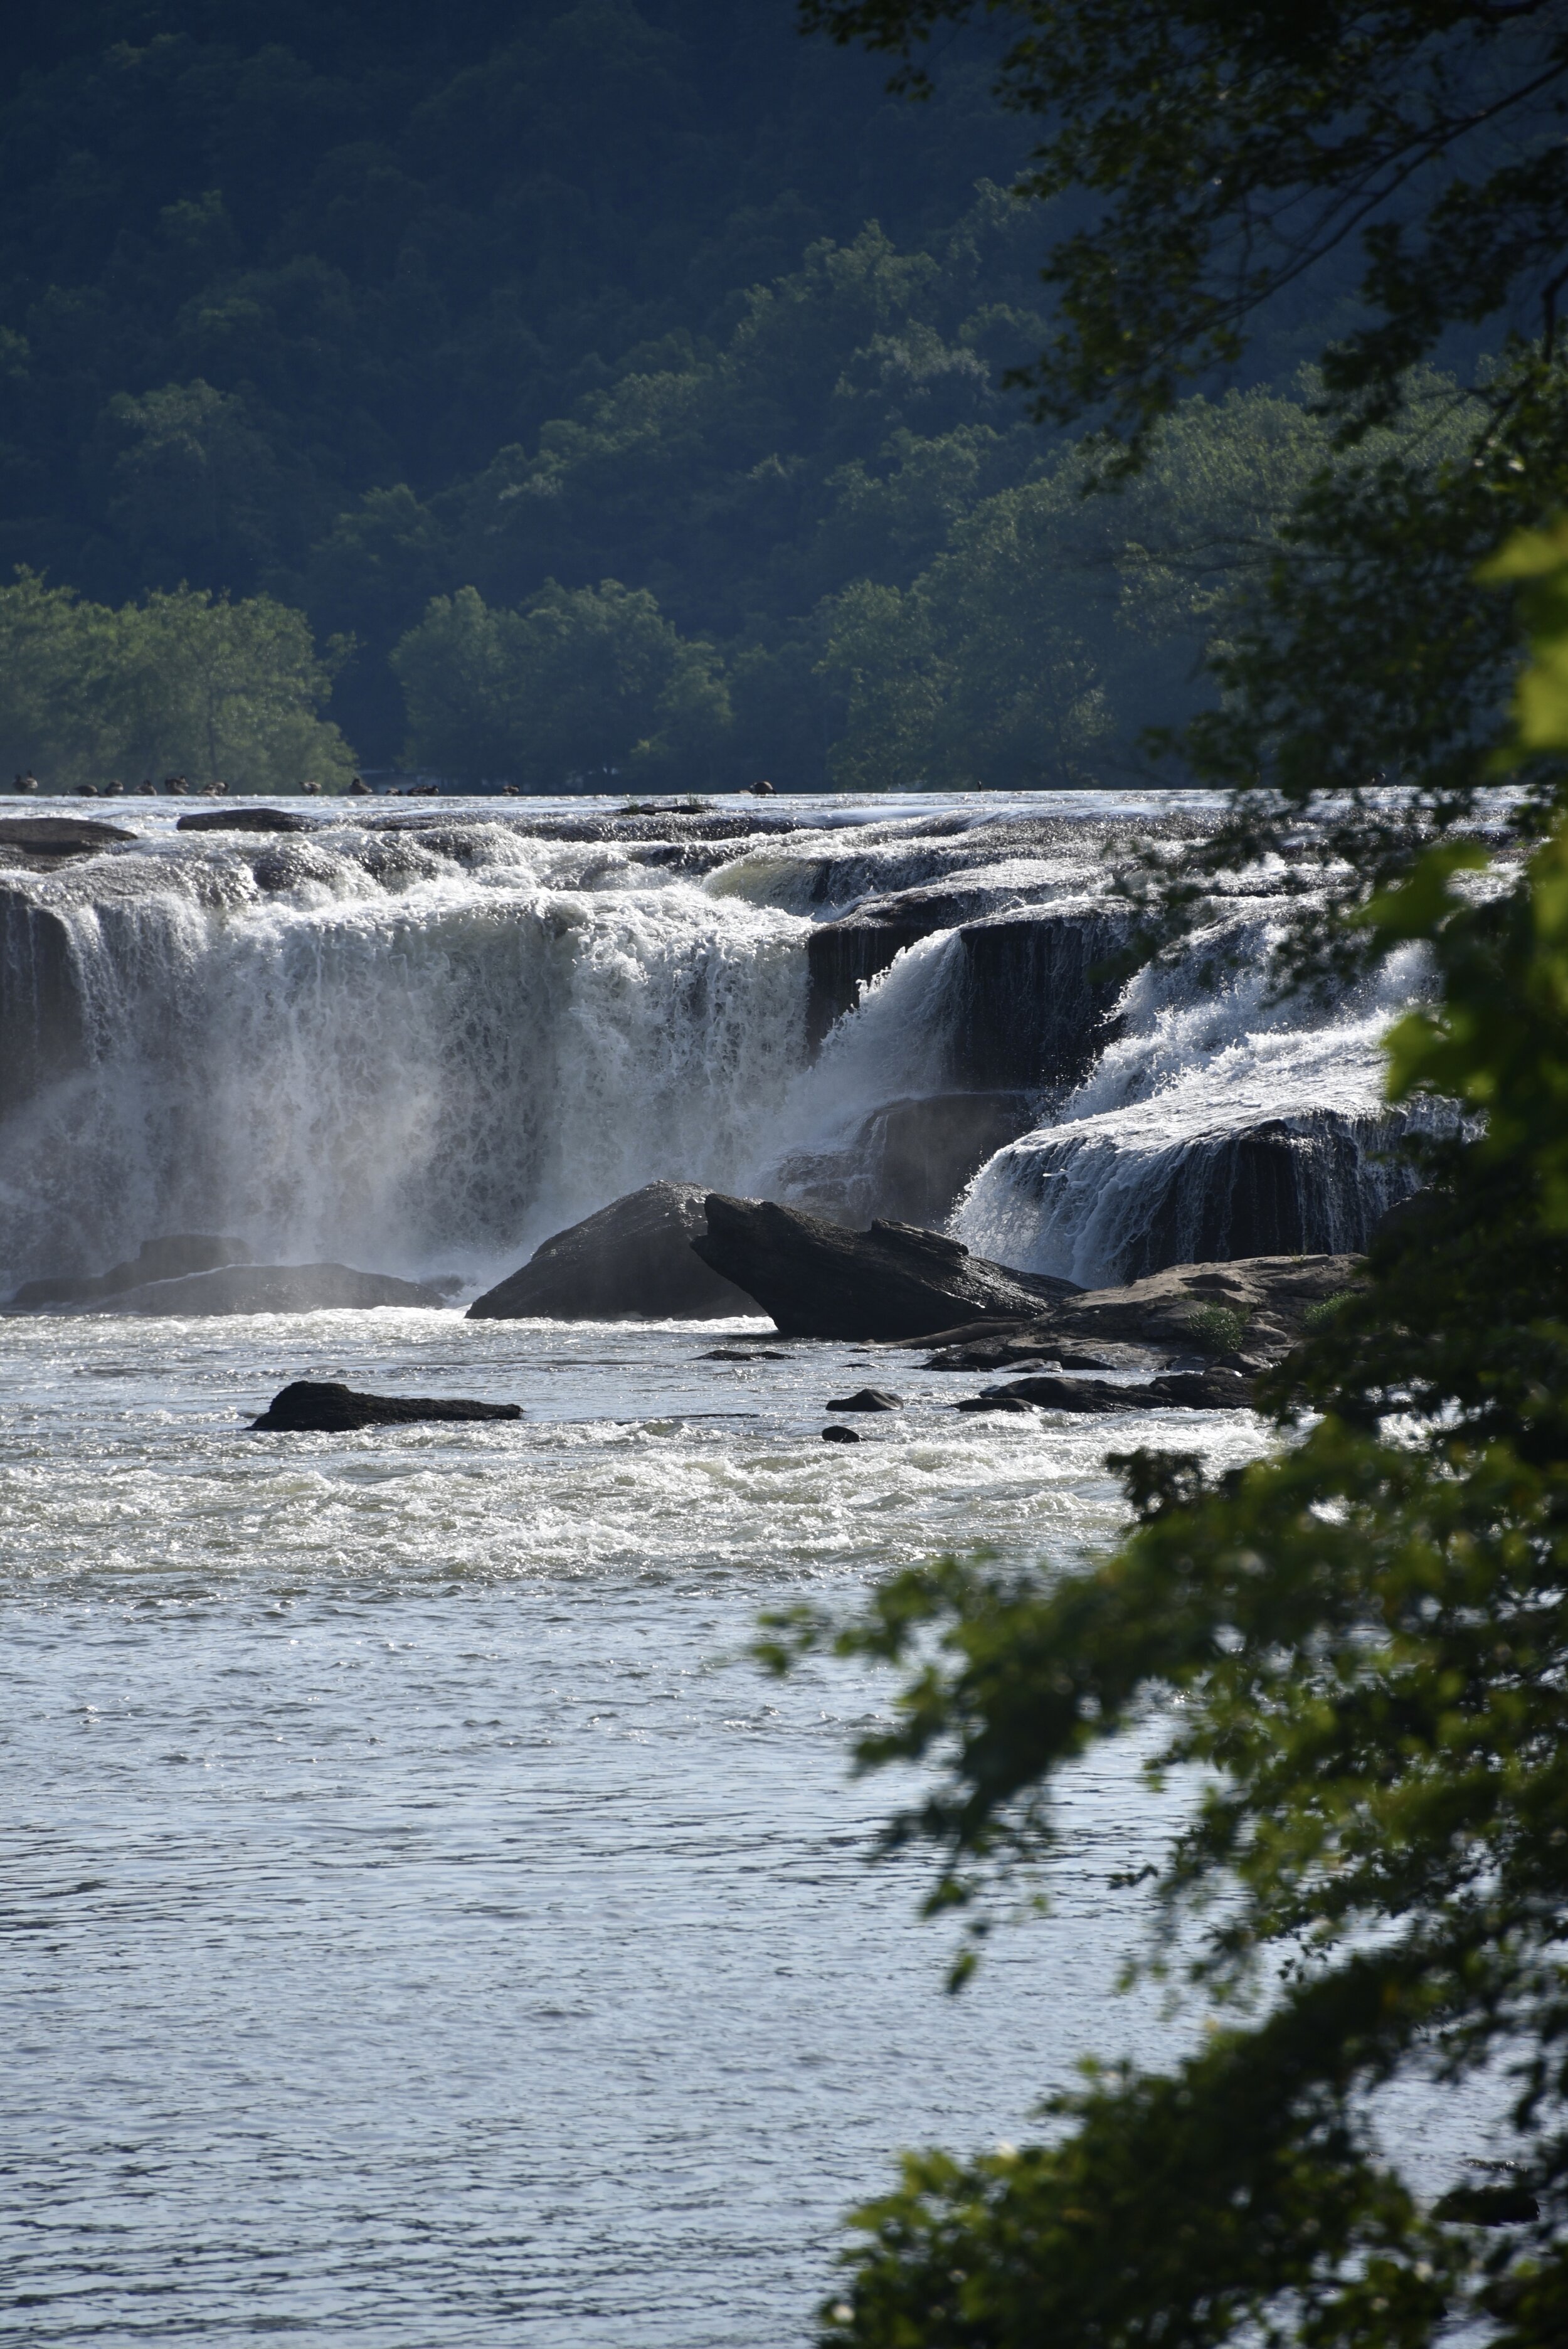
These falls should make it on your list of places to explore. There were plenty of people fishing here, as well as sitting among the rocks and enjoying the views under the summer sun.

Sandstone Falls Boardwalk
The wide, accessible trail leads you to several viewpoints of the falls. It’s also dog-friendly!
What are you most excited to experience in West Virginia?

The Best Way to See the New River Gorge Bridge in West Virginia
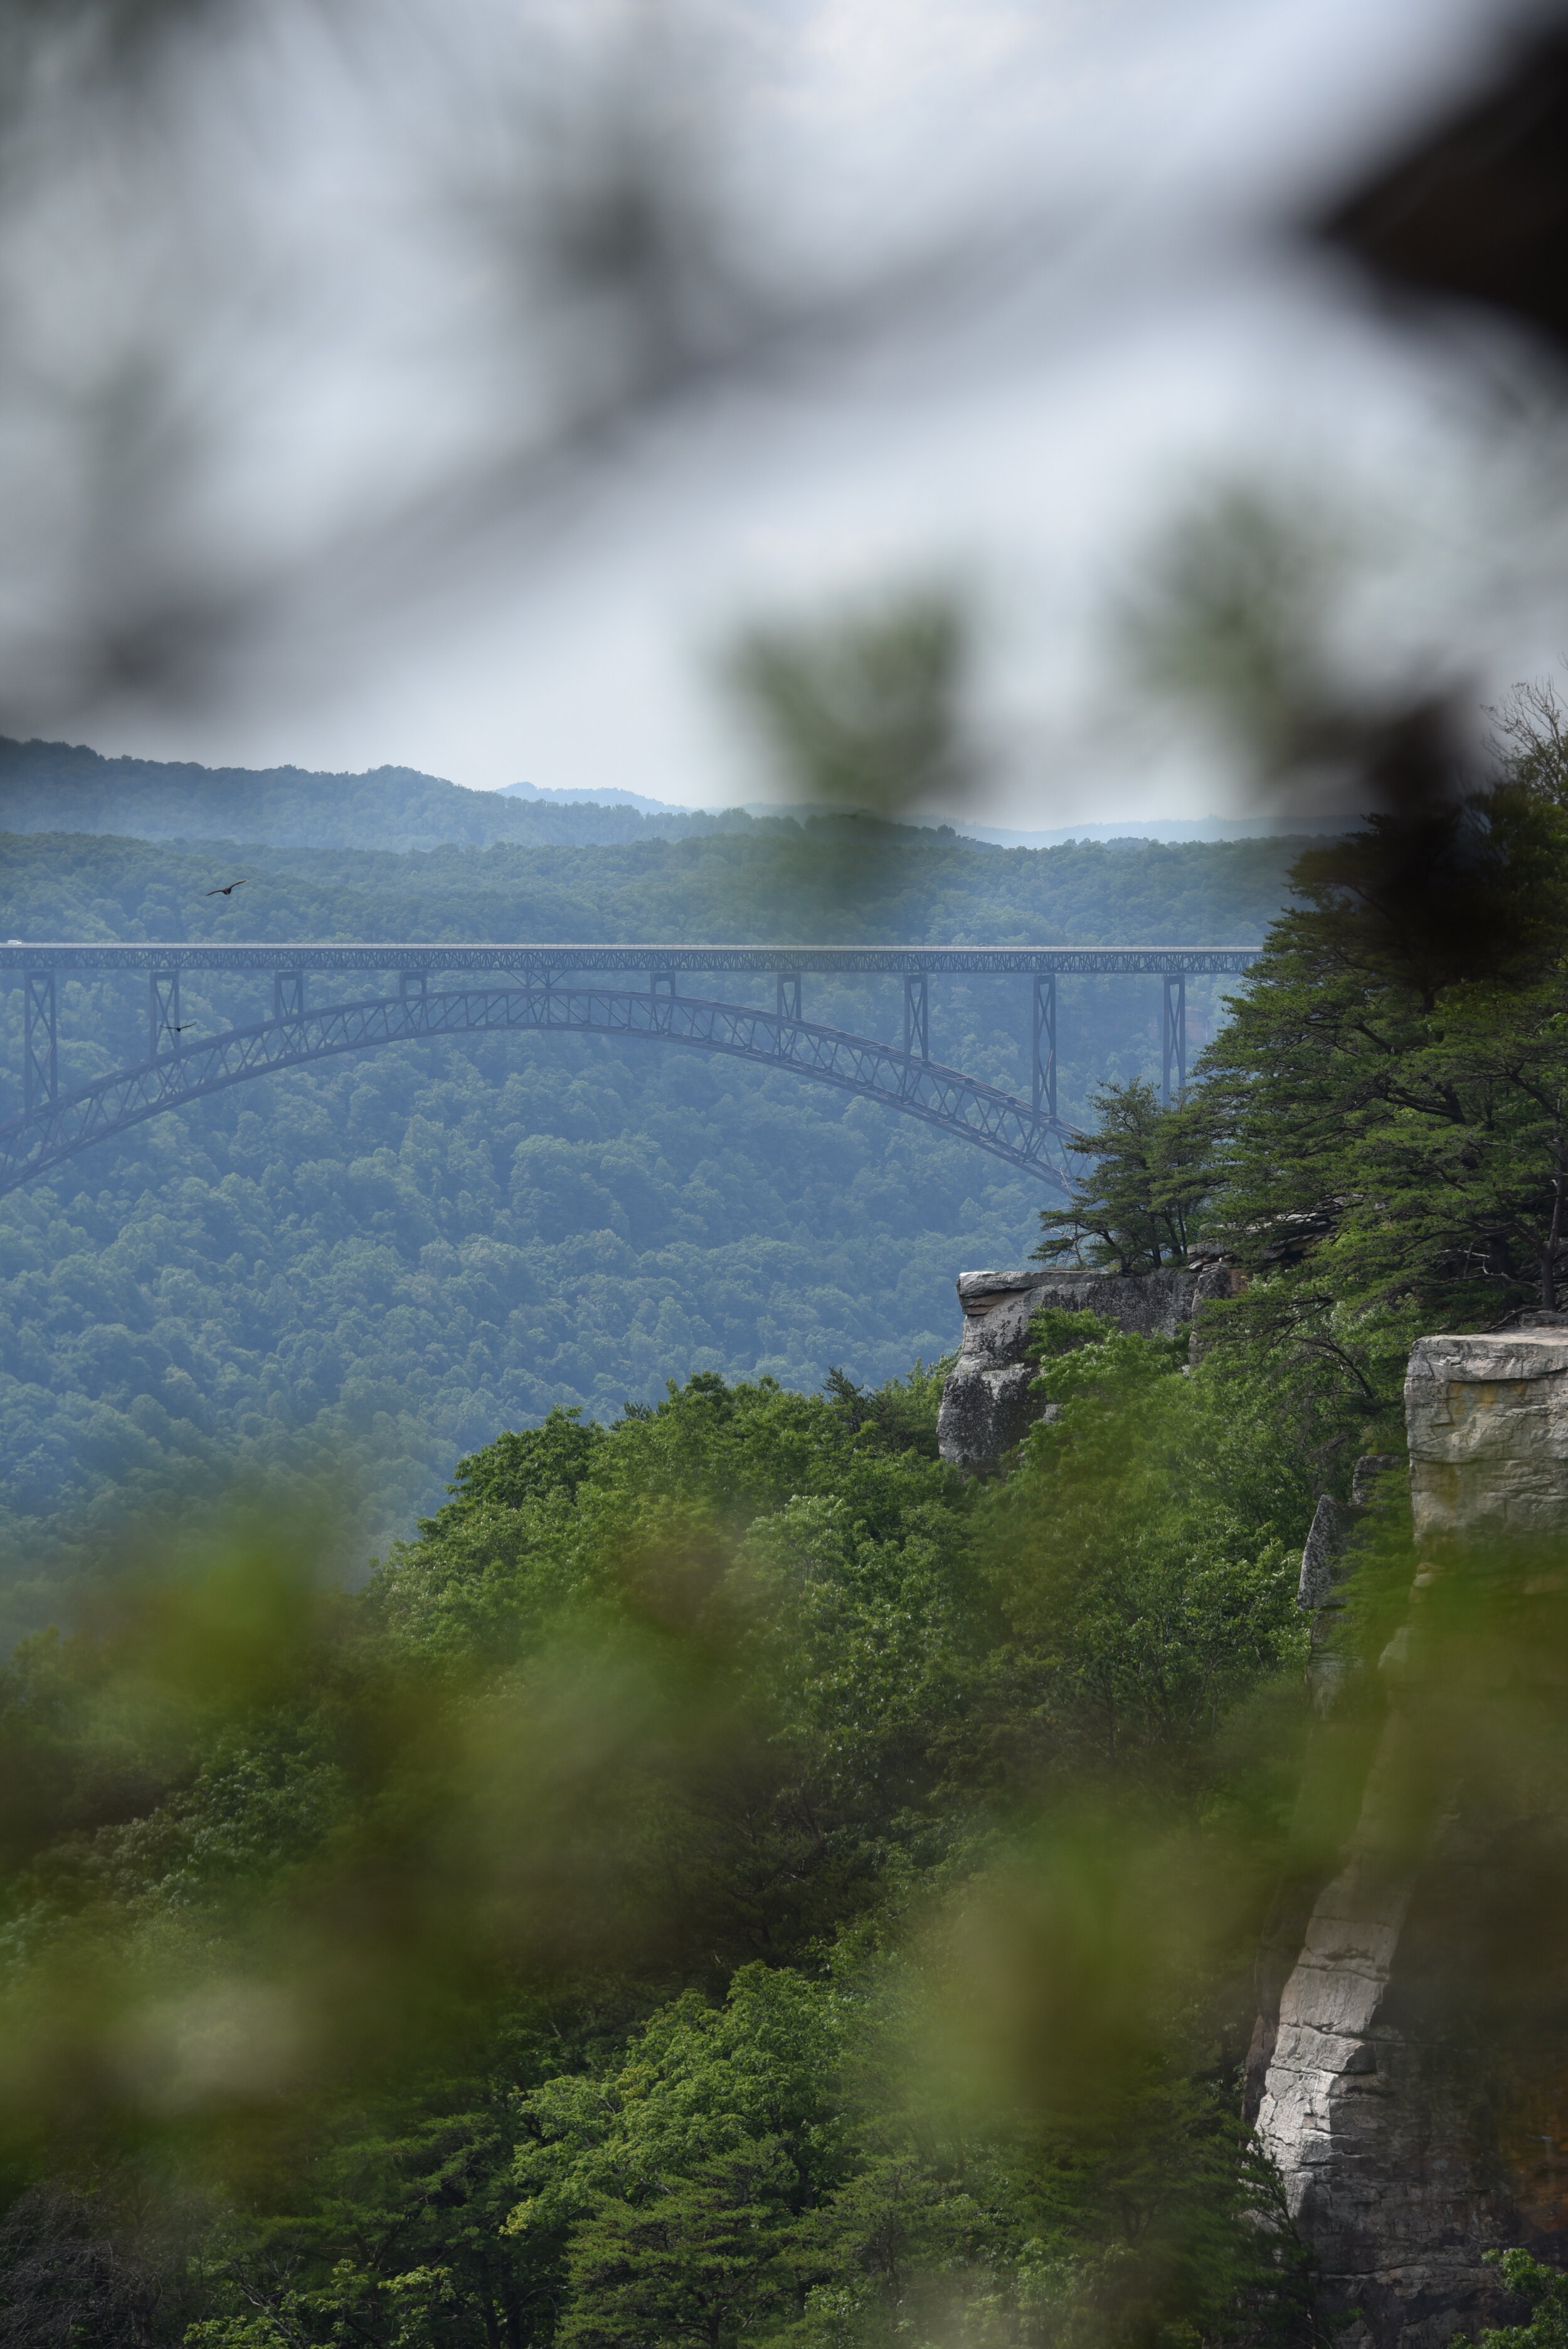
The absolute best way to see the New River Gorge Bridge is by walking across it. No, not walking on the road where cars are driving past. Rather, walking directly beneath those cars…

If you peer closely, you can see the catwalk directly under the road.
At the end of 2020, the New River Gorge in beautiful West Virginia was designated a national park, making it America’s 63rd national park. One of the highlights of the New River Gorge is the bridge.
Through the construction of this bridge, the commute between the mountains of West Virginia was cut down from forty minutes to one. The access this bridge provides to the locals is immense, and I love that a visit to this park includes driving across it each time.
This bridge, at the time of its creation, was the longest, steel single-span arch bridge in the world. Today, it’s the fourth. It is 3,030 feet long and 876 feet above the rapids below it. It’s taller than the Space Needle in Seattle and the Gateway Arch in St. Louis. It comes just shy of the Eiffel Tower and the Empire State Building.
While you can access these other impressive monuments and buildings by elevator or a long walk up, there is something quite unique about the New River Gorge Bridge that you simply cannot do anywhere else.

The absolute best way to see the New River Gorge Bridge is by walking across it. No, not walking on the road where cars are driving past. Rather, walking directly beneath those cars. I highly recommend a bridge walk when you visit the New River Gorge National Park. You can book a bridge walk here.
The walk is guided and costs $72 with tax. It’s completely worth it. What I also love about this guided tour is that it’s accessible. Everyone can enjoy this experience!

The catwalk is quite wide with railing alongside the entirety of the walk.
Here are a few tips for how to best enjoy your experience walking across one of the coolest bridges you’ll ever explore:
1. Book your tour in the evening – choose the 5pm time slot! The lighting is best and you may catch a glimpse of the sunset, depending on what time of year you go. West Virginia can also get hot, so it’s a great idea to avoid the midday heat if possible.

As we headed off the bridge, we watched the sun set behind the West Virginia mountains.
2. Secure your phone. This sounds obvious, and the Bridge Walk store even sells phone cases to fasten your phone around your neck for $5, but take this seriously. About 5 minutes into our walk, after we were already strapped in, a woman behind me dropped her phone. Casually down 876 feet.
You can bet I held onto my Nikon and iPhone a little tighter the rest of the way.
3. Only take what you need. You will be locked in on a harness for a couple hours, so all you need to have on you is whatever device you’d like to take photos with and remember to wear closed toe shoes.

4. Sit down along the catwalk.
The entirety of the bridge walk is spent walking 3,000 feet across the bridge. How neat is it that you can sit and dangle your feet from this incredible bridge? When your guide allows (usually once you’ve hit the halfway point to be fully above the river), take a seat!

The bridge walk was such a neat experience that is unlike any other national park adventure!
Are you adding a bridge walk to your New River Gorge itinerary? Let me know if you do!

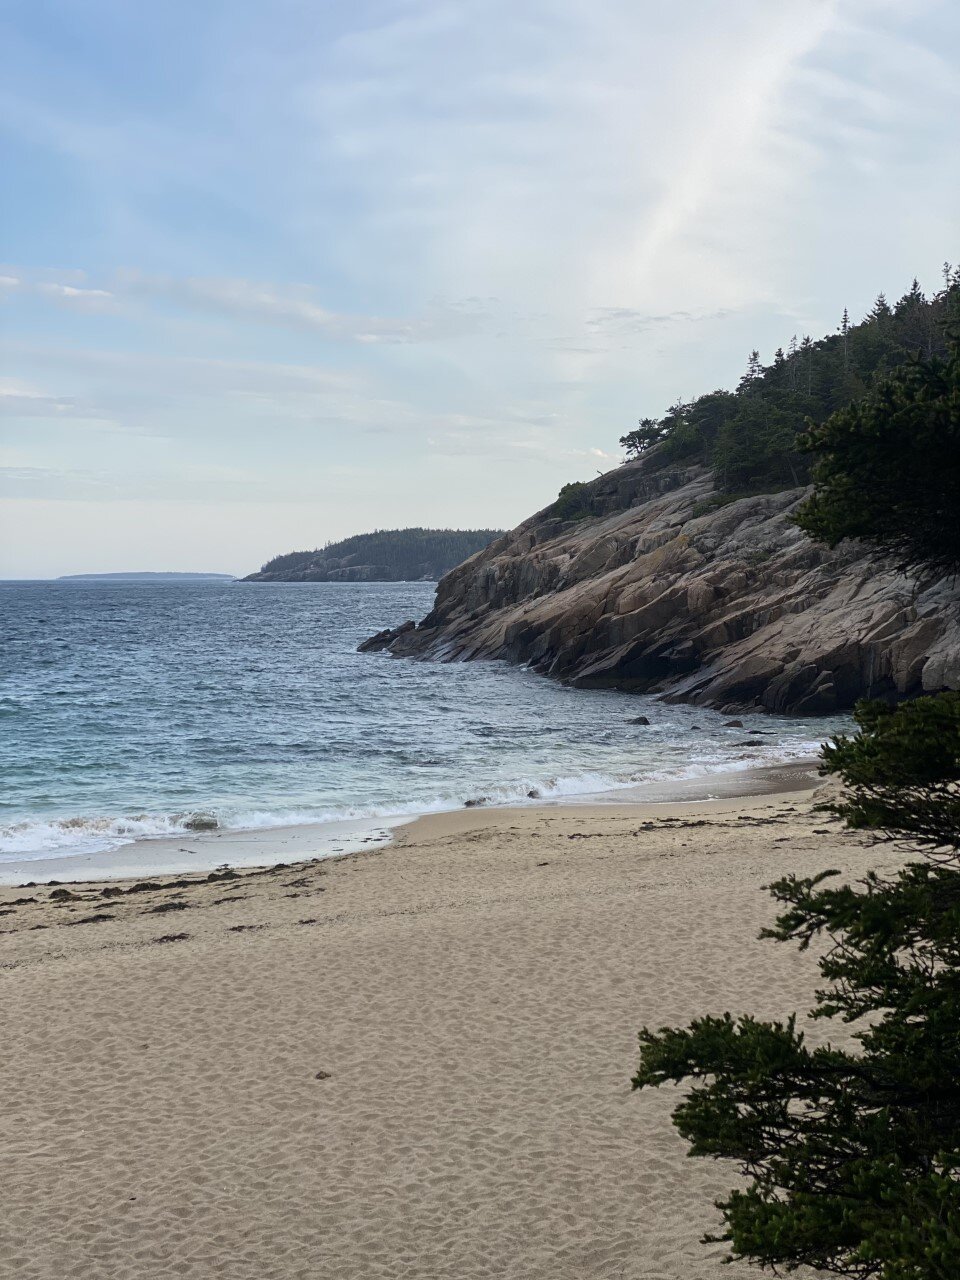
Everything You Need to See in Acadia National Park, Maine
Here’s everything you need to see and do in a weekend in Maine’s (and really, the Northeast’s) gem:
Ah, Acadia National Park — where the mountains meet the ocean. Truly, the best of both worlds.
Five years ago, I told myself I’d never run another half marathon unless it was somewhere scenic. It’s not too much to ask for to need great views when you’re running for more than two hours, right? As a result, when I came across a race in Acadia National Park, I thought to myself, this is exactly the place I would run a long race in. And so, I signed up.

I camped with a few friends on park grounds, spent the night gazing at the stars on rocks with the Atlantic breeze chilling my face. I rose the next day, ran for what felt like forever (turns out it’s a hilly course), and experienced Acadia for a brief moment.
Fast forward five years and it felt like time to revisit this spot. We stayed at a KOA (my go-to stay spot for adventures) minutes from Bar Harbor and the park. My first visit, despite running so many miles through the park, didn’t really result in me truly experiencing the park. This time around, we had an agenda full of Acadia adventures to enjoy.
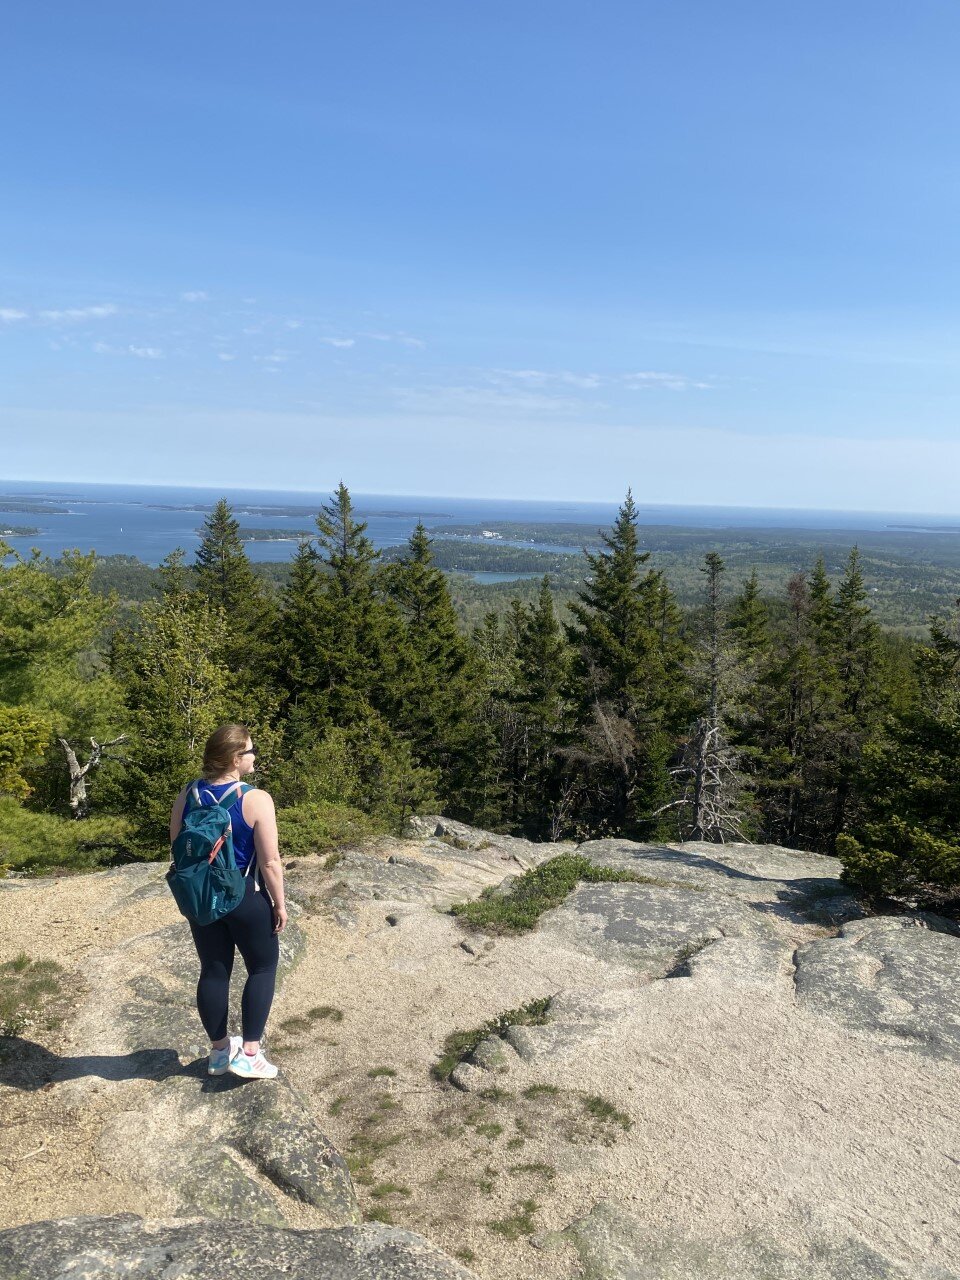
New Englanders are at a slight disadvantage with the National Park system with Acadia being the only national park in the area, but a major advantage is that it’s within driving distance! For us in Western Mass, this drive is about five hours. Not rough at all considering the Adirondacks are a little over a four hour drive and I consider that a day trip sometimes.
If you find yourself looking for local adventure, or wanting to experience the beauty of coastal Maine, Acadia should move up to the top of your travel list.
Here’s everything you need to see and do in a weekend in Maine’s (and really, the Northeast’s) gem:
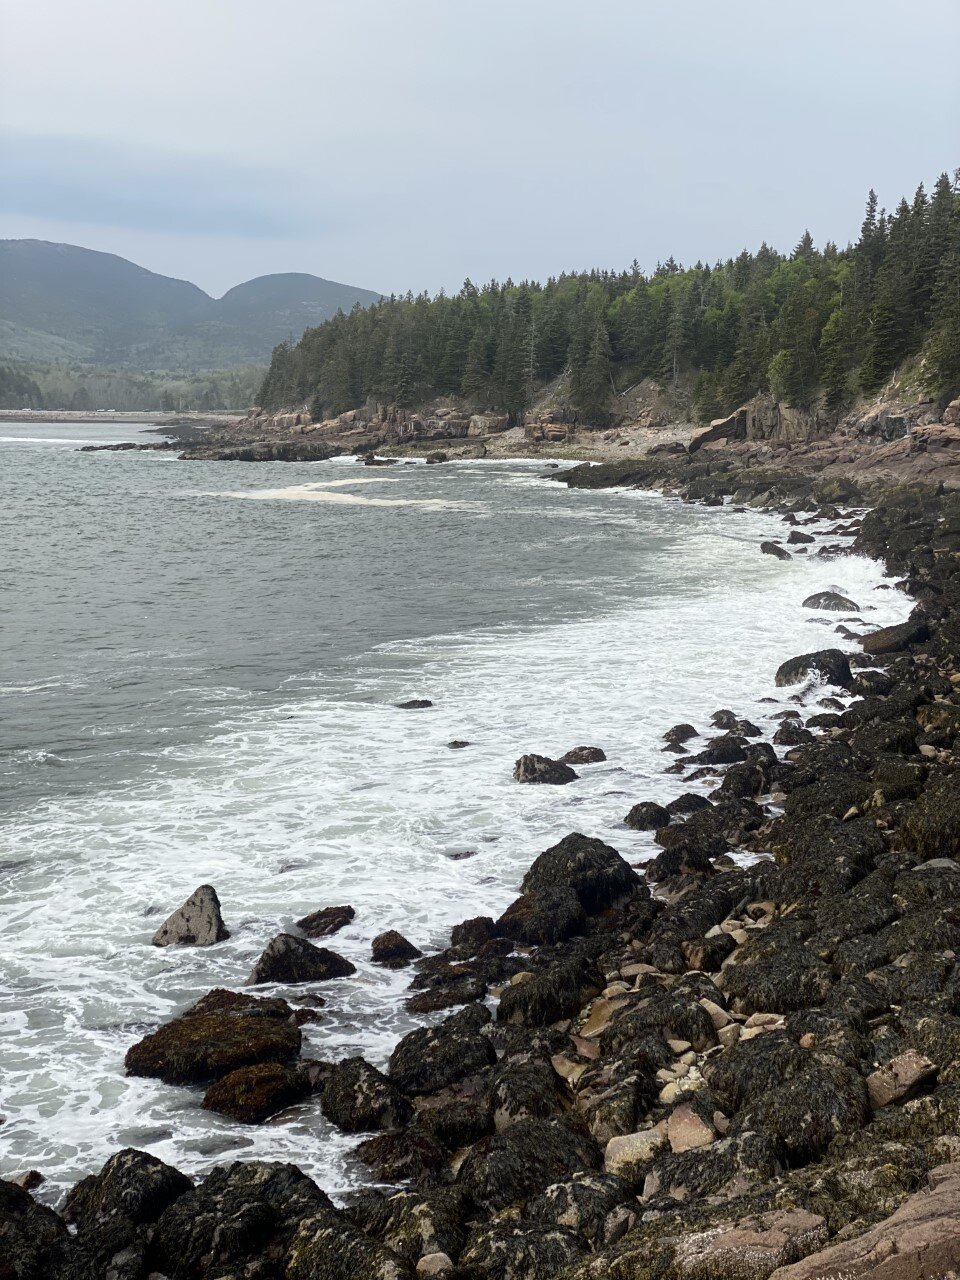
Hikes

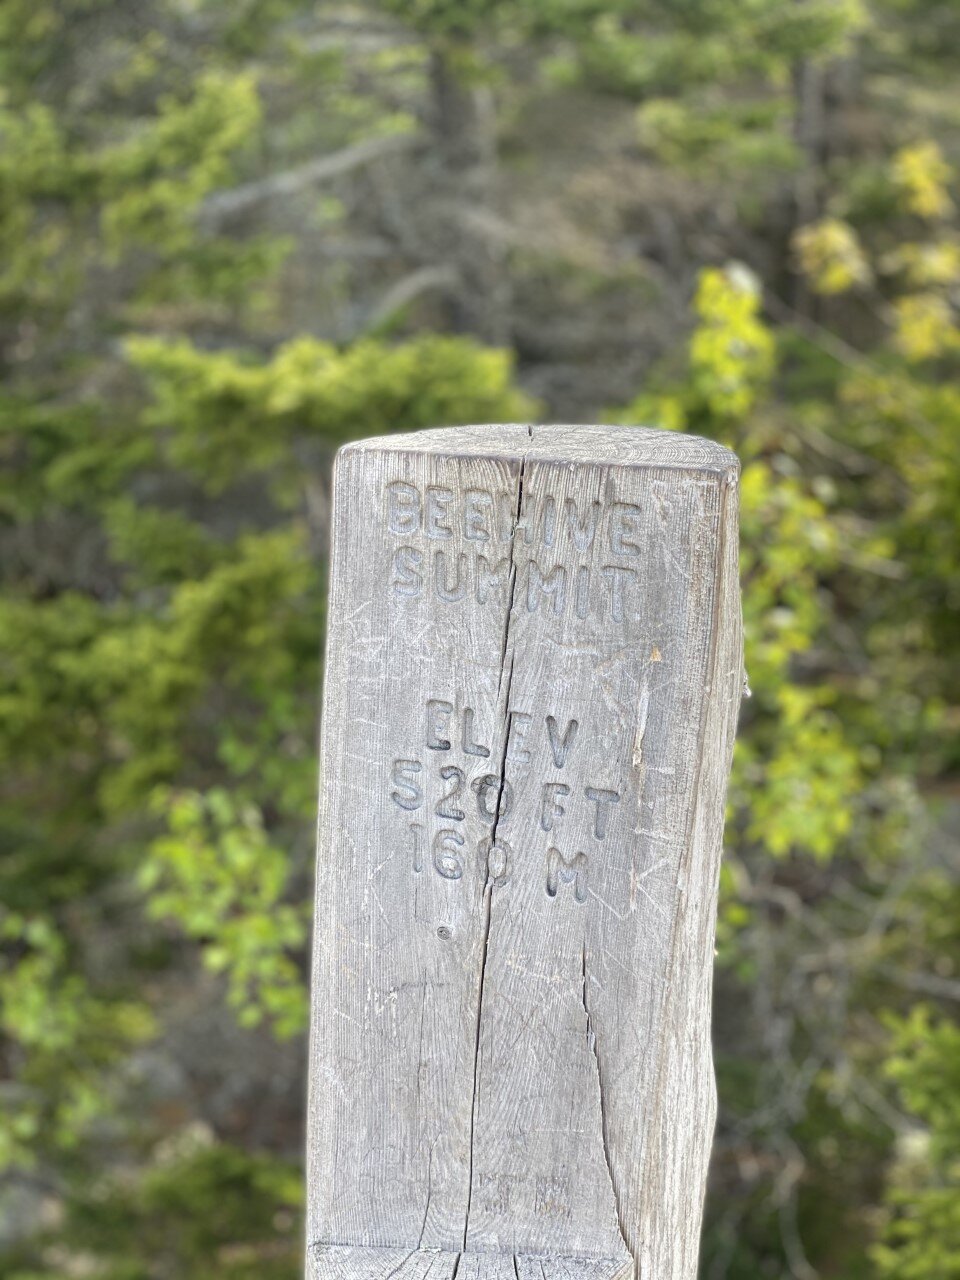
Beech Mountain
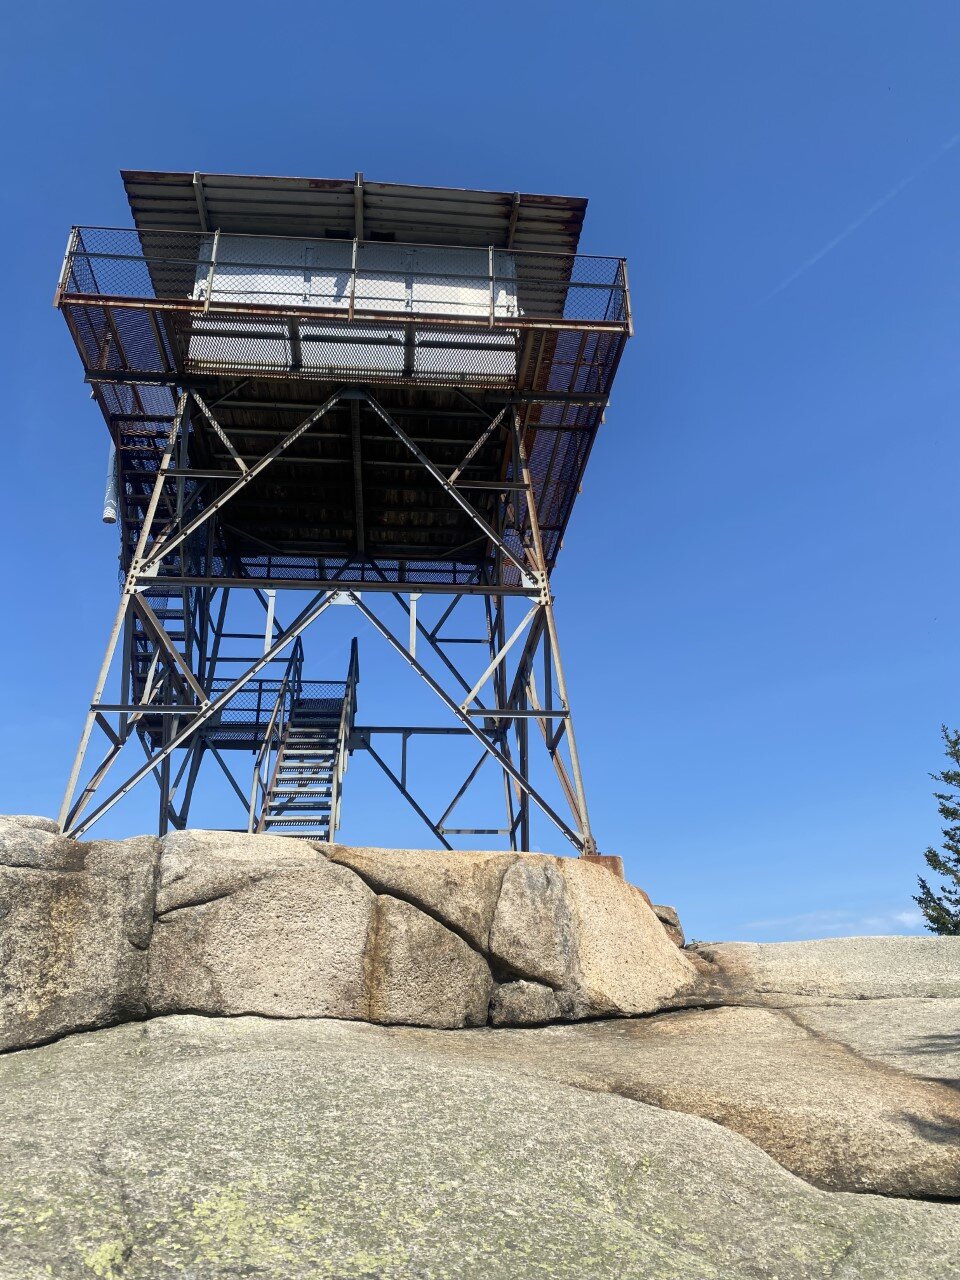
A short, somewhat rocky hike up to a fire tower with stunning views of Echo Lake and nearby peaks. The total hike is a little over a mile. I suggest hiking clockwise for the best views on this loop (along the .4 mi of the trail). You can make it about halfway up the fire tower for a better birds-eye-view. On your way down on the loop, the views get even better. I highly recommend this hike in the afternoon on a sunny day. It’s dog-friendly as well!

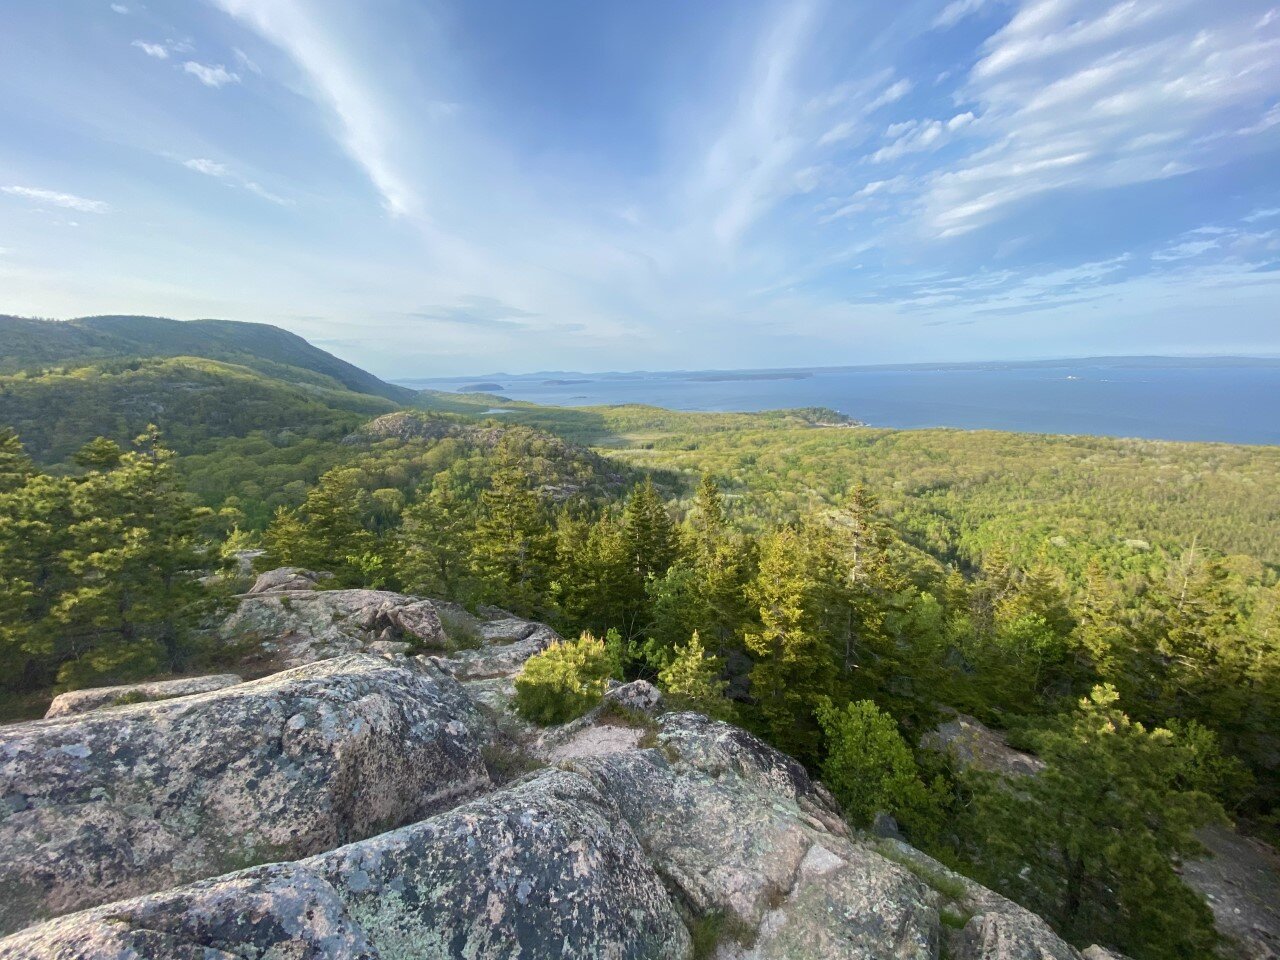
Beehive Mountain
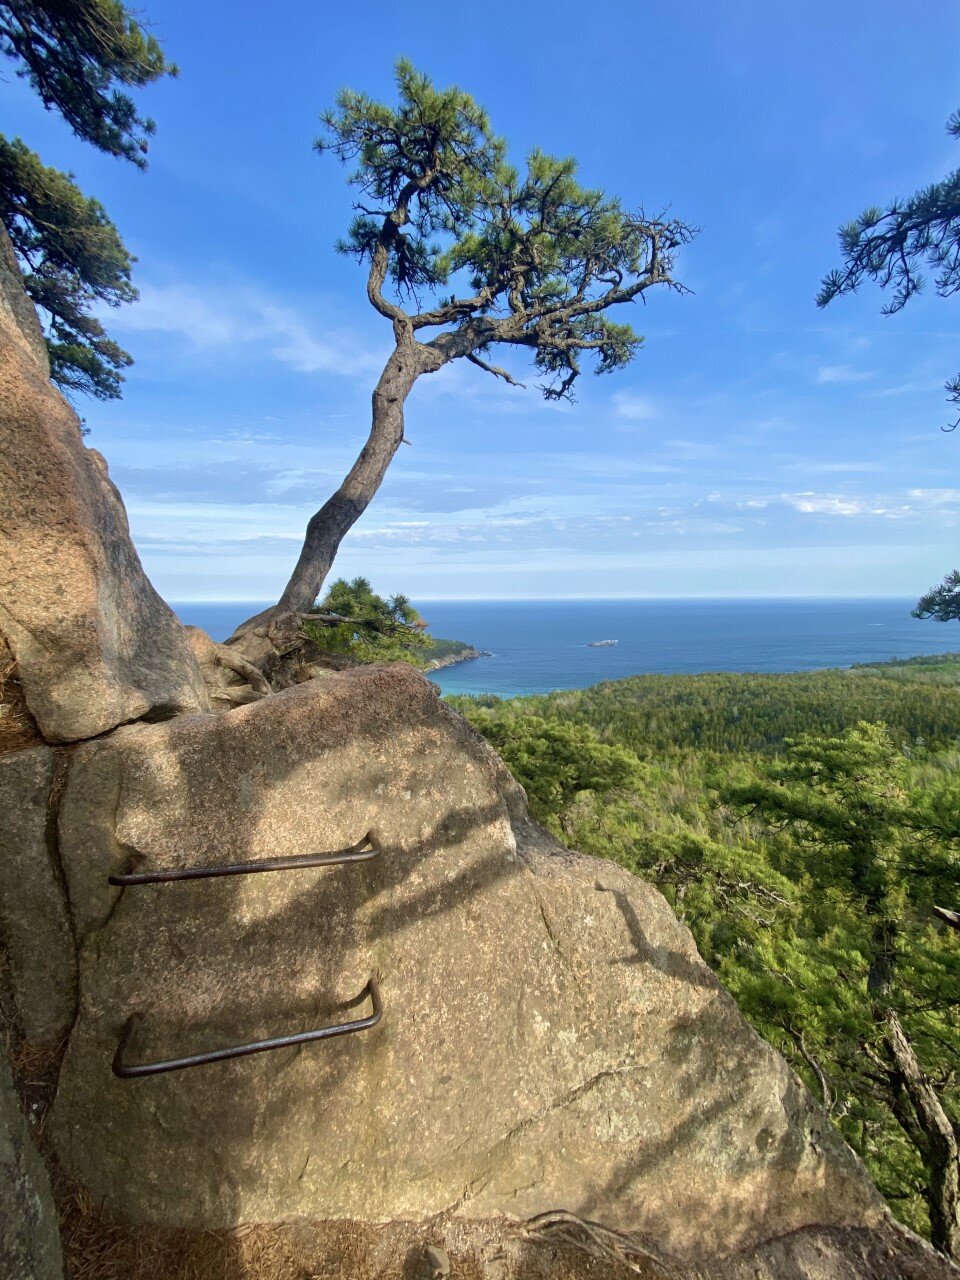
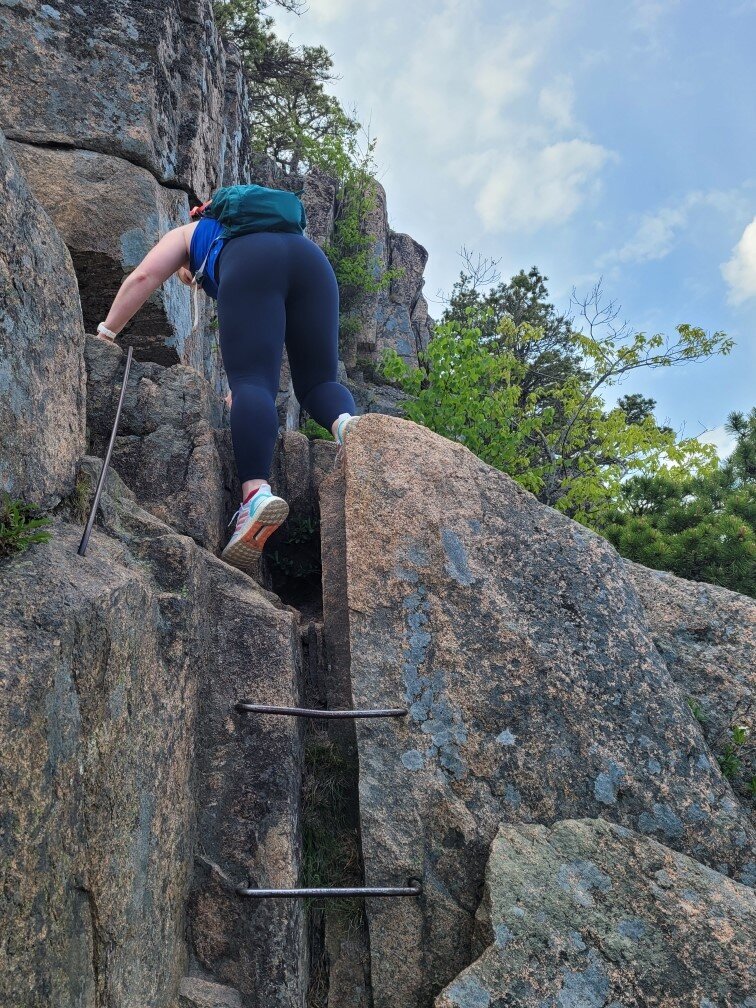
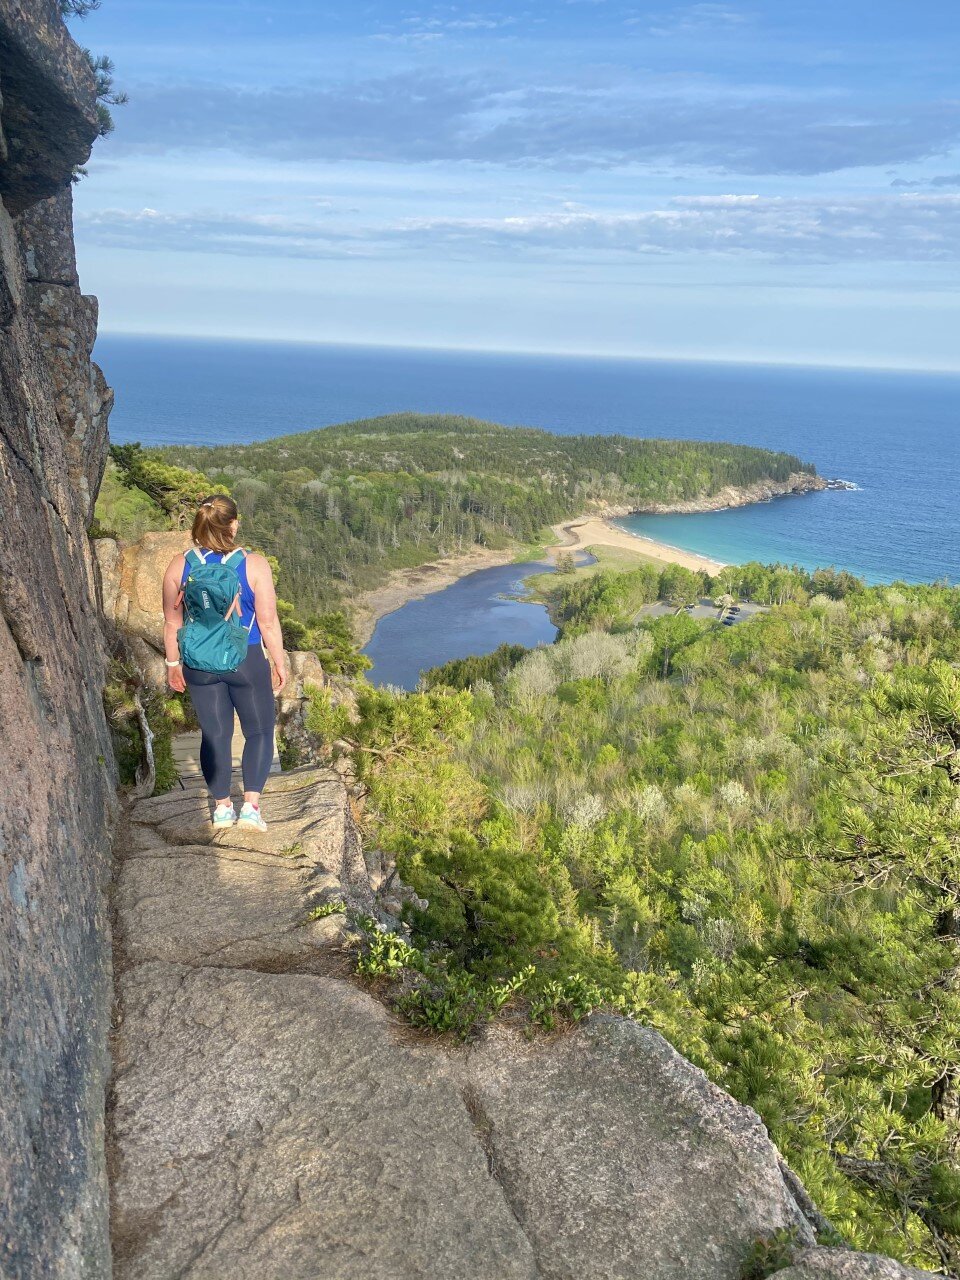
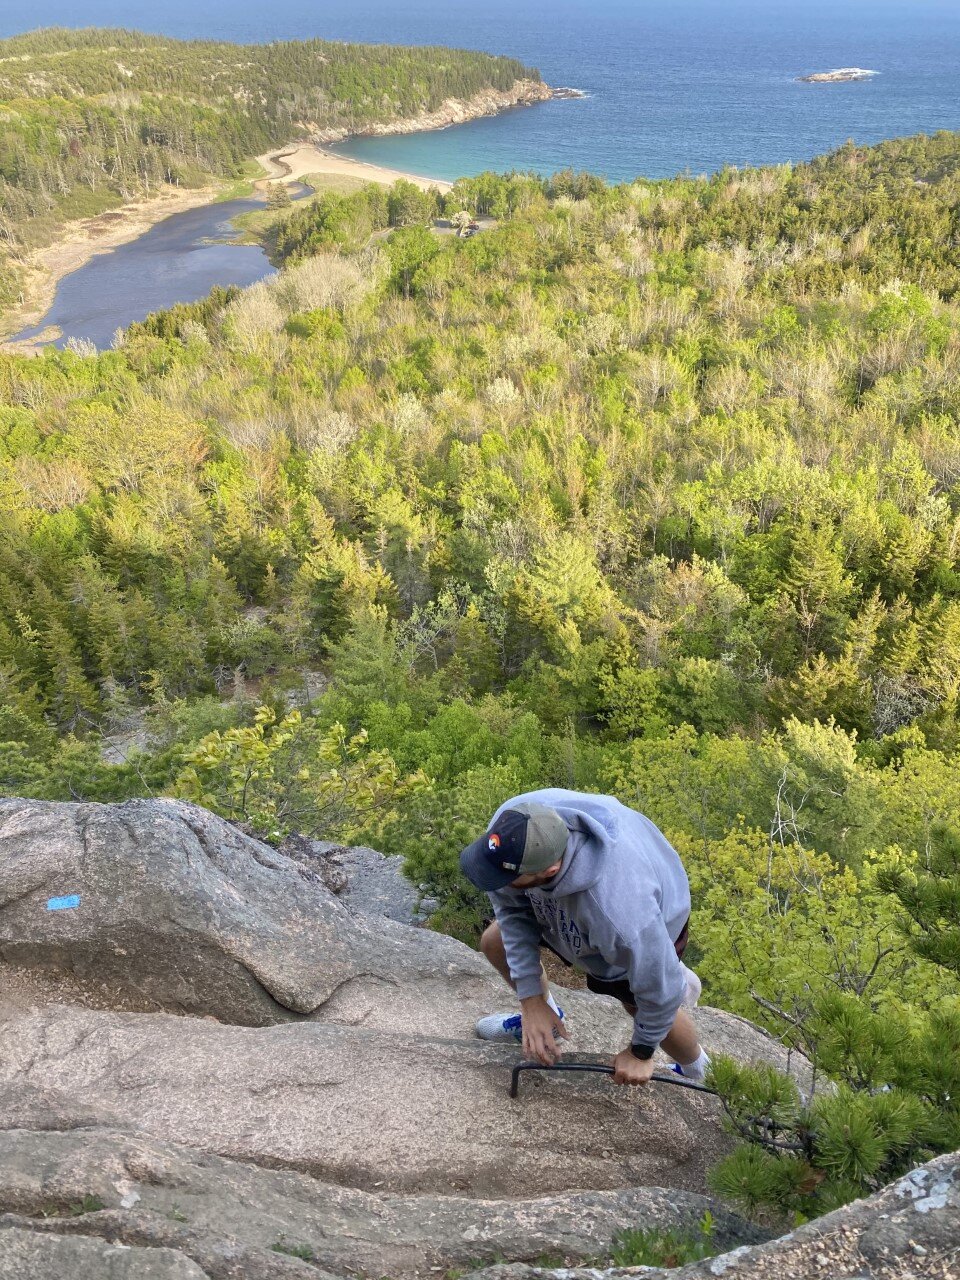
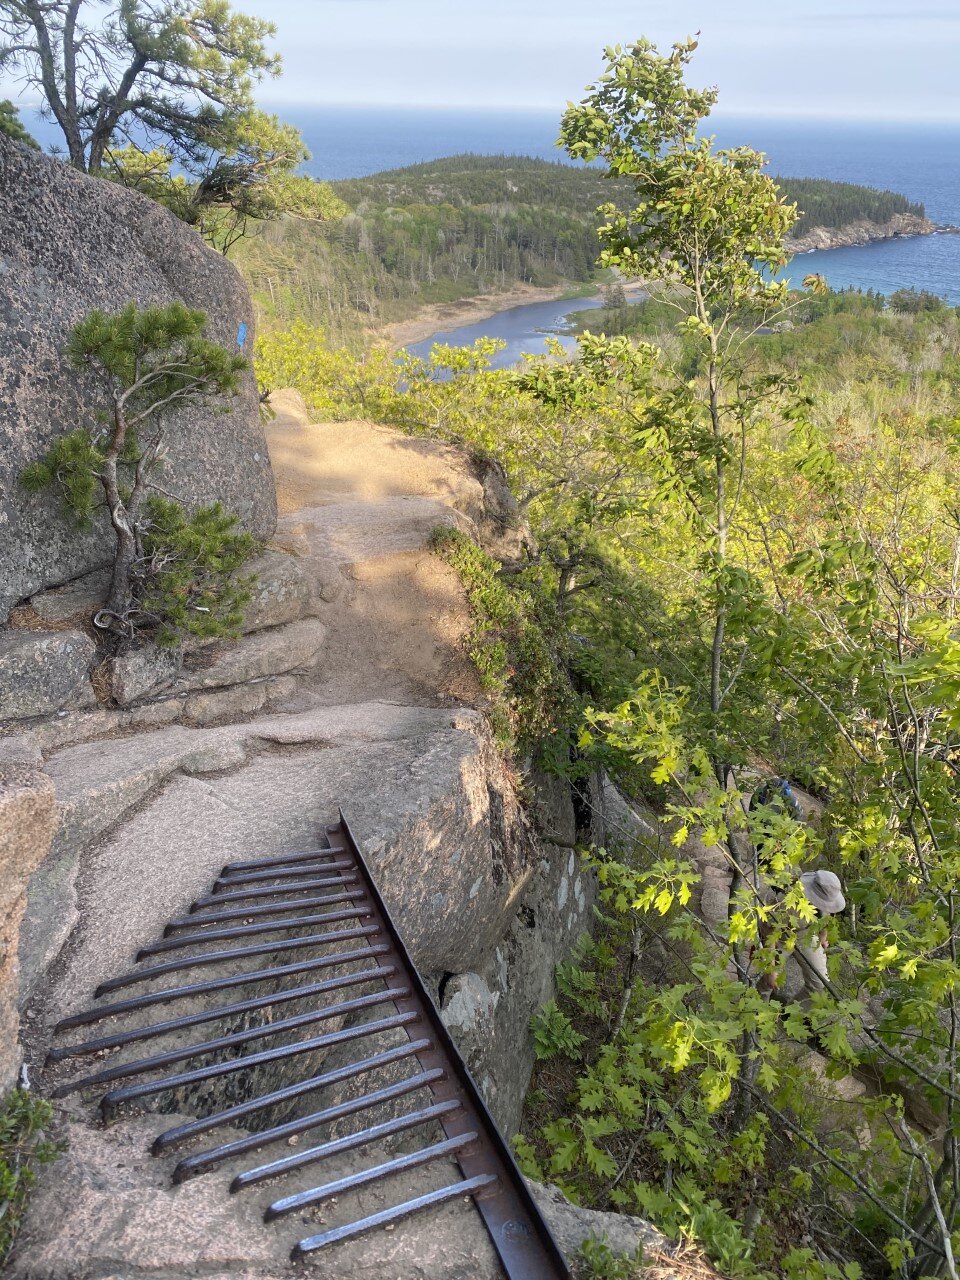
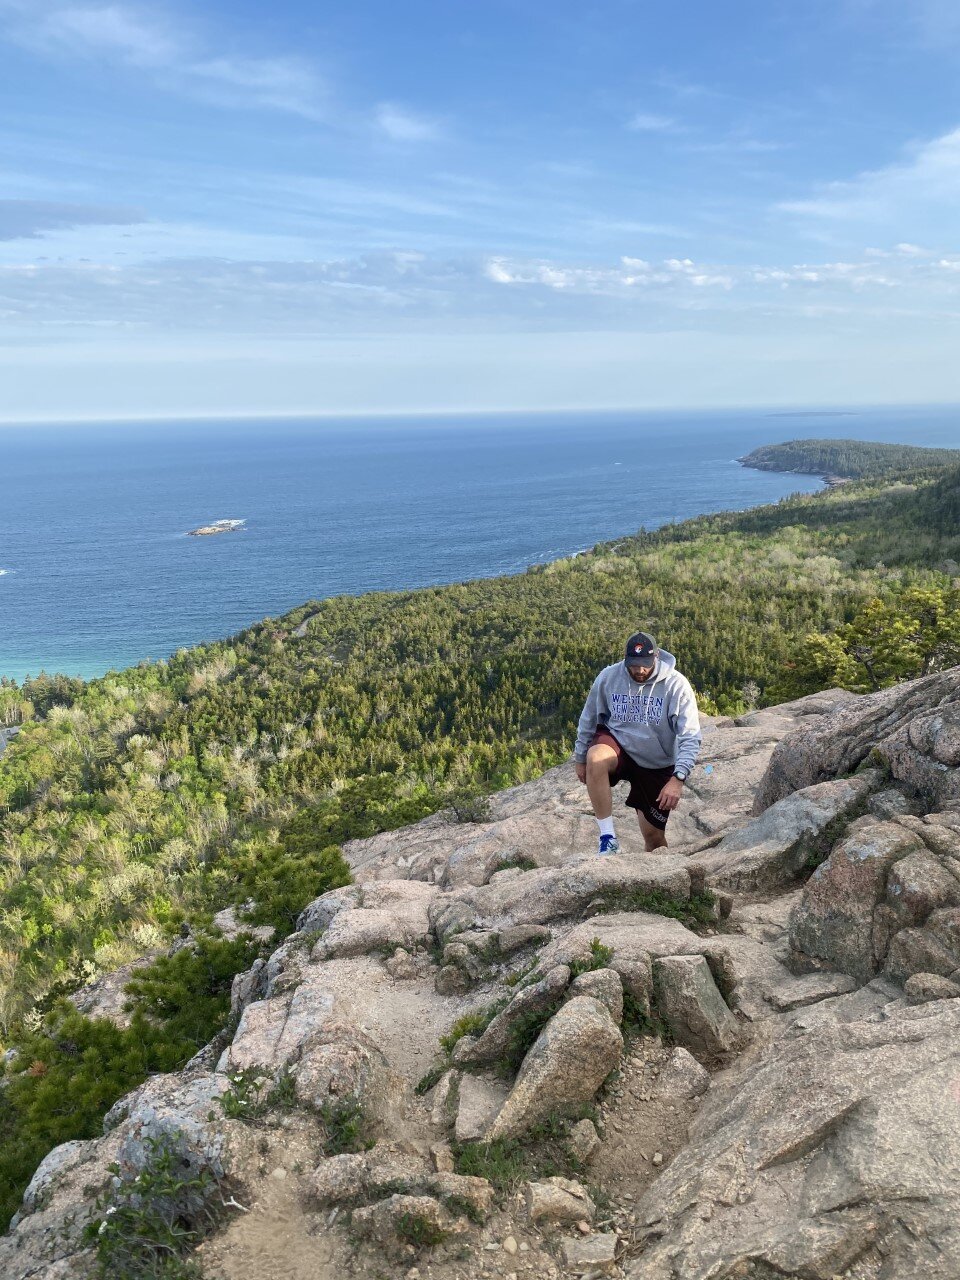
The Beehive trail has been at the top of list. I hike often, so anytime there is a little diversity in the type of terrain or trail, I jump at the opportunity to climb it. Beehive is particularly unique because of its steep incline involving rungs. I soaked it all in. One moment you’re walking along a rocky, dirt path staring up at the summit, and the next you’re climbing up rungs with your hands and gazing at the ocean and sandy beach below. Again, I’m a big fan of intriguing trails.
If you’re afraid of heights, I’d take this trail slow. It’s totally doable for all ages and completely worth it. Once you soak up the beach views, head up to the summit and immerse yourself in Norwegian-like greenery and islands. I felt like I was somewhere far away, a feeling I solemn get in New England, or the U.S. for that matter.
Precipice Trail
This trail sounds epic. More rungs, more incline, more steep drops - it’s my kind of adventure. You climb about 1,000 feet in under a mile. Unfortunately, both of my visits to Acadia have been in May and June, which is prime time for peregrine falcon nesting. This trail is often closed during late spring to summer for this reason. All the more reason for me to visit Acadia again one day in autumn!
Experiences:
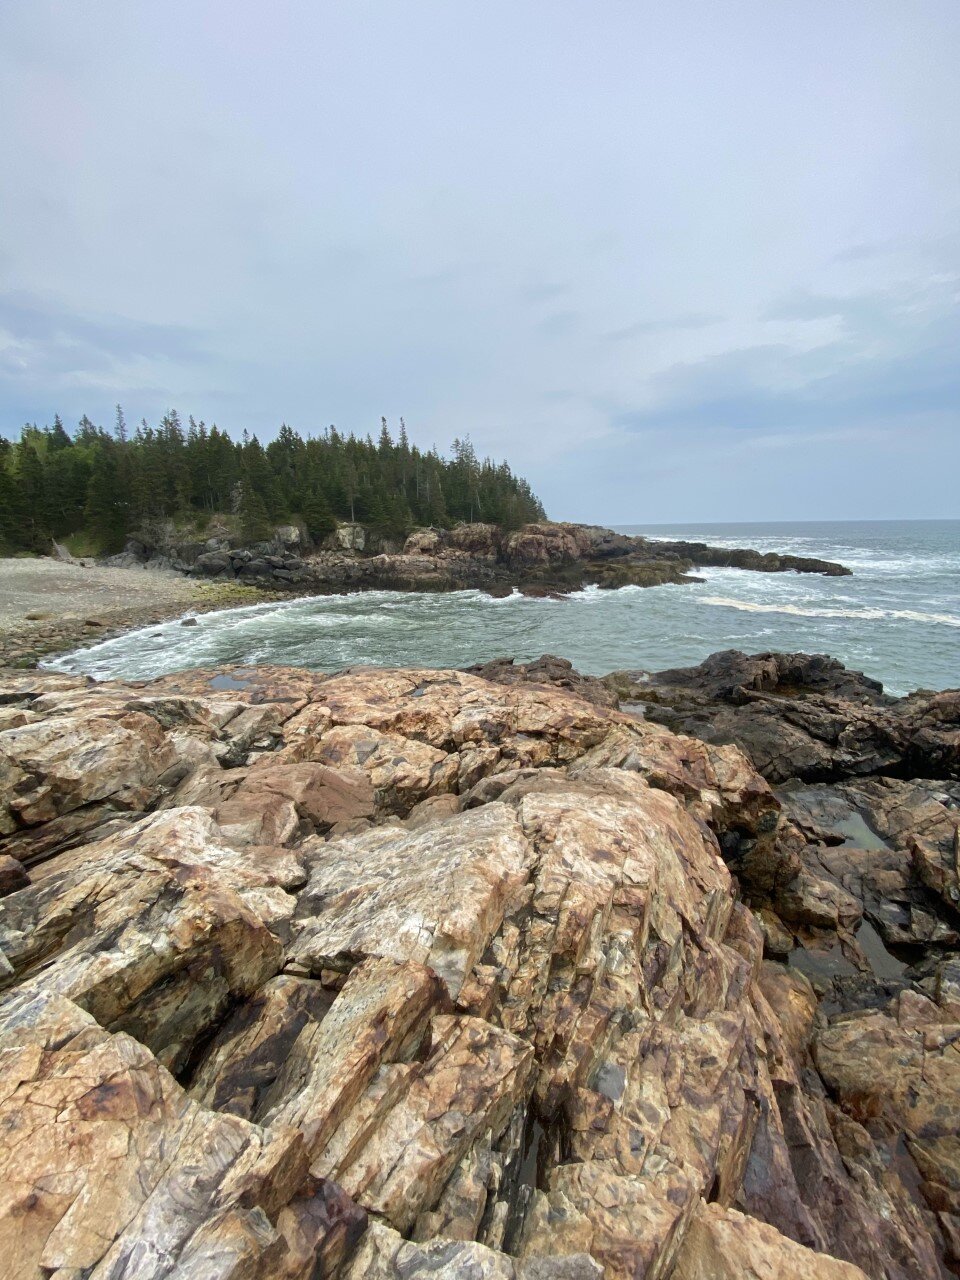
View sunset at Bass Harbor Head Lighthouse.
Arrive an hour early to get a scenic spot on the rocks. Parking here is also limited. Bring a rain jacket as the waves enjoy crashing the rocks, thereby soaking you by default. Watch as the colors in the sky unfold before your eyes in vibrant orange and red hues.

Drive the 27-mile Park Loop road.
Stop along the way for hidden gems and solitude in spots like the ones below.

Watch the U.S.’s first sunrise at Cadillac Mountain. You need reservations for the busy summer months due to limited parking, so you’ll need to book a vehicle reservation to snag one of these coveted spots. If you’ve worked up an appetite since you woke up before 4 AM for this experience, head into Bar Harbor for breakfast at Jeannie’s Great Maine Breakfast. Always get a grilled blueberry muffin. Especially when in Maine.


Is Acadia on your list of places to explore? What are you most excited to see or do?

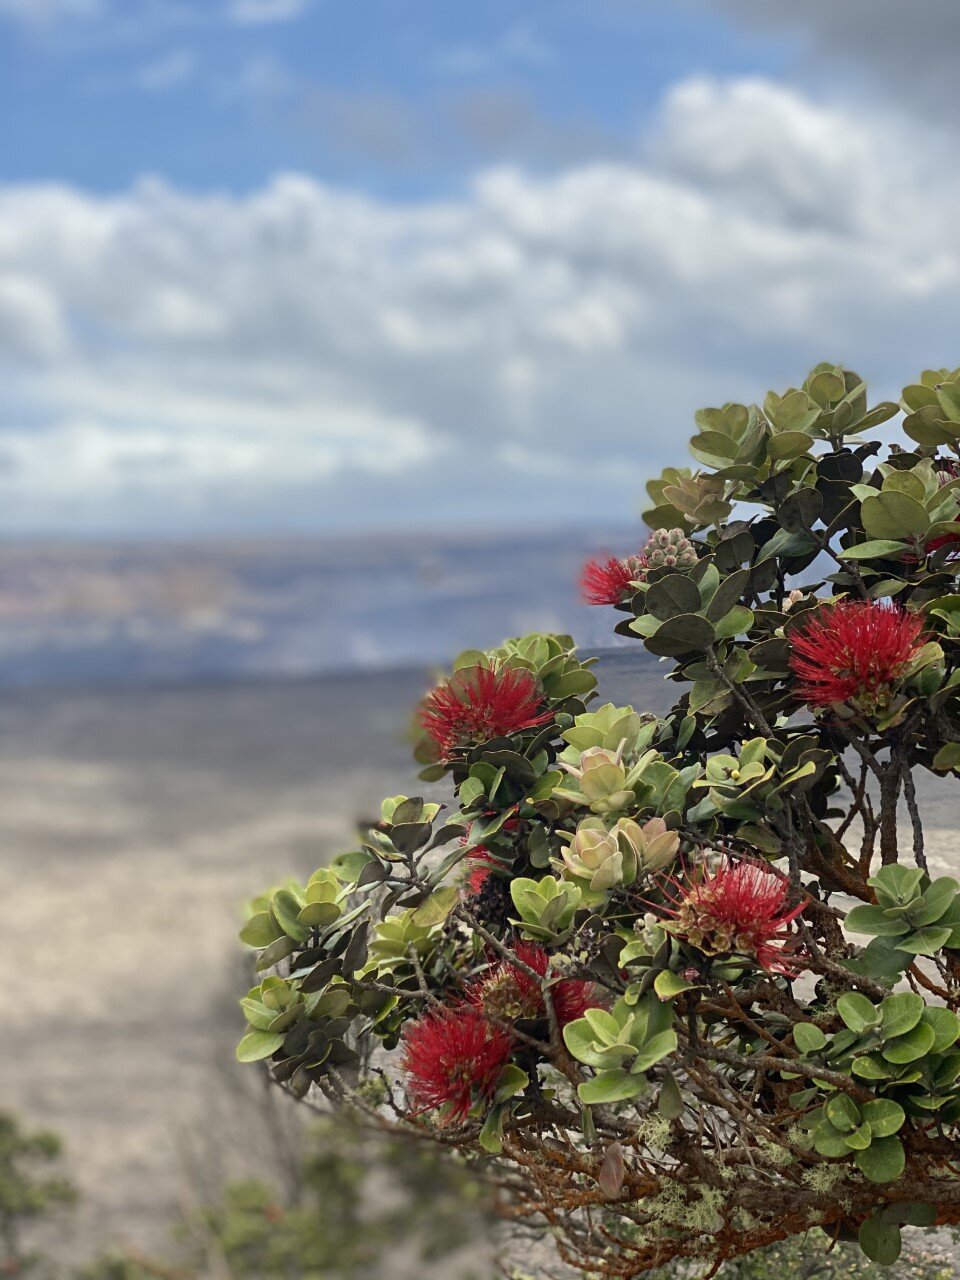
A Guide to Hawai’i Volcanoes National Park

My 32nd national park!
I knew the least about Big Island prior to visiting. All I knew was that Volcanoes National Park resided there, and so I needed to visit. That’s the beauty of wanting to achieve a list. Sometimes, in order to cross a place off, you find unexpected beauty. We stayed in this beautiful Airbnb off the grid right outside the park immersed in the rainforest. I highly recommend it if you’re planning to spend time at Volcanoes!
We headed into the park our first night, headlamps in tow. I usually try to limit my night explorations in unknown places, but seeing this park at nighttime is an absolute must.

The lava glow at Volcanoes National Park.
We drove into the park near the Kīlauea Visitor Center to explore the Kīlauea Overlook. The parking lot was nearly empty on this mid-April evening, and we walked the minute up to the overlook. We weren’t entirely prepared for what we were about to see, or in this instance, not see.
When researching this park, I knew an eruption occurred a few months earlier in December, and I was hoping to catch a glimpse of lava up close. I wanted the feel the radiating warmth of the lava against my skin, but instead I only felt the cool air bringing my body to a chill. If you make it out to this park at night, bring a jacket. Or two.
When we walked up to the Kīlauea Overlook, a hazy reddish hue like a gentle brushstroke of acrylic paint just touching the canvas for the first time caught our eye. “That’s it?” My friend remarked.
Instead of lava flow, we were met with lava glow. The glow appeared a deep orange and red blend on camera. A rarity for the picture to be more astounding than the image in reality. Below is the daytime view.
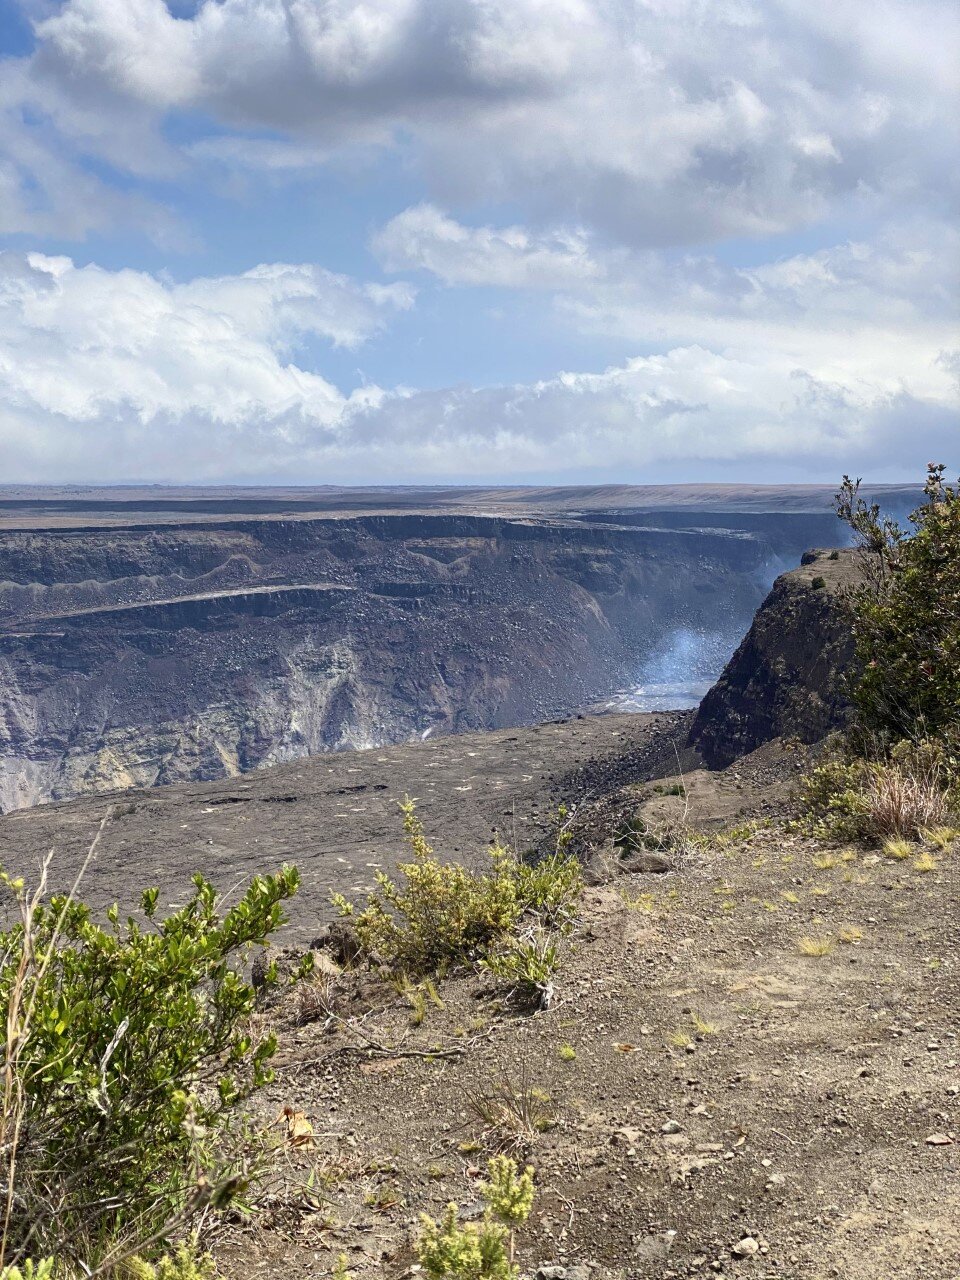
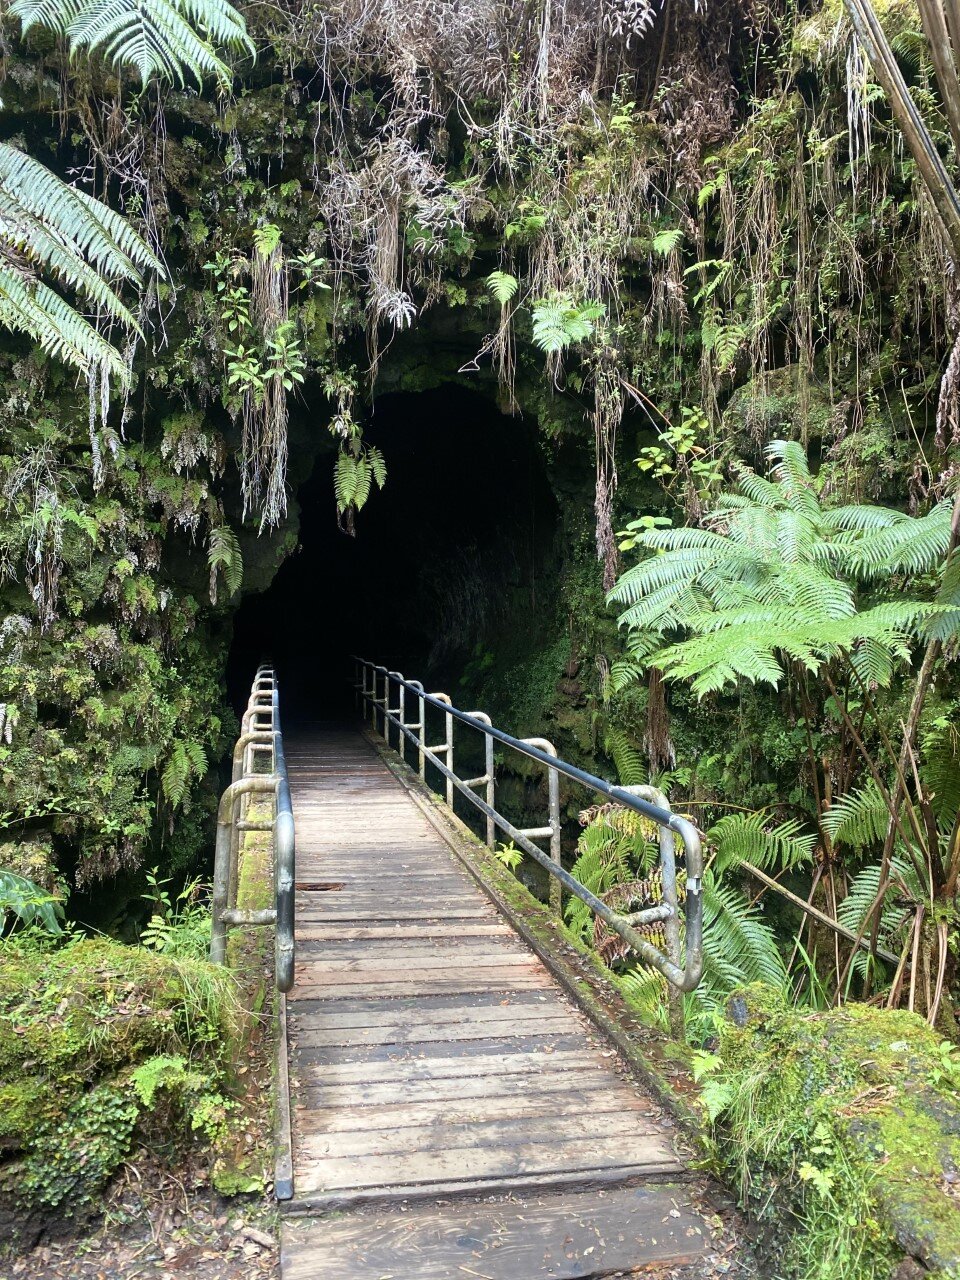
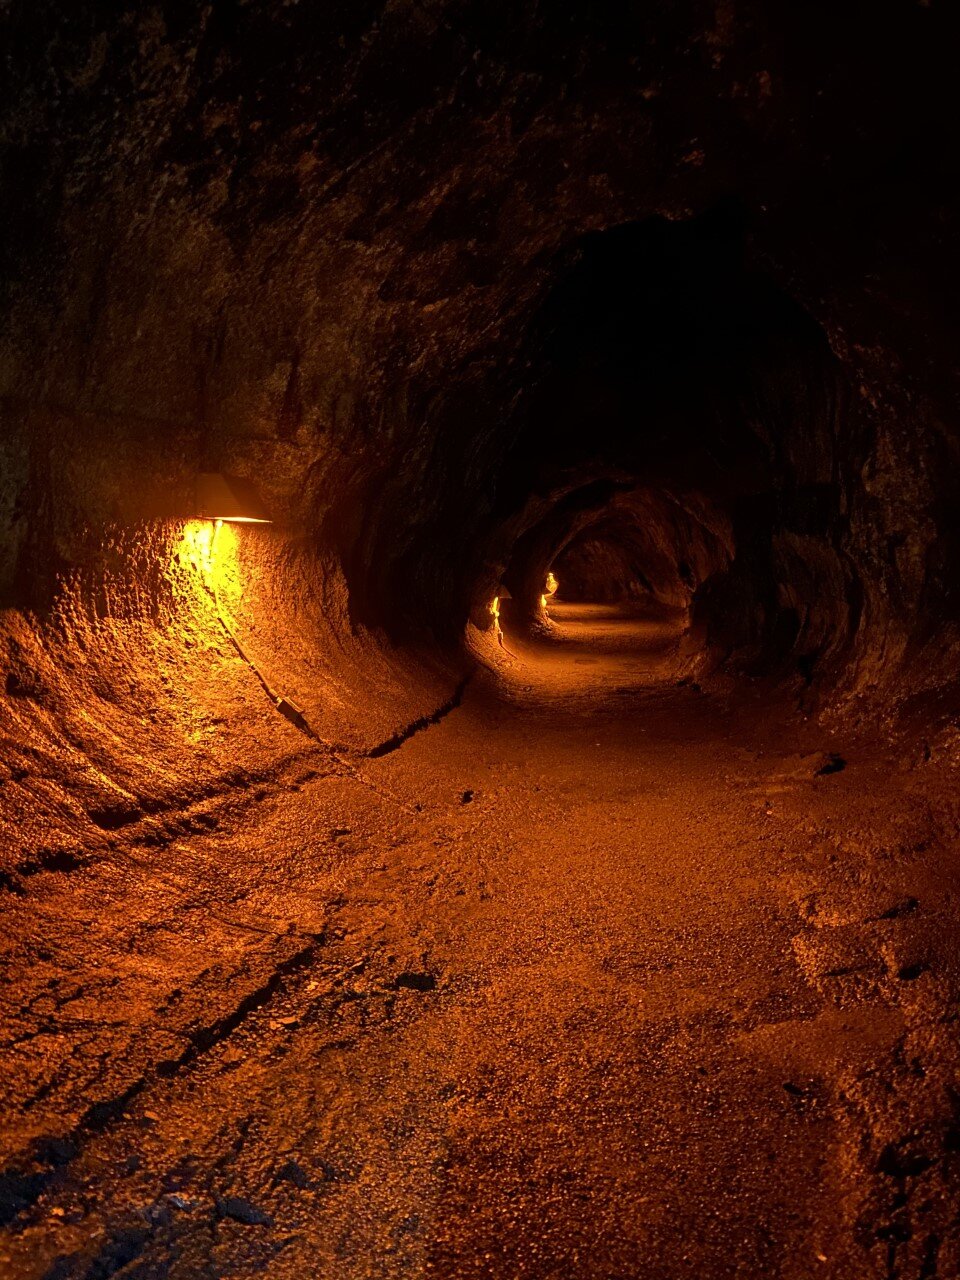
We explored the park in more depth the following day. We discovered another viewpoint at Volcano House that would be neat to see under a starry sky. We walked along the crater rim. Truthfully, I thought there would be hiking in this area, but all the sidewalks are very accessible and were all .2 or .3 miles of walking. Once we felt we had seen the crater enough, we drove onward to the Thurston lava tube. Another short traverse led us through a scenic rainforest and into a lit cave. At night, the lights are off if you want the full cave experience.

Across the street from the lava tube is a beautiful short trail as well with vistas of a crater floor you can actually hike down into and on!
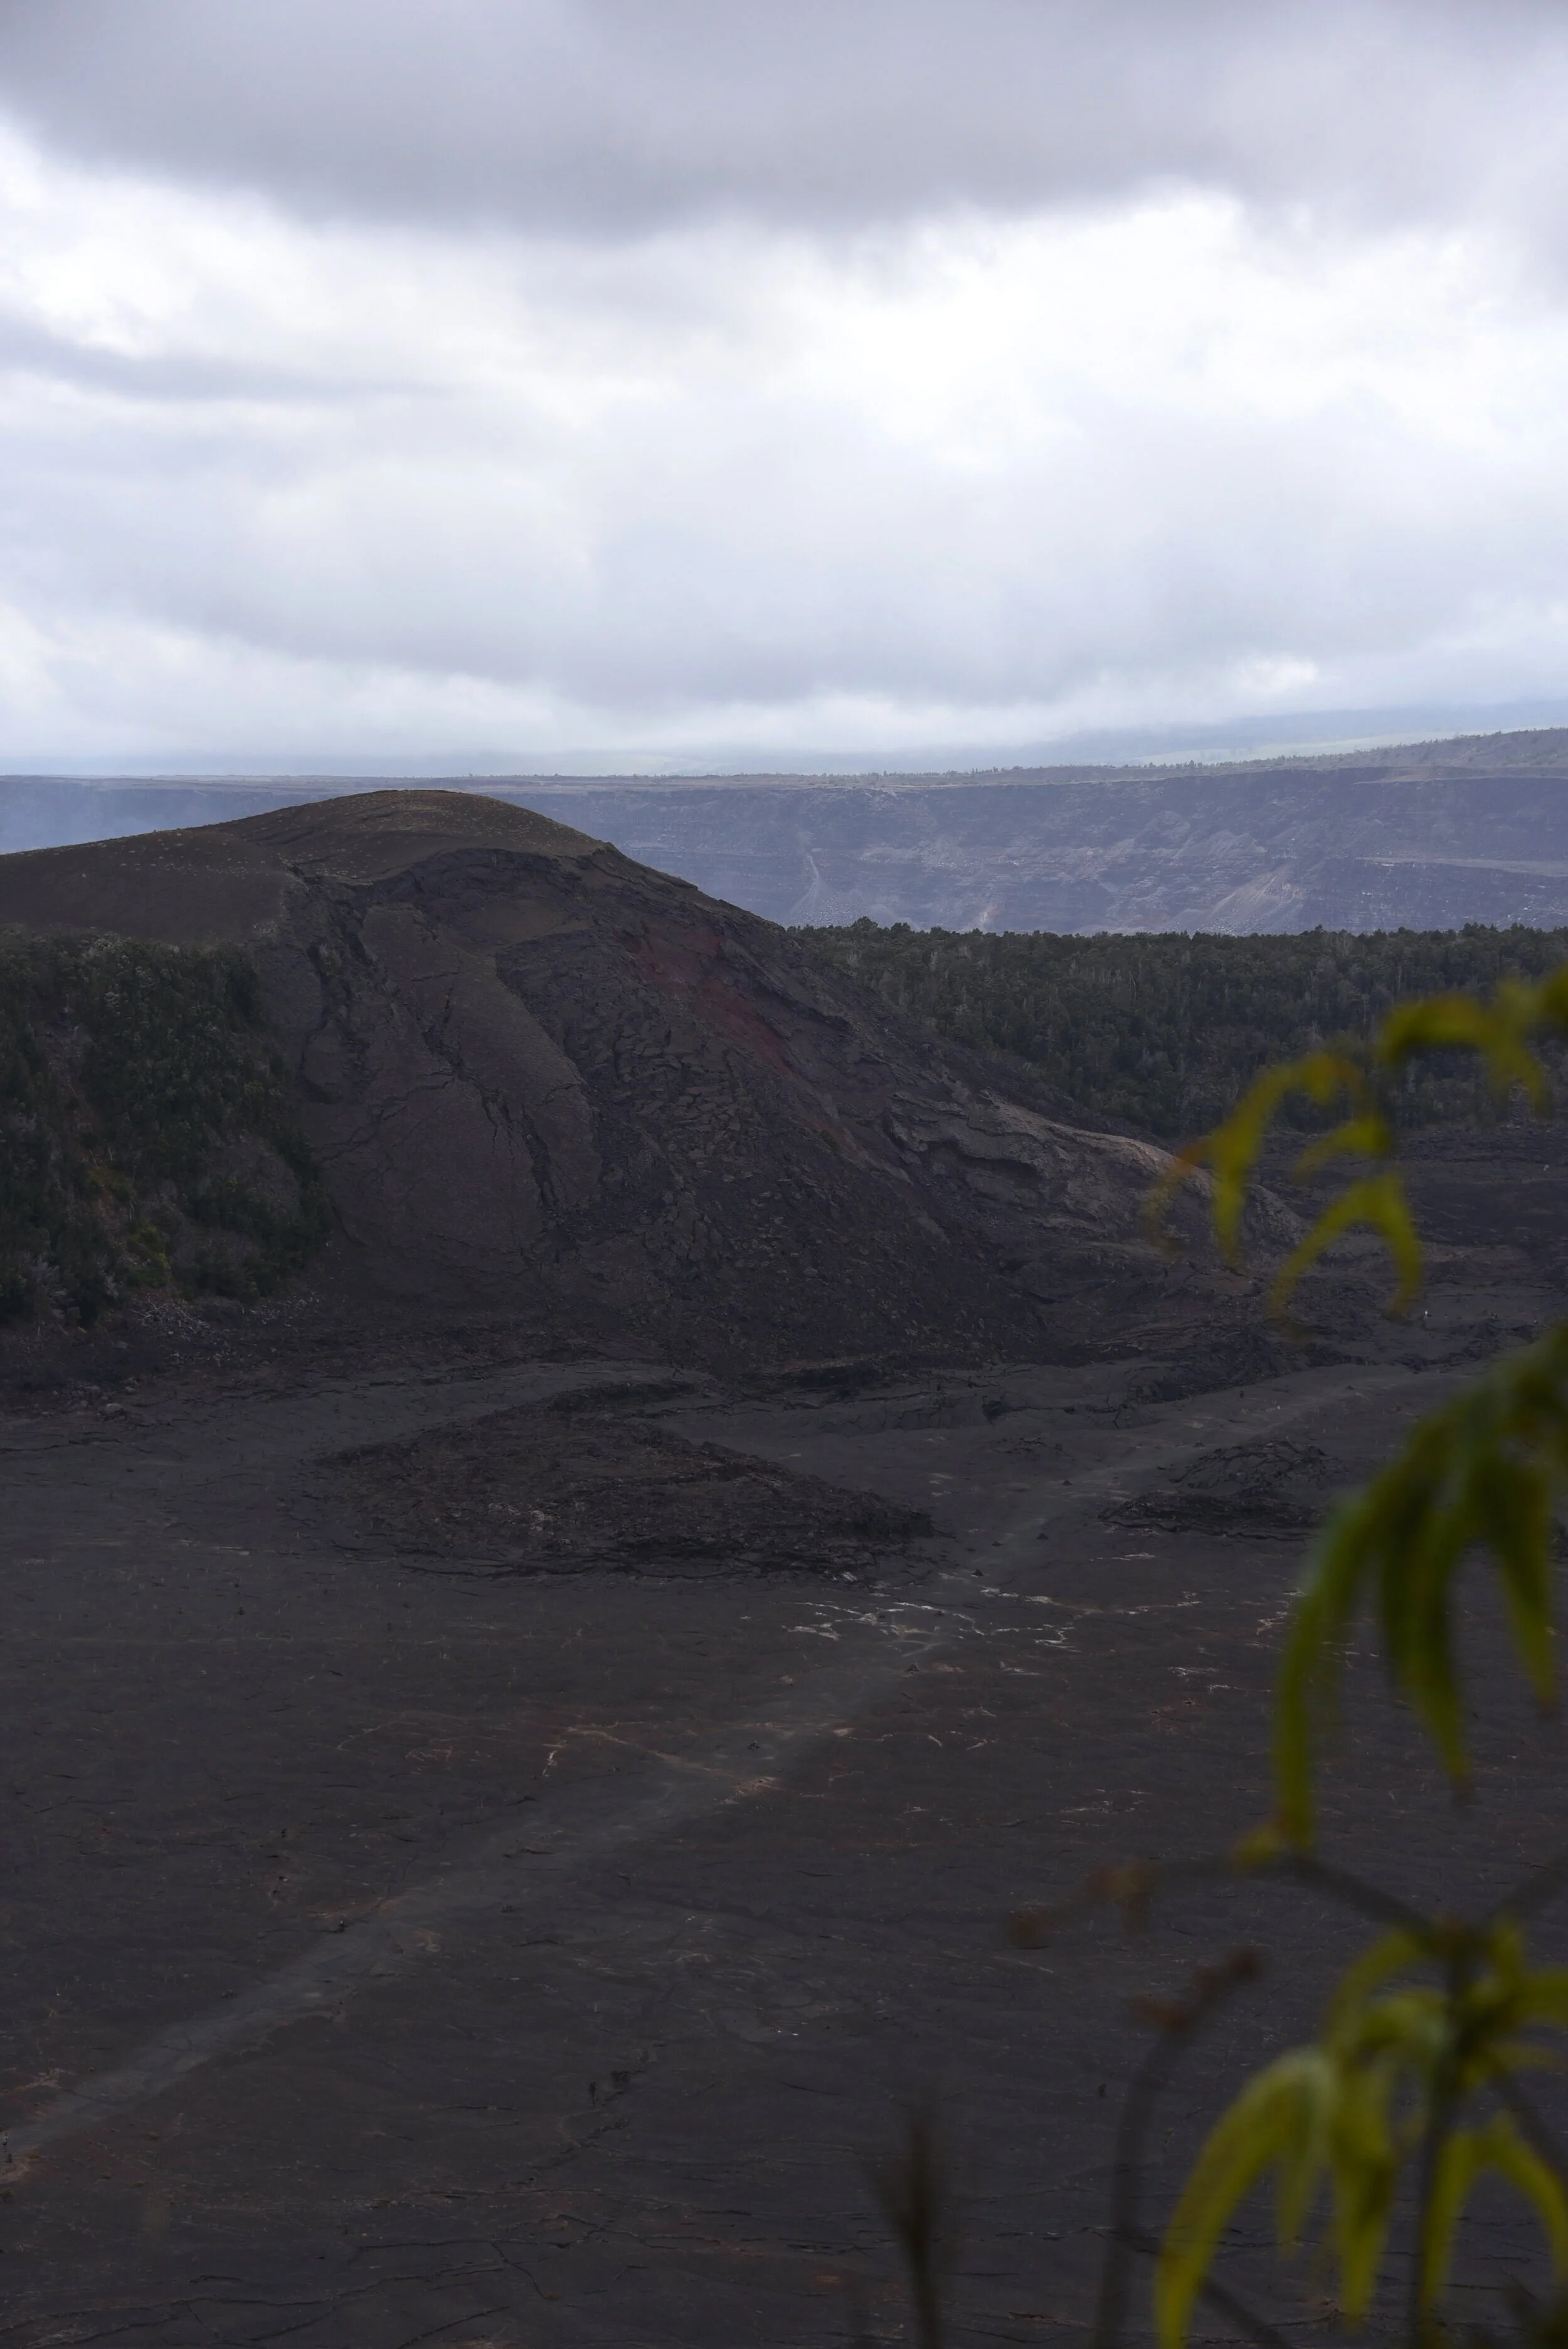
If I come back to Volcanoes one day, I would love to walk across the crater floor at the Kīlauea Iki Crater Overlook. It’s a 400 foot descent and a little over 3 miles of hiking down. The birds-eye-view is above.
We hopped back in the car and headed down the Chain of Craters Road – a road lined with lava rock. The final destination on this road would lead us to the ocean. I love variety in a national park and like Olympic in Washington, Volcanoes provided us with desolate, dark lands contrasted a few miles away with the glimmering ocean.
A .6 mile out-and-back along a road led us to Cliffs of Moher, Ireland views. Also known as the Hōlei Sea Arch on the Big Island. The arch formed from waves slowly eroding it, which is neat to consider it is constantly changing. This little ocean visit was a highlight of the park for me particularly because of the road to get down to it, and eventually, back up.

Hōlei Sea Arch at Volcanoes National Park
Our final adventure led us to the summit of Mauna Kea, one of Hawaii’s largest volcanoes. From its base underwater to the peak, it’s over 33,500 feet, meaning it’s taller than Mt. Everest (if you count what is submerged in water). Pretty neat, right?
There is an observatory 13,803′ feet up to watch the sunset from. We made it up 9,000 feet where we were met with this worrisome sign (the eerie fog didn’t help) and a guard along the road.

And to think, we were just by the coast with the ocean breeze.
We drove from sea level to this point in about an hour and a half, so the sign makes sense. The remainder of the road can only be traveled with AWD, and most rental car companies won’t cover the damage from this road specifically.
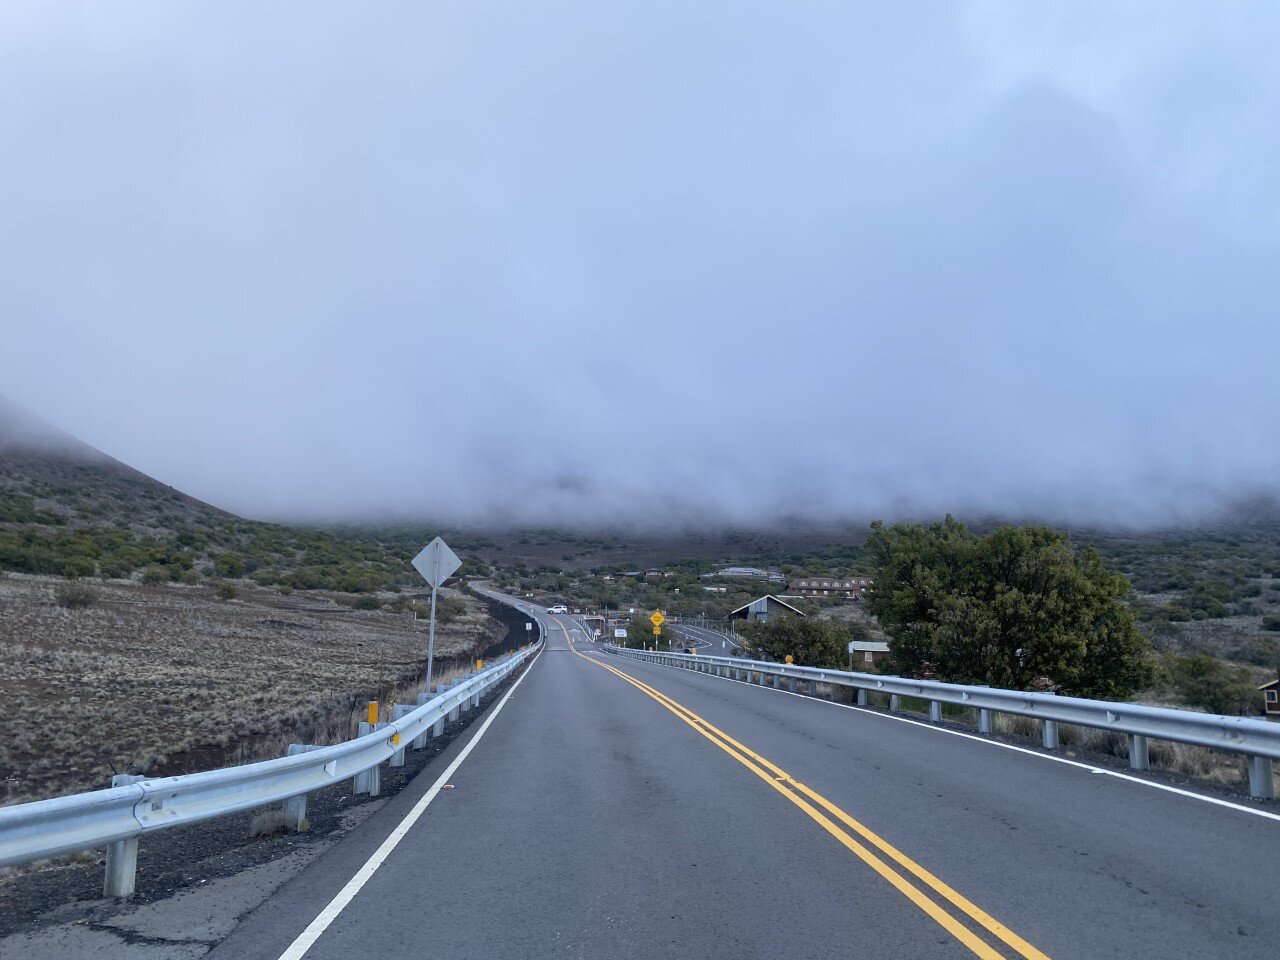
The ominous road that leads to the guard checking if you have AWD or not.
So here’s the sunset from our little spot 9,000 feet up in the sky.

Our sunset above the clouds, but still a few thousand feet below the summit.
Did you have Volcanoes National Park on your list of places to visit? What part of the park can you not wait to explore one day?

Two Best Ways to Experience Haleakalā National Park
1. Drive up Crater Road for sunset…

My 31st National Park!
I have had dreams of visiting this park for years, but was too afraid to island hop solo four years ago when I was last on Oahu. This time, with friends in tow, I would make it to see this dormant volcano. And better yet, I’d find unique ways to explore what it has to offer. With that, here are the two best ways to see Maui’s only national park, Haleakalā:
1. Drive up Crater Road for sunset.
On a clear day, if possible, drive up Crater Road. The drive alone takes you through a variety of trees and landscapes. As you make your way up the winding road, you’ll want to stop and take in the clouds. Soon enough, you’re above the clouds – an experience most of us only take part in on an airplane, not actually outdoors.

The beautiful above-the-clouds drive up Summit Road.
I had only been in the clouds once before on my trek on the Inca trail, so this was a refreshing delight. There are a handful of pull-in spots to step out safely and take a picture at an overlook.

Take advantage of all the lookout points like these.
If you are pressed for time, make your way to the summit parking lot to not miss the sunset. Once you park, head up a very short (and I mean, short) path to the viewing points of the crater. The trail we hopped onto is the Keonehe’ehe’e Trailhead, which takes you into the crater (also referred to as the Sliding Sands trail).

This isn’t what I often picture Hawaii as at all and I loved every moment of it.
You’ll stay on the trail for .1 miles and a remarkable view of the dormant volcano greets you suddenly. At this viewpoint, you have the volcano on one side, and on the other, a stunning sunset above the clouds.
Watching the sun disappear into the clouds at the summit of Haleakalā.
The road to the Haleakalā Observatory is closed, but you can make the half mile or so trek to the top. I initially wanted to do this, but my friend suggested we stay where we were and wow was I glad she said that. We had a kaleidoscope of colors setting on the crater as we turned around and watched as the clouds consumed the sunset. Had we of watched sunset from the observatory, we would have missed the crater views.

Above is the short hike up to the Observatory since the road is blocked off to car access.
2. Reserve a bike tour to cycle down from the park.
When I found out you could bike downhill from Haleakalā, I was sold. I reached out to Bike Maui via email and they were extremely helpful in assisting me in picking the right ride. They offer so many – from sunrise rides to self-guided. I booked the morning self-guided tour, which started off at 9 AM at their location near the park.

The same Summit Road, but immersed in the clouds.
Our incredible tour guide, Kimo, drove us to our drop-off location just outside the park. He provided great commentary and humor along the way, and mapped out our ride for us back to the bike shop.

He also had a keen eye for photography, and took this silly shot for us.
I would highly recommend Bike Maui for your tour company! The equipment was clean and comfortable and the staff was extremely friendly and helpful.
We biked down some of the winding road we had just driven up the previous night for sunset, and stopped along the way for some scenic vistas. The ride overall was comfortable, beautiful, and quick. My Garmin logged the ride at 22 miles with a gain of 236 ft. The entire experience took 5-6 hours with the set-up and drive time with the guided tour on the way. The ride down is entirely up to you and your speed, but it is also almost entirely downhill, so there’s no way it’ll take you hours. All in all, an awesome way to experience Haleakalā aside from seeing it at sunset.

Our ride took us under the clouds and through more of the beauty this park has to offer.

Planning a Trip to Hawaii
Tips to get started planning your island getaway!
How to Plan a Hawaii Trip: 4 useful tips to get started planning your island getaway!

1. Narrow in your days.
As a teacher, I’m limited to what times of year I can travel. However, that isn’t the case for everyone. Consider if you can possibly fly out on a Thursday, when flights are cheaper. Gauge whether you will need time to recover from the time changes and consider if a night in California is affordable and worthwhile for you. It turned out that our flights were cheaper if we flew direct to California, stayed the night, and flew out the following morning. A win-win.

2. Map out your experiences.
We knew we wanted to bike down from Haleakalā National Park in Maui, but we also wanted to night dive with manta rays on the Big Island. These excursions are not offered daily, so we needed to map out what days and times they were offered and go from there.
My favorite way to map things out visually is with Google sheets. I have used the same template for trip planning for a few years now thanks to a tech savvy friend of mine. Here’s what our first two days in Maui looked like, mapped out: times, dates, experiences included.
If you’re interested in the template above, subscribe to my blog at the bottom of this page, and I’ll send you my template for free!
3. Read up on safety precautions.
Since we’re still living in a Covid world, it’s important to minimize any surprises (some are inevitable!) while traveling. Going into Hawaii, I knew we would need a negative Covid test to enter Maui. Here’s what we needed to do:
Create a Hawaii Safe Travels profile.
Enter in all the information for where you will be staying. Since we were island hopping, we spent a bit of time entering all of this in.
When booking a Covid test, we read through Hawaii’s Trusted Partners to determine which ones were close by. We landed on CVS because of convenience, but it did cost us $139.
After receiving a negative test, we uploaded it to the Safe Travels profile. The website suggests you print a copy, but I strongly recommend you do. If for some reason your QR code doesn’t get sent to you (which it did for one of my friends), then the printed negative test allows you a stress-free passage through.
Finally, 24 hours before your departure to Hawaii, fill out the pre-travel form and you’ll receive a QR code. Save this email or screenshot it for easy access when you land.
That’s it! Unless you are island hopping. If you’re staying in Oahu the entire time, you’re good to go. If you are going to Oahu after another island, you’re also in the clear. If, like us, you decide to go elsewhere, like Big Island, we needed another negative result within 72 hours of departing to Big Island (meaning our original negative results to Maui would no longer suffice). We budgeted and booked time in our itinerary to take a CVS test while in Maui.
*This post was written in early May, after a week spent in Hawaii at the end of April. Hawaii officials are in talks about a vaccine passport, which would allow mainland travelers to bypass several of the above protocols. During my trip, this was not made official yet. *

4. Leave room for unplanned adventures AND for driving time.
We wanted to visit a black sand beach in Maui, but it didn’t work out, so we added one in last minute in Big Island (pictured above). My next tip is to leave time in your itinerary for unplanned adventures like this one, and for driving from place to place.
One thing we did not realize when booking airbnbs is the distance to what we wanted to do. On Big Island, we had this incredible, off-the-grid Airbnb right outside Volcanoes National Park. The only setback was that our manta rays excursion and the airport we were flying out of were two hours away.
If we had done more research, we would have stayed in that Airbnb for one night to explore Volcanoes National Park, then stayed near Kona the next couple nights to save on driving time.
Lastly, leave room for the unexpected: someone wants a snack, a picture, a pee break. It all adds up, so be sure to leave time in your itinerary for these little stops that often are forgotten about until it’s in the moment.
I hope these tips help you plan your adventure to the beautiful islands of Hawaii! Stay tuned for the next few posts where I take you with me into craters, volcanoes, and underwater. Subscribe to my email list below to be the first to find out when I post!