
How to Spend 24 Hours in Ithaca, New York
Here’s what to do with 24 hours in Ithaca, New York:
1. Hike in…

One part about teaching in New England I love is having an additional winter break. A week off in February right when the days are short, and the weather is cold is perfect. A close friend of mine from Texas decided to visit for the weekend with only one request: to experience winter.
After a few warmer days, I knew we needed to head north. One spot that’s always been on my list is Ithaca. Known mostly for two colleges in town, Cornell and Ithaca College, Ithaca has way more to offer than an incredible education.
A quaint, charming town way north of the common New York city experience proved to be the perfect winter getaway.
Here’s how we spent a day in Ithaca, New York:
1. Hike in Taughannock Falls State Park.
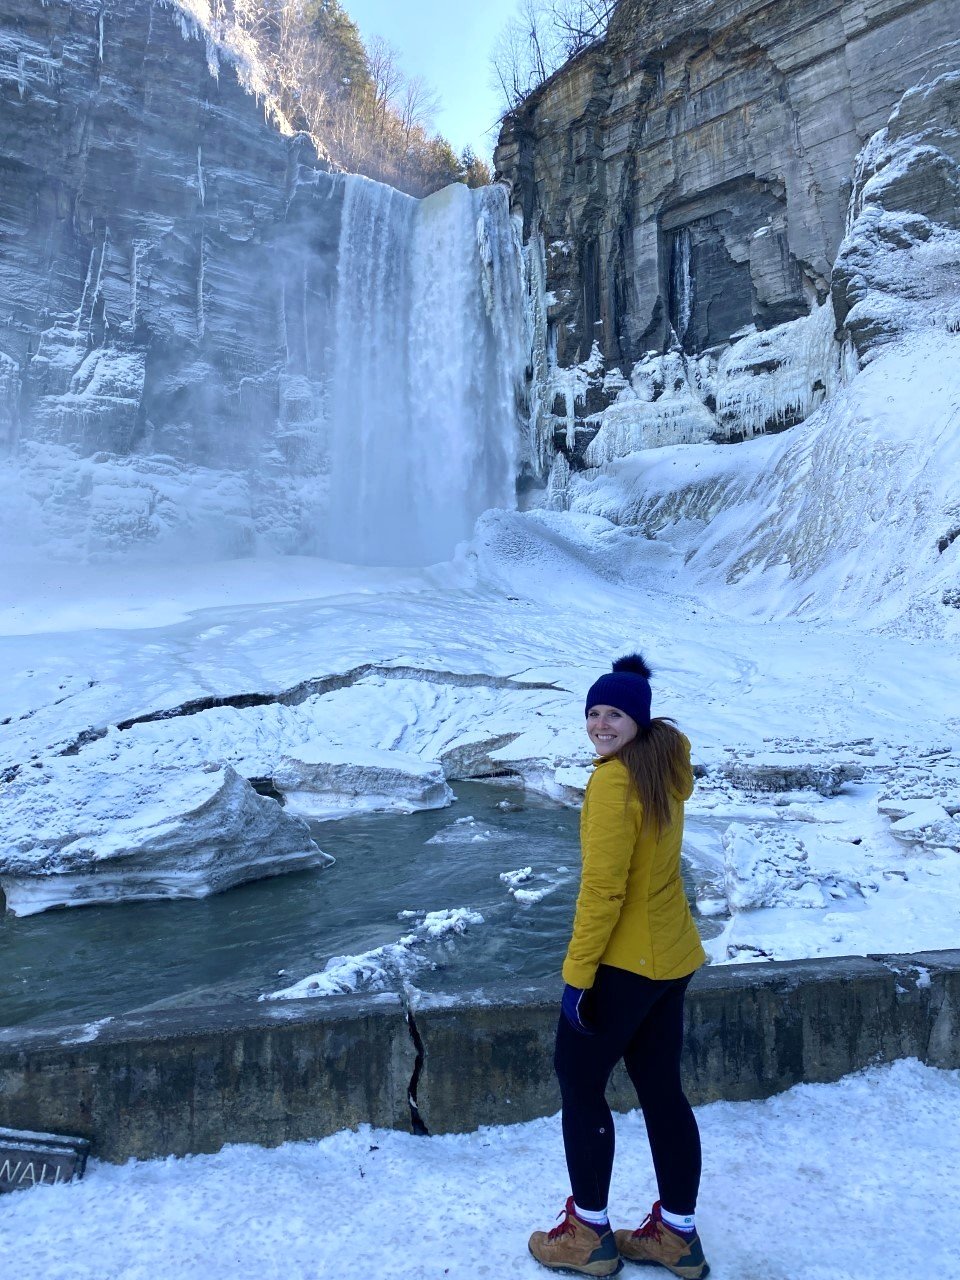
Taughannock Falls in all its wintry glory.
Hike is a loose term given the usual hikes I find myself chasing after. This time, we were chasing waterfalls instead. Taughannock Falls features a massive, 215-foot waterfall. And in winter, you can bet there’s incredible icy formations all around.
The park is popular, but we arrived in the afternoon and managed to snag a parking spot right away. Though the lot is small, the hike itself is a quick walk, so there likely wouldn’t be a long wait for another car to exit shortly.

From the parking lot, we walked on a mostly paved path. The path is extremely scenic – you easily forget you’re relatively close to civilization and it’s a wonder this isn’t a more popular destination.
High cliffs, a rushing river, and the winter magic made this trek feel like we were hiking in a national park.
We reached a short bridge about ¾ of a mile into our walk. The falls are visible from this bridge, but we walked a bit further on the path to get a close-up view.
Surprisingly, Taughannock Falls is actually three stories taller than Niagara Falls (not too far away from Ithaca). I’m not a big waterfall gal, but winter changes the game for me. This view was stunning and I couldn’t get enough!
Once you get your dose, drive up the road a couple minutes for a birds-eye-view of the falls from the overlook.
Things to note:
Both the trails mentioned above are open year-round, while the rim ones are not.
There is a $7 park entrance fee. The overlook is free though!
Dogs are allowed on a leash!
2. Peek into Cornell University’s Uris library.
I love a good library, and Cornell’s Uris Library is quite the gem. Think Belle from Beauty and Beast’s library meets J.K.’s Rowling’s rendition in her novels. The best part? It’s open twenty-four hours with incredible sunset views over nearby Cayuga Lake.
It was peacefully quiet when we entered and remained so as we explored. If you’re a book lover, it’s worth a quick stop here.

We did feel odd being back on a college campus after graduating several years ago. I definitely had flashbacks to all the late nights in the PCL library in Austin. I probably would’ve enjoyed going to the library more with views like these though (or I might’ve studied more…).

3. Grab dinner in Ithaca Commons.
I had major New England vibes in Ithaca Commons – pedestrian-only for a couple blocks of shops and restaurants. Parking was easy to find once we navigated the streets.
One of my favorite finds in a new town is walking along the main street, or in this case, the Commons.
Similar to Burlington, Vermont, Ithaca comes alive in this area. A few restaurants were closed Sunday when we visited (and a few closed permanently, sadly), but there were a handful of delicious options on this last-minute trip.

3. Enjoy a bagel breakfast at Collegetown Bagels.
Since we had a four-and-a-half-hour drive home to Western Mass, we needed to head out early in the morning, but not before finding a coffee and breakfast spot.
We enjoyed a fresh cup of coffee from Gimme! Coffee, followed by bagels from Collegetown Bagels.
Collegetown had every type of breakfast sandwich imaginable and felt like the place you could create something wild and they’d make it happen.
I had the Rise n’ Shine with a couple changes: a bagel with jalapeño cream cheese, roasted red peppers, provolone, and sausage. Anytime there’s jalapeño cream cheese on the menu, you can almost guarantee I’ll be ordering it.
I suggest grabbing the bagels to go and heading to the final stop on the itinerary: Ithaca Falls.

4. Look in awe at Ithaca Falls.
I told my friends I had one more surprise in store. When I parked in an empty parking lot off a street, they were confused. They followed me for a minute and were immediately awestruck by Ithaca Falls.
This waterfall is literally on the side of the road. How is Ithaca so lucky?
Tip: The path down to the falls is paved, but with the wintry weather, it had a lovely layer of ice on top. I used microspikes to get to the bottom of the falls.
We stayed at a charming, pet-friendly, and very affordable AirBnB just moments from Ithaca Commons, which made all the adventuring in under twenty-four hours possible!
Though we only checked out two waterfalls, the Ithaca area is actually home to over one hundred waterfalls. It’s one-liner is “Ithaca is gorges.” So fitting. Have you visited any?
If you enjoyed this post, you may also like:
Everything You Need to See in Acadia National Park, Maine

A Beginner’s Guide to Skiing
There are so many reasons not to ski. It’s expensive. It’s tough. It’s overwhelming to think about where to begin. All great reasons to try it out, right? By now you know I love the mountains and winter, so it was only a matter of time before I tried out a winter activity outside of hiking that includes my favorite things: great views, high adrenaline, and a good challenge.
I’ve only gone skiing four times in the last five years, so I’m still very much a beginner. Here’s my guide for beginner skiers (with the hope that you start skiing with paying less and enjoying more):

1. Look Local.
My first couple times skiing, I joined a friend to a popular ski destination in Vermont. The trip was essentially a hefty cost on my end to ski the bunny hill (for beginners). Heads up, there are bunny hills at every ski mountain and each time I practice on them to get what little “ski legs” I have up and moving again.
What I wish I had done is find a local ski mountain instead as I was starting out. It’s way more affordable! A nearby mountain for me cost $30 for the ski lift pass and $35 for equipment (skis, boots, and poles). It’s still a pricey way to spend an afternoon, but way better for your budget than the fancy spots.

2. Build your equipment bank.
The first time I skied, I rented (or borrowed) everything. I borrowed pants from a friend, paid $10 to rent a helmet, and wore an old winter jacket. I lucked out one snowy day that I opted out of renting goggles, but actually needed them. A ski lift operator gave me a hand-me-down pair for free. You’ll notice that skiing can get expensive, swiftly. The first time you do it, try to borrow attire from a friend and rent any remaining equipment. If you find you enjoy skiing, then begin building your equipment bank.
It takes some patience, but wait for the season to end. I purchased incredible ski pants at Eastern Mountain Sports for a fraction of the actual cost (solely because it was the end of the ski season). The following year, I purchased a helmet at Costco for $60. Each year I add to my equipment so the cost is never outrageously high for me as I continue to get into skiing.
Another tip: ski mountains and ski shops often have goodies on sale at the end of the season as well, not just adventure stores like EMS. Be on the lookout at the end of March and pre-season around September for bargain buys!
3. Know your direction. Going up the ski lift is all fun until you have to immediately hop off and are unsure of which way to go. Obviously going the wrong way can be disastrous. There are three types of trails for skiing: green circles, blue squares, and black diamonds. These are always clearly labeled on ski mountain maps and at the top of the lift.
If you’re ever uncertain, there is always an operator at the bottom of the lift before you get on that you could ask, as well as inside the lift at the top. It’s way better to clarify your direction than to end up going down a black diamond when you aren’t ready. For context, I’ve only gone down greens and I still have a great time.
Aim to do your research in advance as well. Every ski mountain has trail maps on their websites that you can download or screenshot to your phone.
4. Enjoy the learning. As someone who tried skiing in their early 20s, I was intimidated by the toddlers tackling the black diamond trails while I took on the bunny slope for the fifth consecutive time. I’m serious, it’s impressive what kids can do. They’re fearless!

Once I stopped fearing what would happen if I fell, my arms flailing reduced and I remembered the procedure for how to stop. I love that no matter what age you are, you can continue growing. Even if it means falling a time, or two.
Let me know if you’ve ever tried skiing! If you have, what tips would you give others just starting out?