
Lake Placid 9er Hiking Challenge
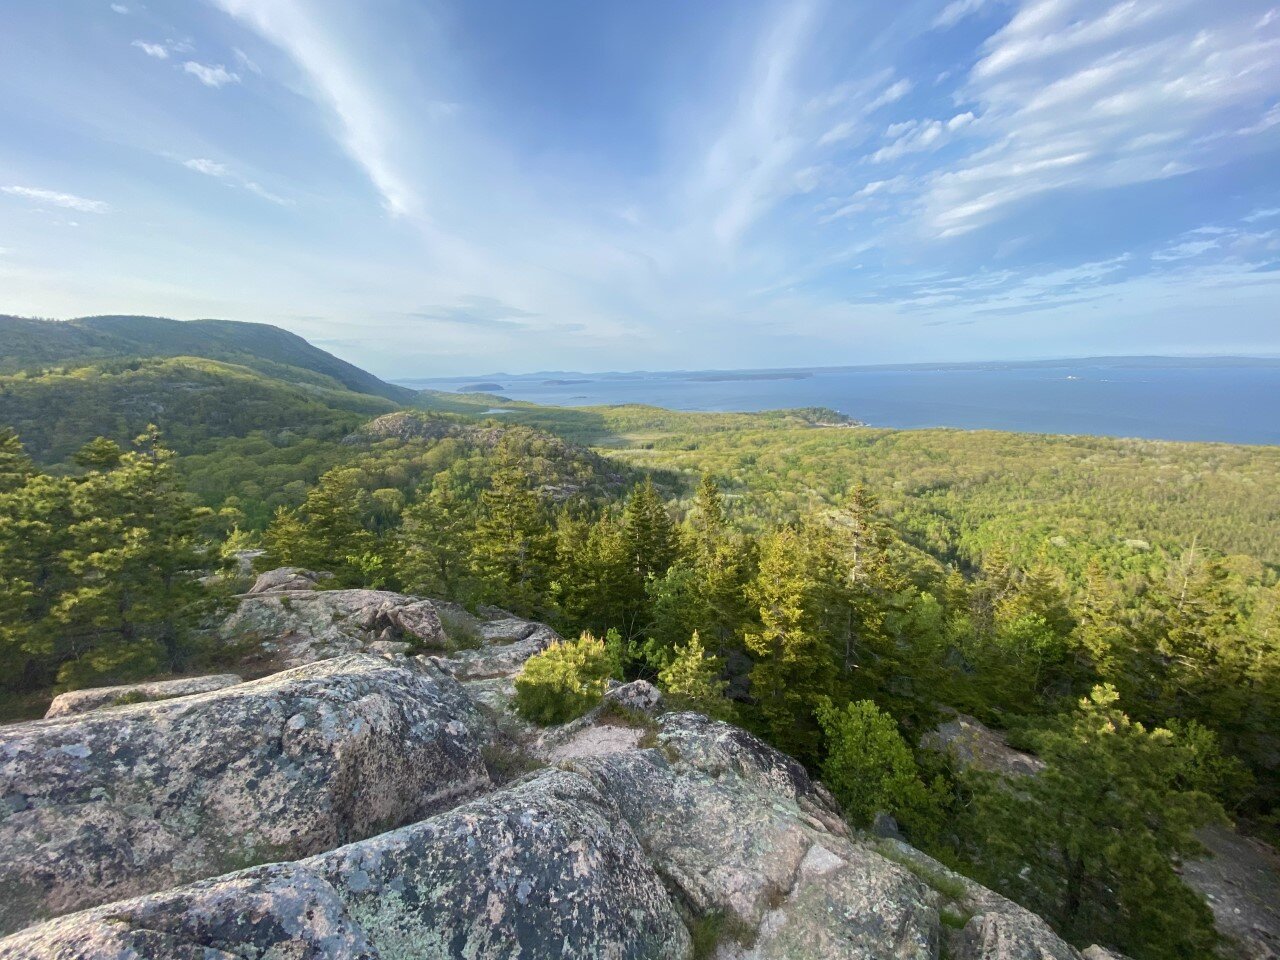
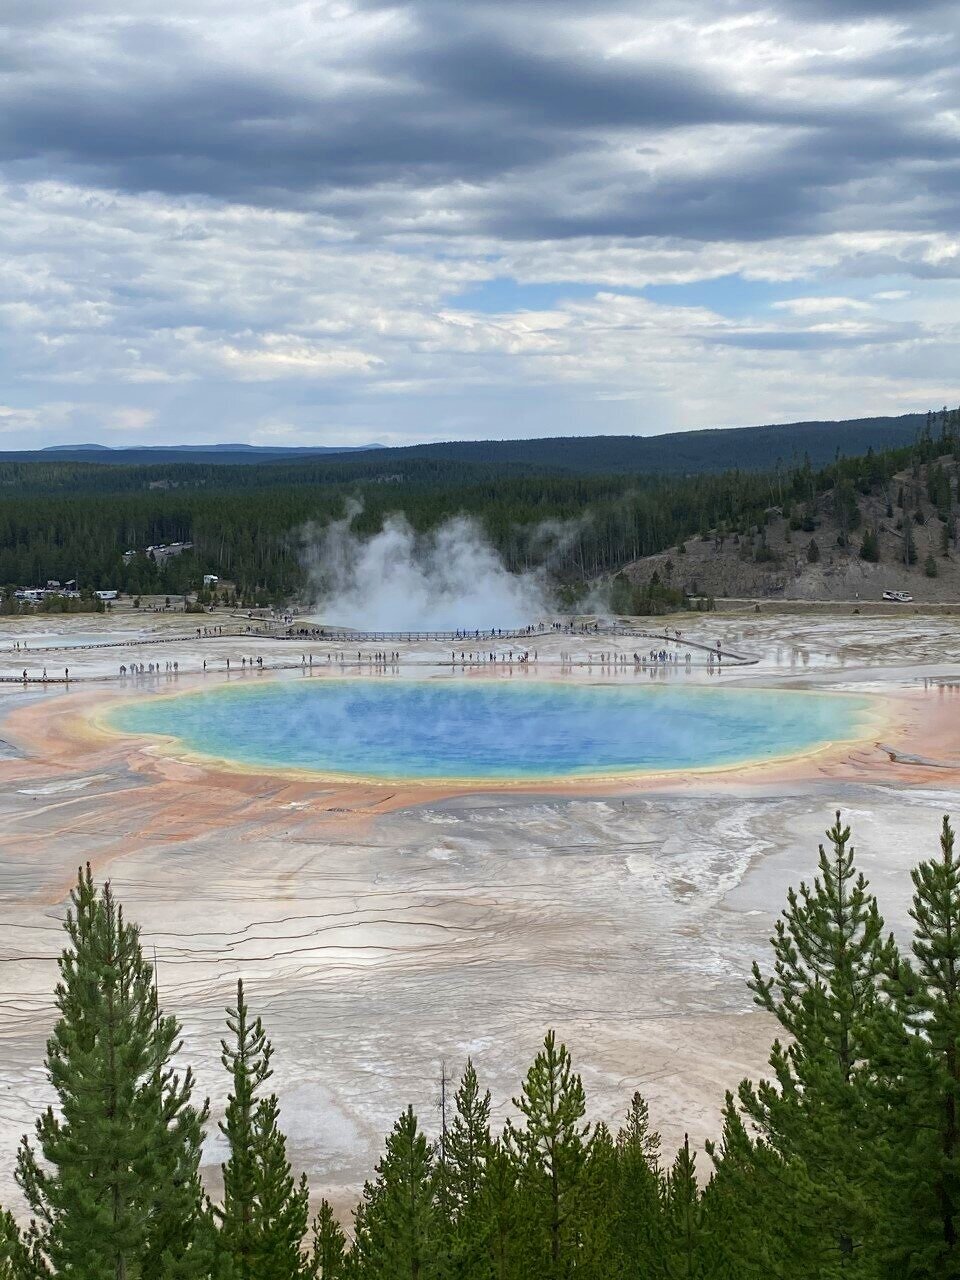
Over the span of 31.31 miles, I climbed 10,388 ft along these 9 summits. Here’s how I broke down the Lake Placid 9er hiking challenge:

I never grow tired of the beauty of these majestic mountains.
If I’m being honest, the Lake Placid 9 originally didn’t appeal to me. I love the brutal nature of a long day hike. Of miles and hours spent climbing a couple thousand feet for the triumphant feeling at the summit. Even if the view isn’t there.
I first heard about the Lake Placid 9 after hiking a couple of the ADK 46. I thought, why spend my limited time in these gorgeous mountains on very short hikes? Well it turns out, these short hikes sure know how to hold their own.
When mapping out my fall foliage adventures, I usually spend one weekend in the Adirondacks and the rest chasing the colors in New Hampshire. This year, after spending an early September weekend in the Adirondacks showing my parents the beauty New York has to offer, I decided to spend more time in upstate NY. Instead of New Hampshire. I know, I hardly recognized myself too.
My parents were up for a short hike, so I picked the shortest one of the Lake Placid 9: Cobble Hill. After this hike, I had an idea.
What if I combine my fall foliage chasing adventures with this short hiking challenge? It’d motivate me to get out there, and I’d gain more experience up in these rugged mountains. Plus, I’m a sucker for the foliage photos.
And thus began my multiple trips to Keene and Lake Placid, NY in September to October, with one final lap in November.
Over the span of 31.31 miles, I climbed 10,388 ft along these 9 summits. Here’s how I broke down the challenge:
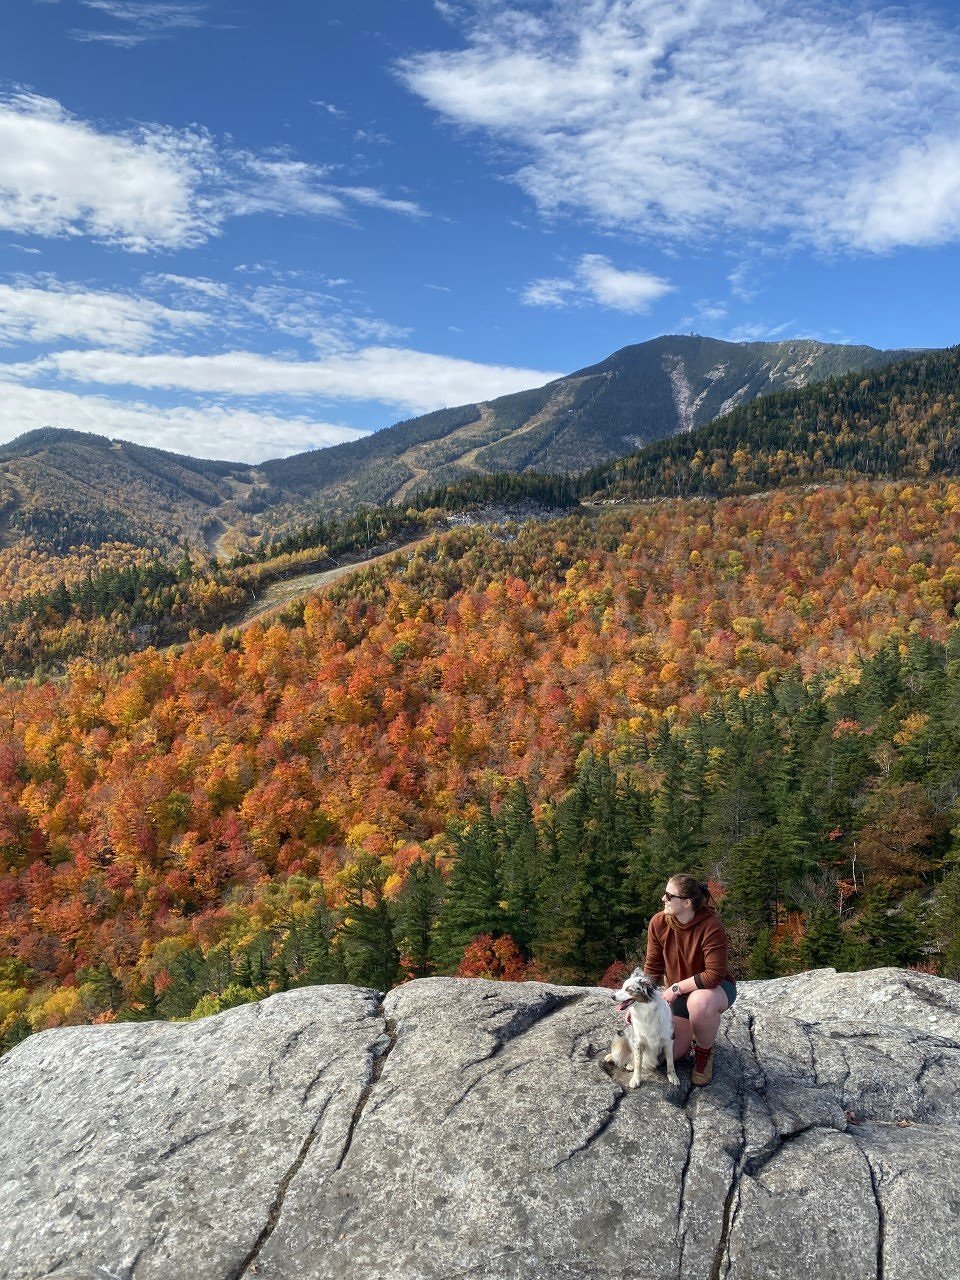
1. Cobble Hill
Distance: 2.89 mi
Elevation Gain: 610 ft
Location: Lake Placid, NY
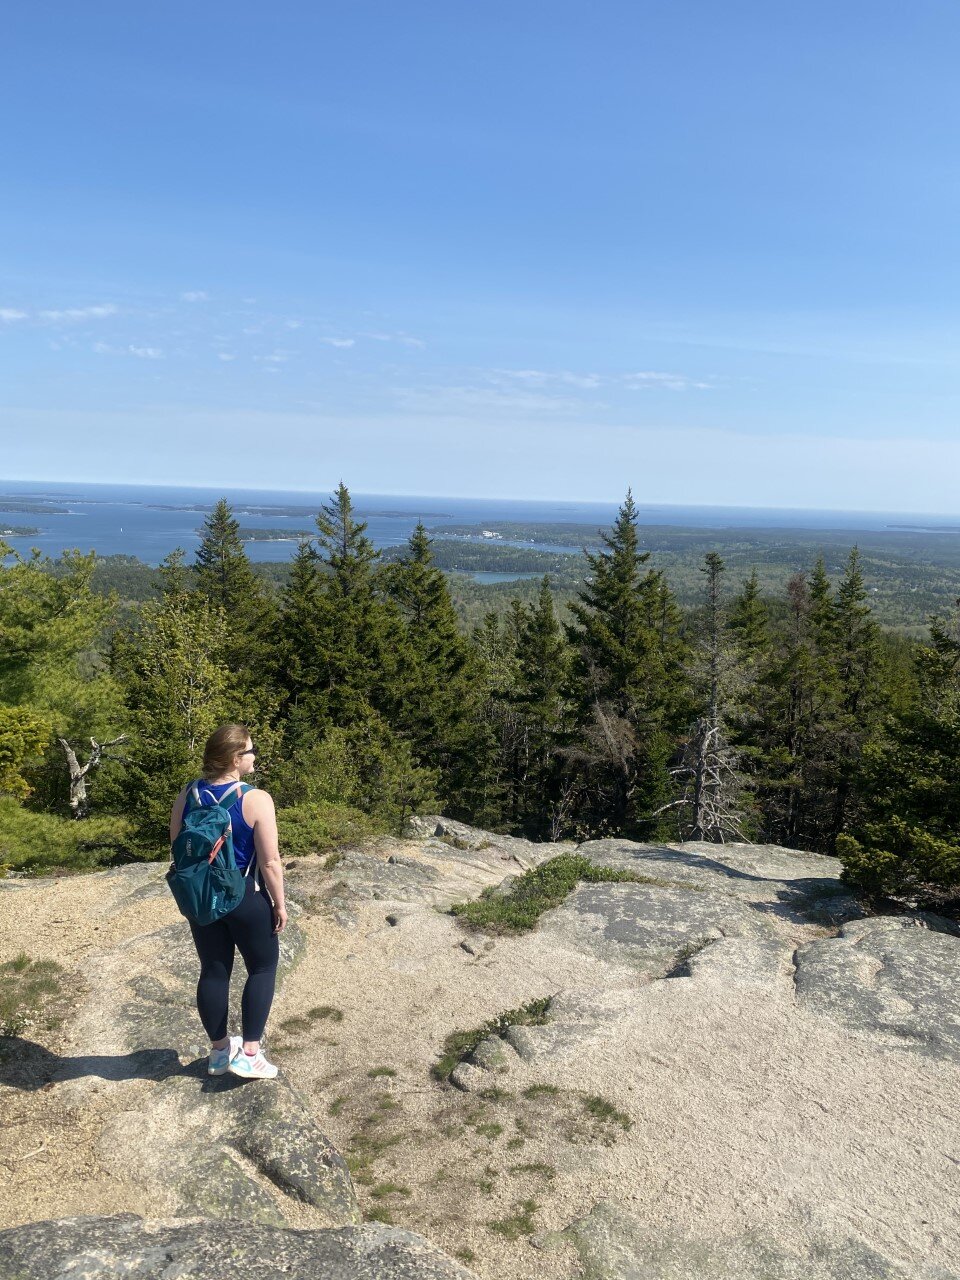
With my parents visiting for a short weekend, I wanted them to experience an ADK hike without too much exhaustion. Since we were staying in Lake Placid, I figured why not finally check out Cobble Hill.
We hiked the steep, shorter way up, and took the longer, gradual way down. I highly recommend this route because you get a bit of rock climbing with a rope ascending, but descend on a lovely trail walk next to a private pond. It’s a great way to get your feet wet starting out on this challenge!

My route to Cobble Hill is above.
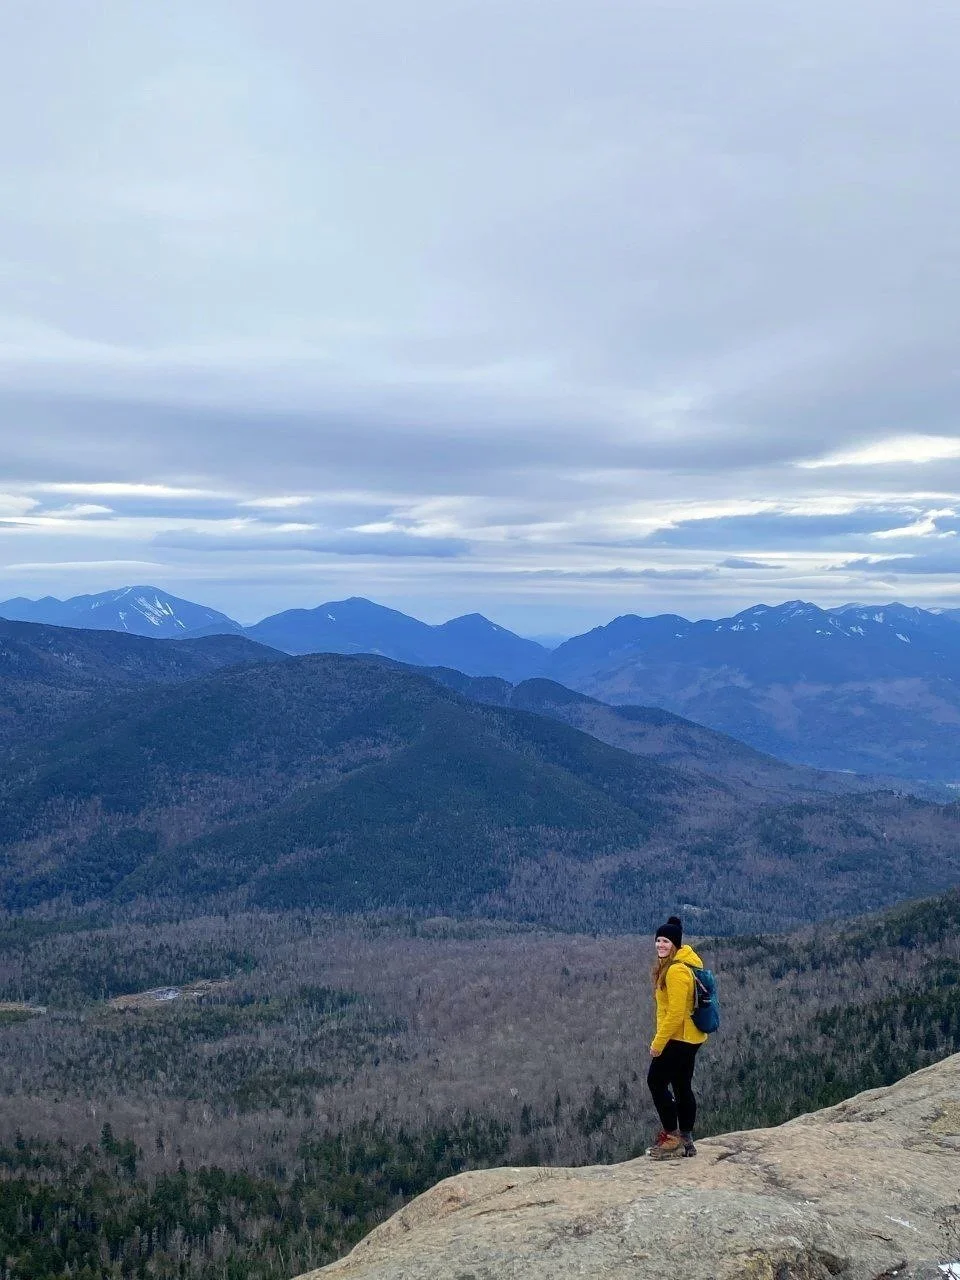
2. Mt. Jo

Third trek up this mountain gave way to a new view!
Distance: 1.94 mi
Elevation Gain: 761 ft
Location: North Elba, NY
Technically this was my third time hiking up this mountain. Every time I hit the trail, my hope to find the iconic view is strong. This hope slowly withers away as I simply couldn’t find the lookout point.
After two failed attempts, I wasn’t leaving the summit this time around without seeing the heart-shaped lake in its entirety. Aptly named, Heart Lake. You’re in luck, because my determined self found it this time so you won’t have to hike up multiple times (unless you choose to!).
Mt. Jo is an extremely popular mountain because of the trails, location, and views. When you arrive at the ADK Mountain Club Loj, you’ll pay $15 as a non-member for a full day or $7 for a half day. Depending on the weekend, you may get lucky with an afternoon. If it’s peak foliage season on a late September or early October weekend, you may way to
After parking, you embark on a short traverse before finding two roads diverged in the woods. You can take the short way, or the long way. I’ve never taken the long way, but be prepared for some stairclimbing if you take the short route.
The trail is a swift one mile up, and I took the same route back. Stay cautious heading down on the rocks, especially if you’re taking this on in the fall where often times rocks are wet due to those rainy autumn forecasts.

Tip: The view at the summit isn’t the best view. The best view is easy to miss. When you’re near the ladders, there’s a trail a few steps away that is sure to give you a reason to love Mt. Jo.
My route is on the left.
3. Mt. Van Hoevenberg

Distance: 4.7 mi
Elevation Gain: 1,047 ft
Location: Lake Placid, NY
Mt. Van Hoevenberg has two trails to the summit: a newly constructed one, and the old one. I was already familiar with the ADK Loj area, so I chose the older path. The parking here is extremely limited – maybe less than ten cars can fit. I went at a less popular time of day, so it worked in my favor.
The distance of this hike is longer than Mt. Jo, but the first mile is a simple walk in the woods. It’s quite lovely! After climbing 1,000 feet in roughly a mile, expansive views of the valley open up. This hike is a true gem!
It’s definitely one I’d love to revisit in winter when the peaks are snow-capped. The trails are an out-and-back, unless you have another car to park on the ski area side where the new trail begins.
Here’s my route:

The trail to Mt. Van Hoevenberg.
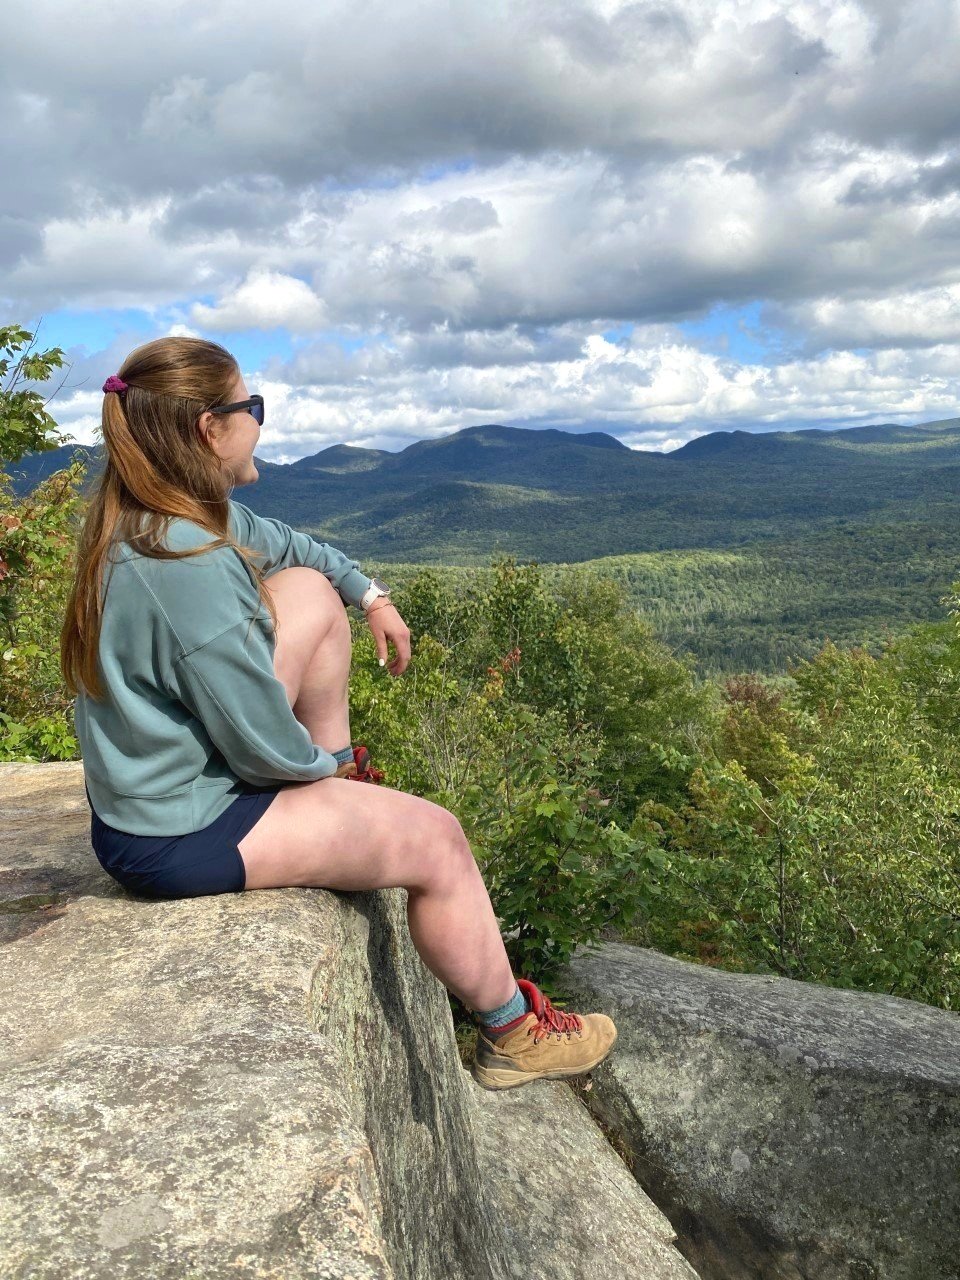
4. Big Crow Mountain

A solo summit on a moody evening.
Distance: 1.34 mi
Elevation Gain: 610 ft
Location: Keene, NY
When I entered Keene for this hike, the clouds decided to join me. I knew it was a short distance, so I thought I’d knock it out and if I got a view, I’d be two for two. The parking lot for Big Crow is also the lot for one of the routes up Hurricane. An AWD vehicle would be best as the last mile felt a little sketchy in my RAV4, but still doable. This road isn’t maintained in the winter months, so get this hike in in the summer or fall from this trailhead.
A speedy, consistent climb of 600 feet in under three-quarters of a mile again opened to wide-scaping views of these mountains that are slowly feeling like home to me. I set up my tripod as the clouds rolled in, took a few pictures at the top, and headed back down.
I made a mental note to come back to hike Hurricane from this parking lot since I was now familiar with the drive up.
Here’s my route:
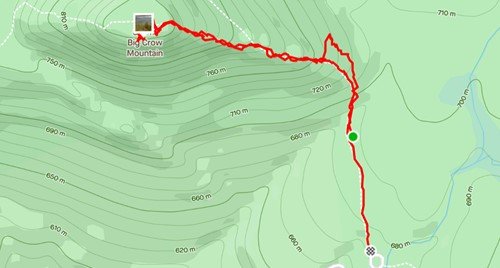
Route map above to Big Crow Mountain.
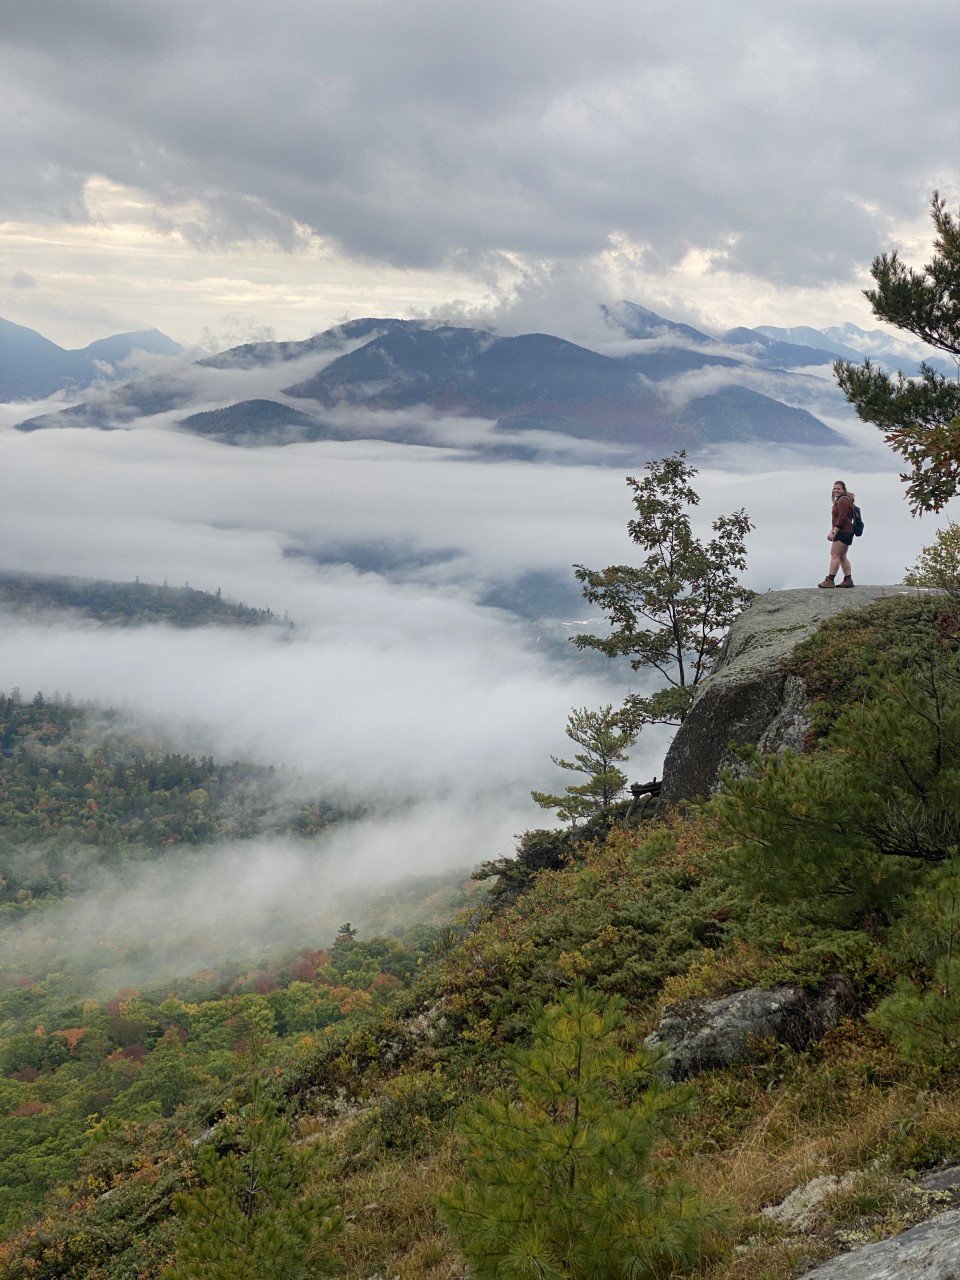
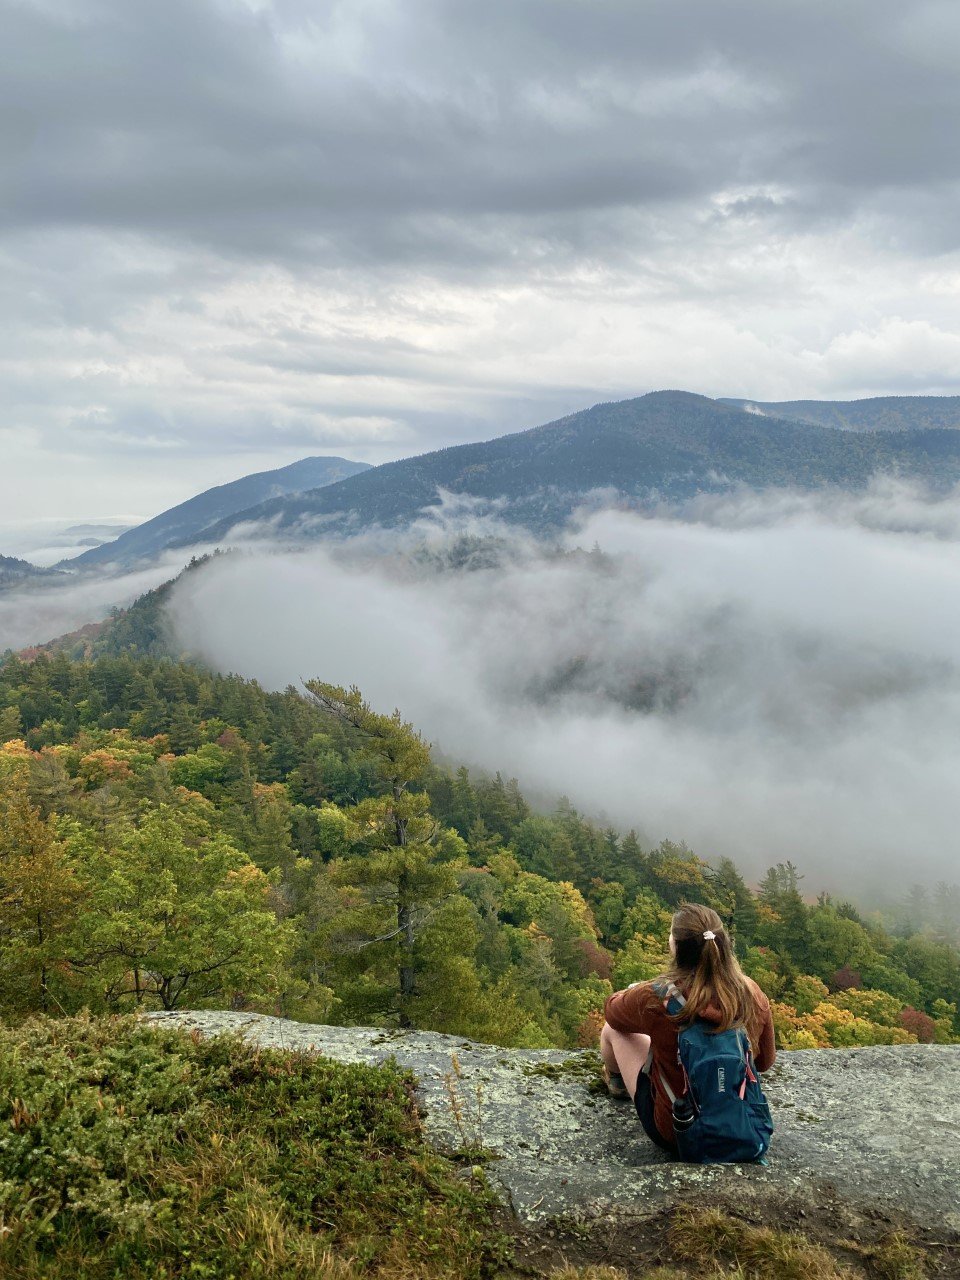
5. Baxter Mountain
Distance: 3 mi
Elevation Gain: 869 ft
Location: Keene, NY
After the stormy wonder of Big Crow, I knew I had to try out Baxter on this trip up to Lake Placid despite the rainy forecast. I woke up to the steady pitter-patter of raindrops. Contemplating just driving back home, I thought, why not just get out for a three miler?
I made my way over to Keene and parked along the road for this trailhead. The sprinkles fell from the sky and with each step, my disappointment of seeing a view grew. On the way to the summit, there are great viewpoints (arguably better than the summit!). For the fifth time on my Lake Placid 9er journey, I lucked out with the views.

Tip: Always go for it when there’s light rain and you don’t think you’ll get a view. You may just end up with this.
My route is on the right. The photos are where the viewpoints are.
If you’re tackling the challenge, head to the summit to say hello, then stop for the views on the way back.
6. Bear Den Mountain
Distance: 3.82 mi
Elevation Gain: 1,542 ft
Location: Wilmington, NY
The day I embarked up Bear Den was a toasty one. A crisp marshmallow in the campfire on a summer night. Quite the opposite of my previous visit to the mountains with the rainy hike up Baxter. Park at the Whiteface Mountain Ski Center and you’re right at the trailhead. The first mile of this hike doubles as a mountain biking route, so be aware if you have a furry friend with you. The trail’s switchbacks keep things interesting as you make your way up. Just tell yourself you’re almost there, trust me, it helps.
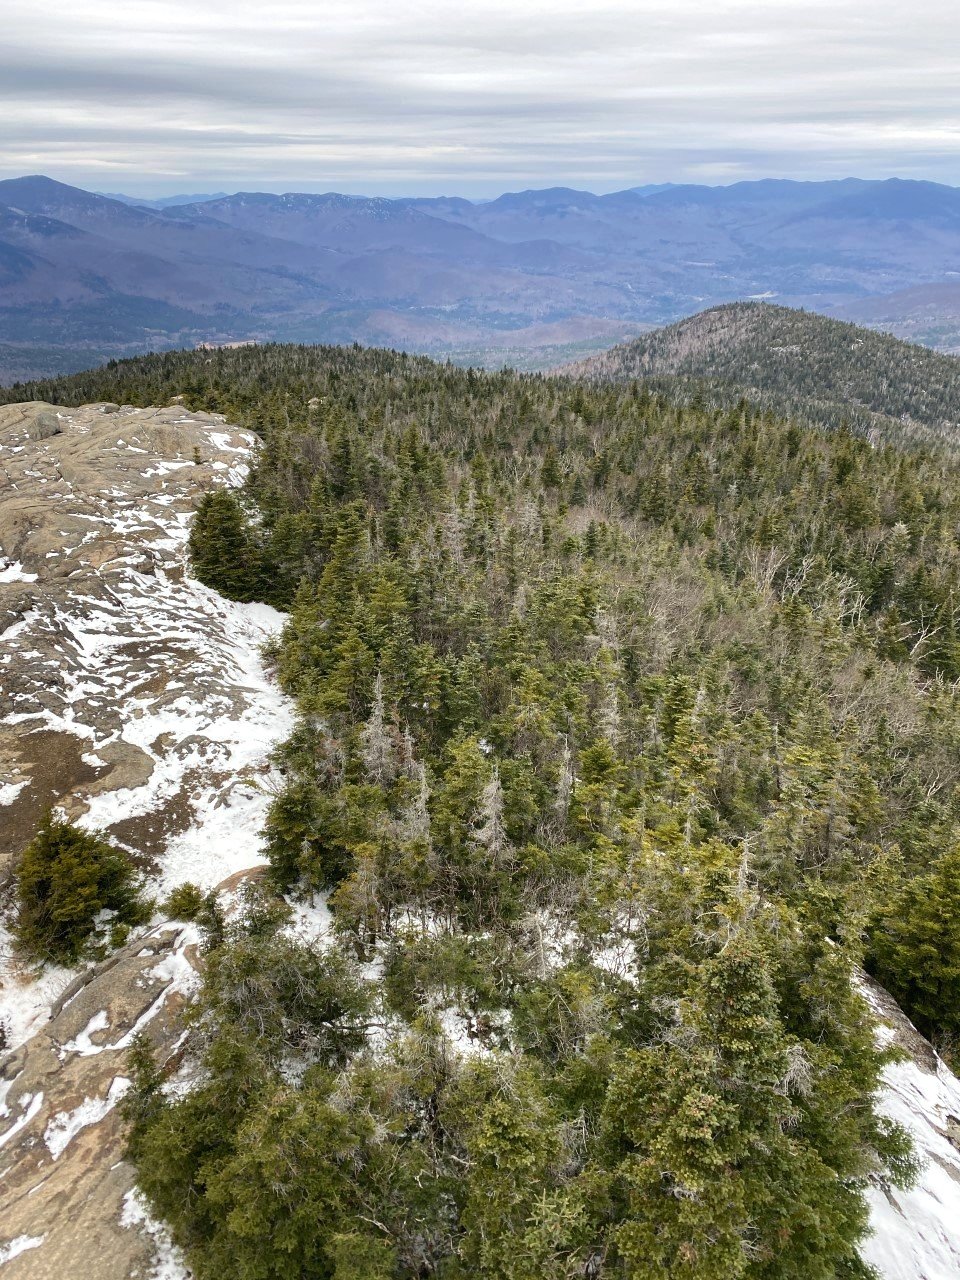
It doesn’t help, but every step is a step closer to the summit! I was in absolute awe atop the summit. The foliage, in unison with the summery weather, lit Whiteface Mountain on fire. It was incredible to gaze my eyes upon.
After awhile of solitude on the summit, I realized the group I passed quite some time ago never summited. As my mind pondered, my eyes wandered. A couple odd colors caught my eye. Those little dots were the other hikers! They had made their way to a rocky surface across the way.
I was curious where they had turned for that added bit of solitude (plus a different angle!). When I headed down, I realized this was another case of the Mt. Jo hidden treasure.

The view of Bear Den’s summit.
As you approach the Bear Den summit, you turn left. Instead, turn right at this sign. There is a very well-trodden trail that leads to that open-rock summit with these views of Bear Den’s summit.

Here’s my route, including the totally-worth-it right turn detour.
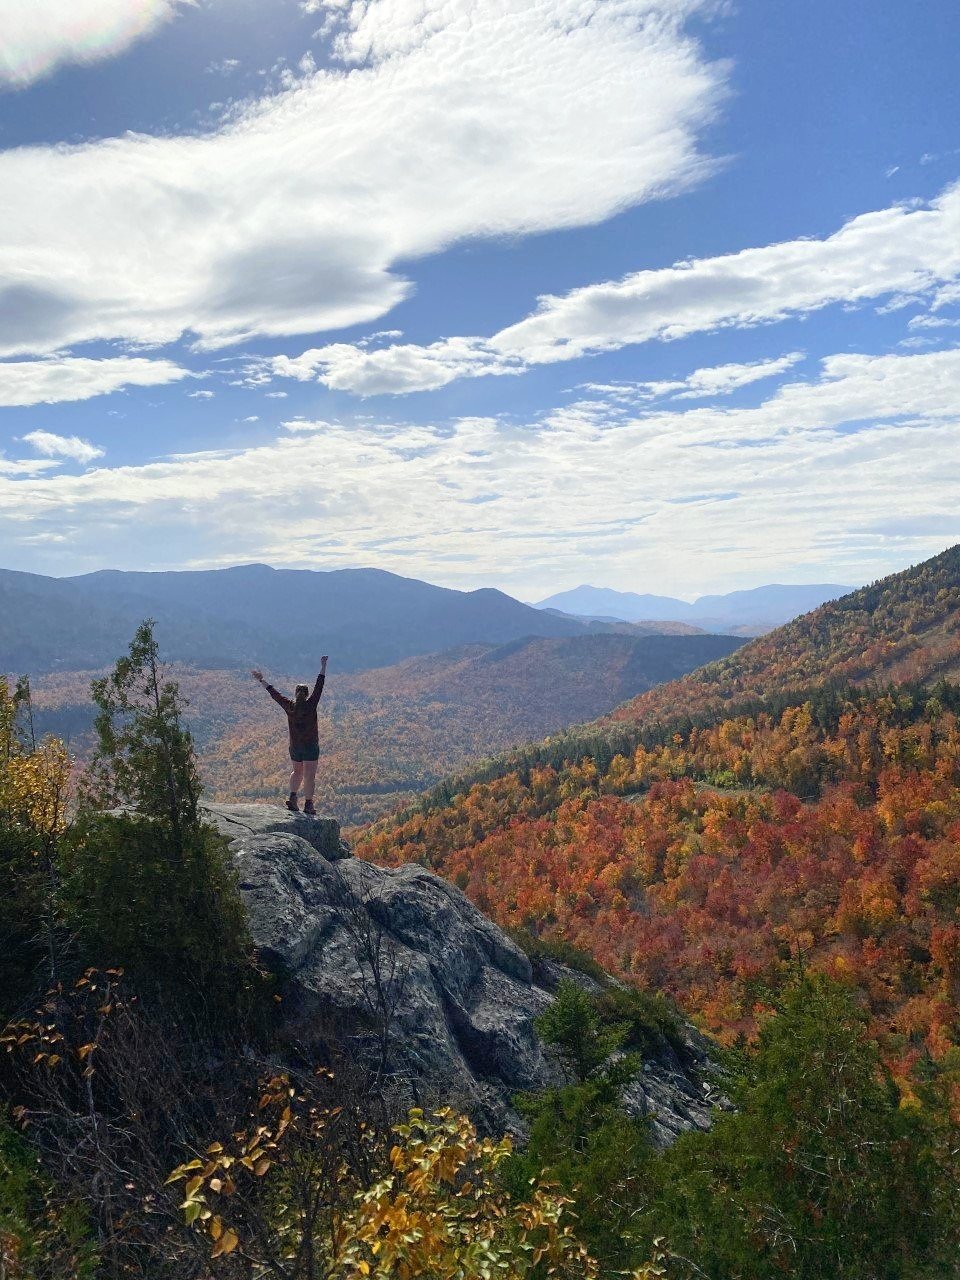
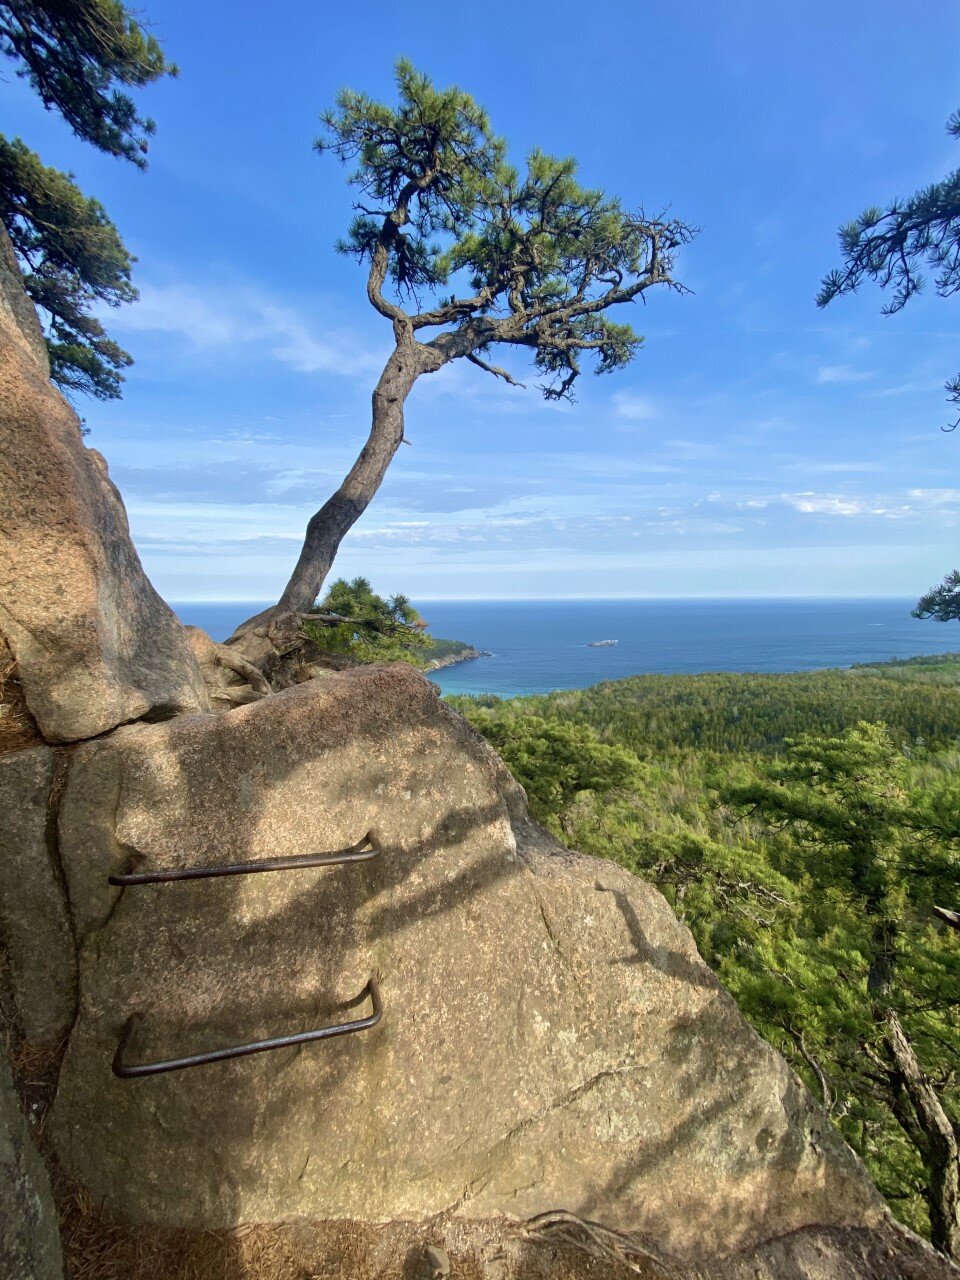
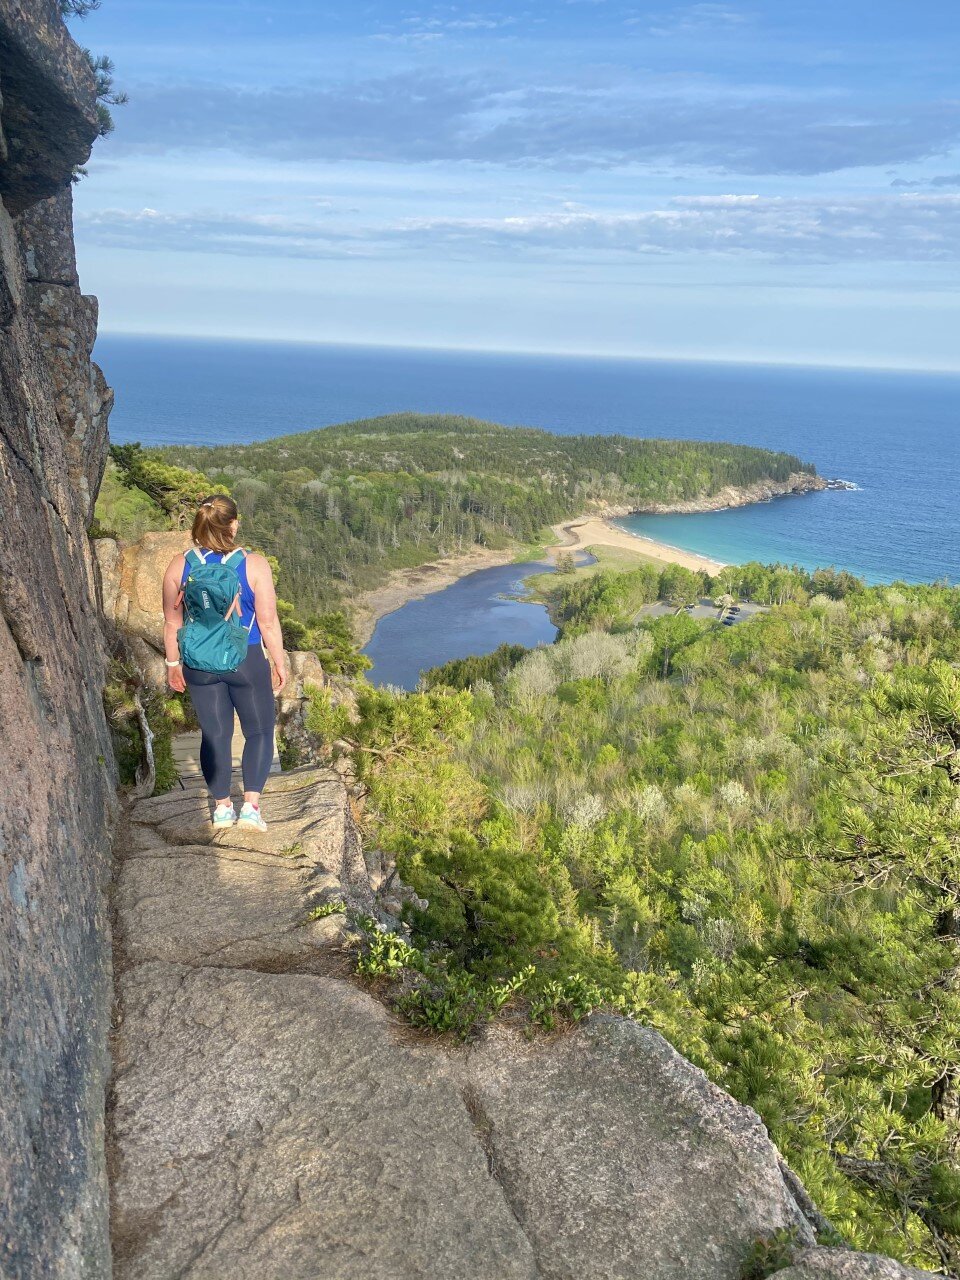
7. Pitchoff Mountain

The famous Balanced Rocks!
Distance: 4.15 mi
Elevation Gain: 1,744 ft
Location: Lake Placid, NY
I was saving Pitchoff for a perfect day. The summit itself is hardly impressive, but a steady climb leads you there with views to the right of Cascade and Porter. It’s neat to see where you’ve hiked before.
After the summit, I returned back to finally see Balanced Rocks. It doesn’t look like much on the trail, but it’s another iconic view like Heart Lake from Mt. Jo. I’ve seen it from the road more times than I can count. Two rocks sit on a very open summit looking as if you could just flick them and they’d fall off. Almost like the Glen Boulder trail in the White Mountains.

Truly the perfect sunset hike in the Adirondacks.
You’ll have incredible water views from here, as well as a great shot of the Olympic jumping complex. It’s a phenomenal sunset spot if you decide to take this mountain on later in the day. The trail is easy to follow with a headlamp at night afterwards.

Here’s my route to both Pitchoff Mountain and Balanced Rocks.

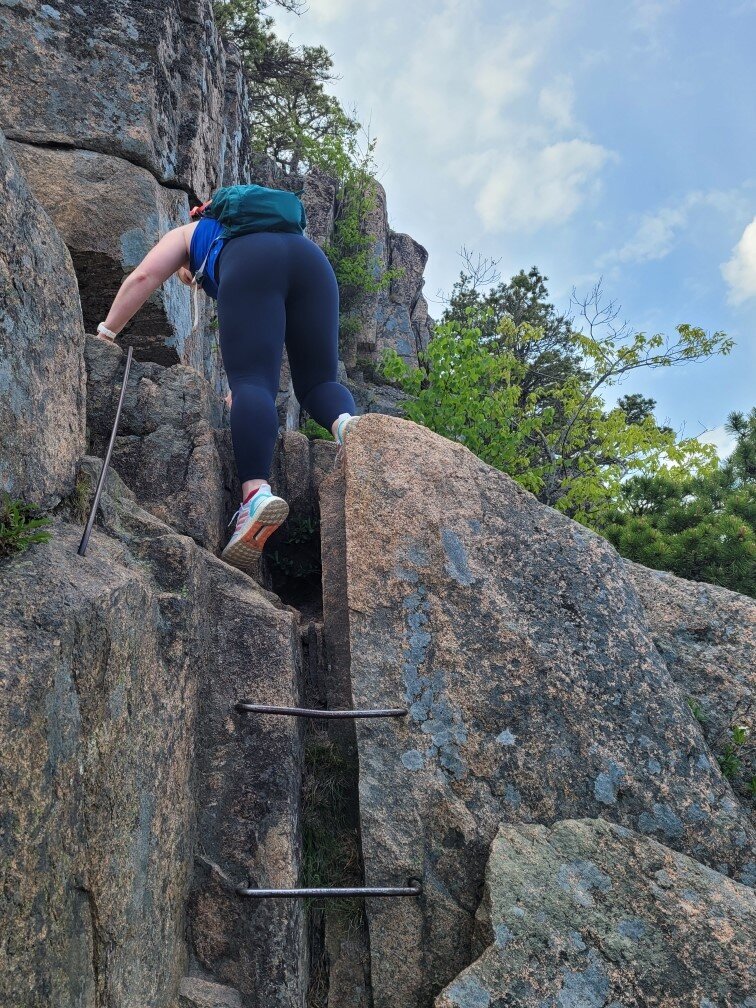
8. Catamount Mountain
Distance: 4 mi
Elevation Gain: 1,624 ft
Location: Wilmington, NY
Oh, Catamount. When researching the Lake Placid 9, this hike was advertised as fun with a side of scary. I took this trail on thinking I’d get Catamount done by the early afternoon with enough time to also trek up Hurricane in the same day. This hike didn’t go as planned at all!
The elevation gain was serious and the hike feels very isolated on a weekday. The trail itself is well-marked and easy to follow. The “fun” comes into play when you’re closer to the summit and features all sorts of rocks to climb. Everyone’s favorite is this little sliver to climb up and through in order to continue the hike.
If I was alone, I think it would’ve felt more enjoyable, but when I hike with my dog, she occupies my mind. I worry about her moves and how she’s going to climb up. The drop is a little steep. After this point, the rest of the trail is smooth sailing.
I would advise against hiking this one on a rainy day, which the summit for me ended up being a little rainy. After eight summits out of nine, I was bound to have a clouded summit. It was fitting it was the toughest one for me! I was able to sneak a peek of what some of the summit views might’ve looked like on my descent.

My route to Catamount Mountain.
9. Hurricane Mountain
Incredible views all around atop Hurricane.
Distance: 5.47 mi
Elevation Gain: 1,581 ft
Location: Keene, NY
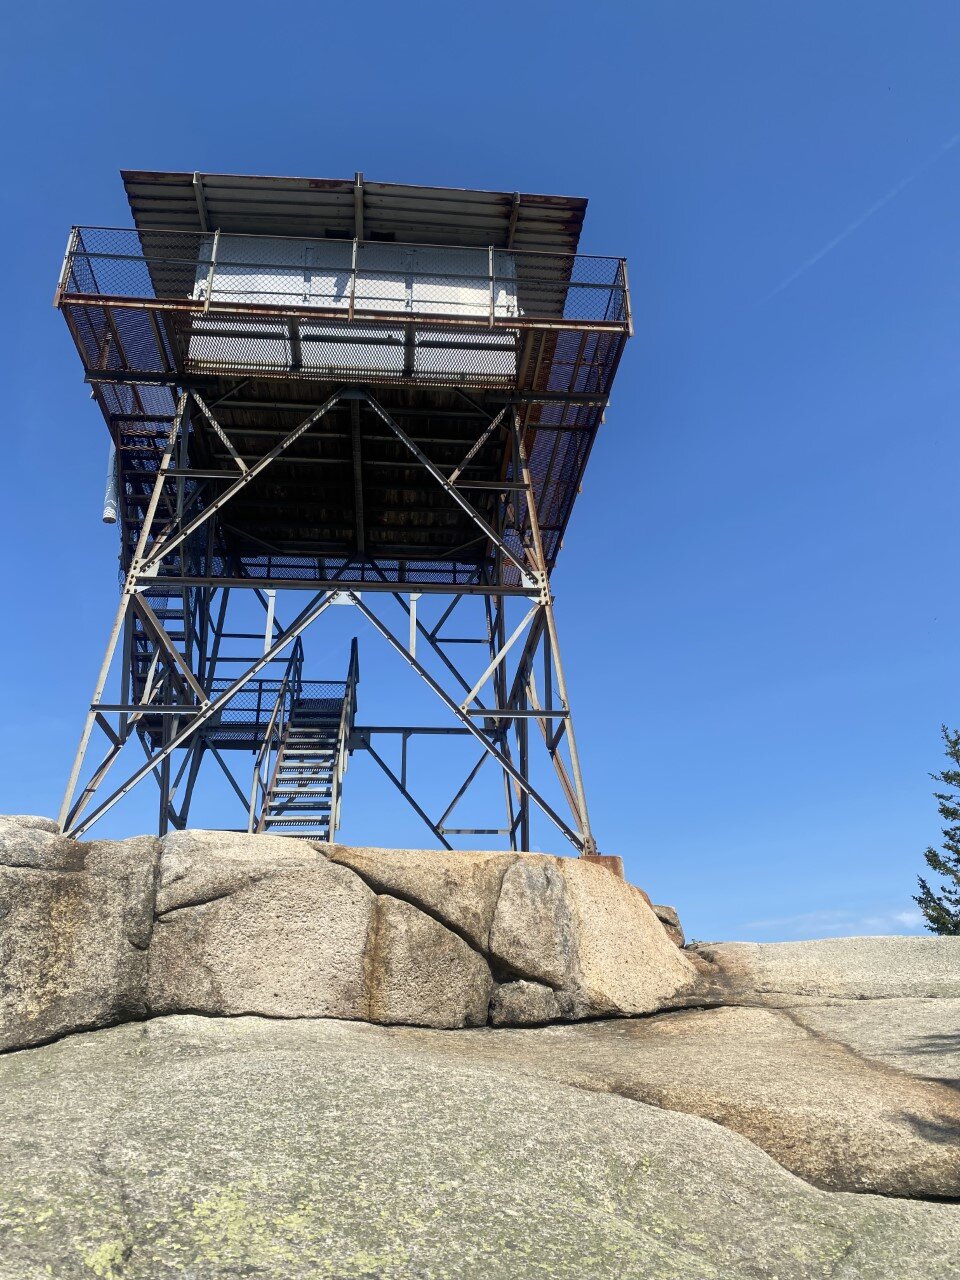
The final peak for me was Hurricane Mountain, and as I told myself a month earlier, I was going to park where I did for Big Crow. This trailhead is a popular summer one as it’s the shortest ascent to the famous Hurricane Mountain fire tower.
I made it just in time before winter entered the mountains and the road would have to be maintained (which it isn’t). At the end of November, I lucked out with a beautiful day to myself on this summit. I summitted swiftly, to my surprise. This hike turned out to be one of my favorites. Catamount for me came in as one with the most elevation gain, but Hurricane is the longest distance-wise. Though after hiking the NH 48 and a few of the ADK 46, a 5.5 mile hike feels light in my mind.
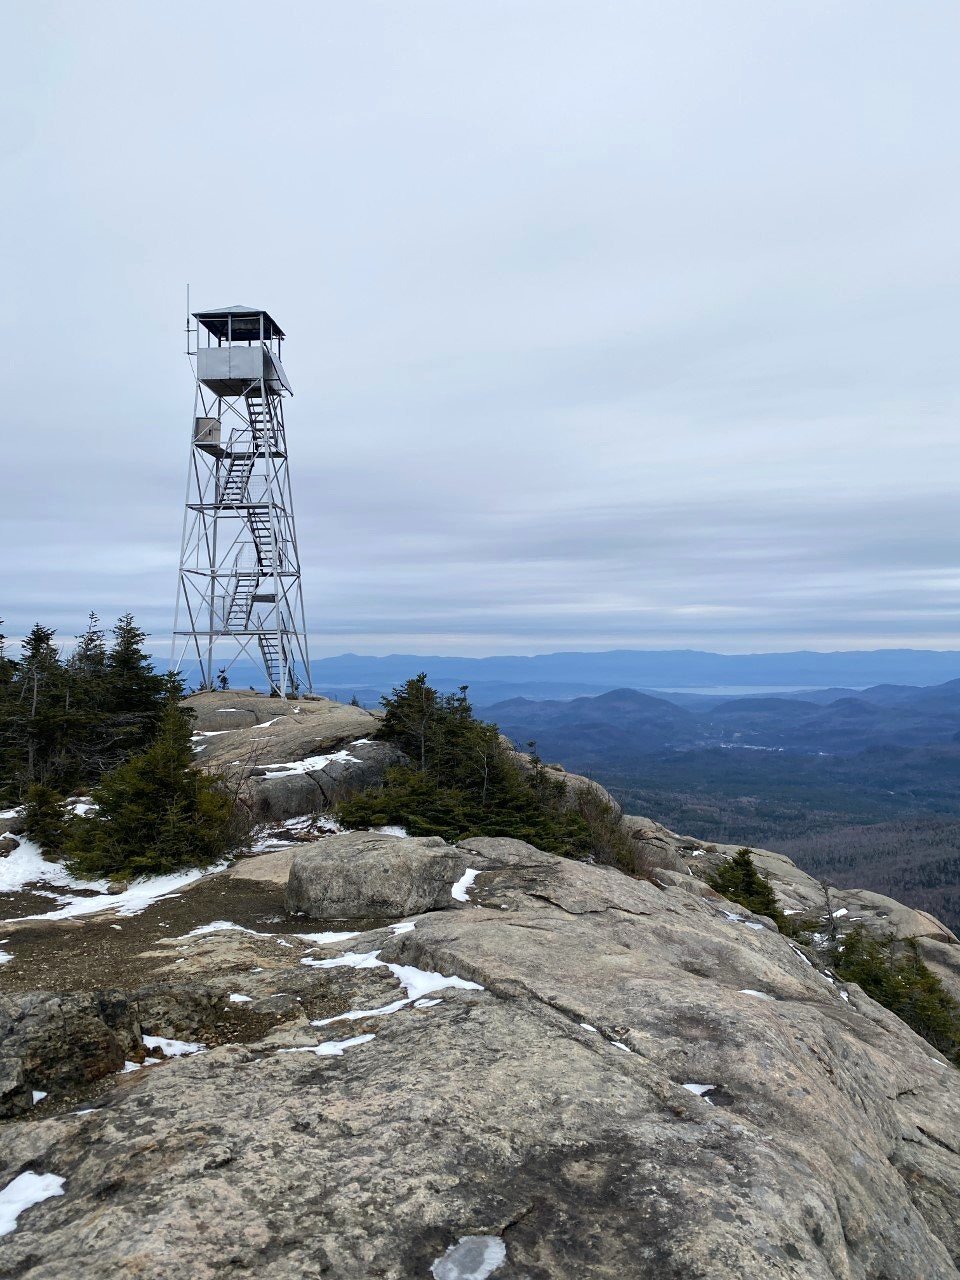
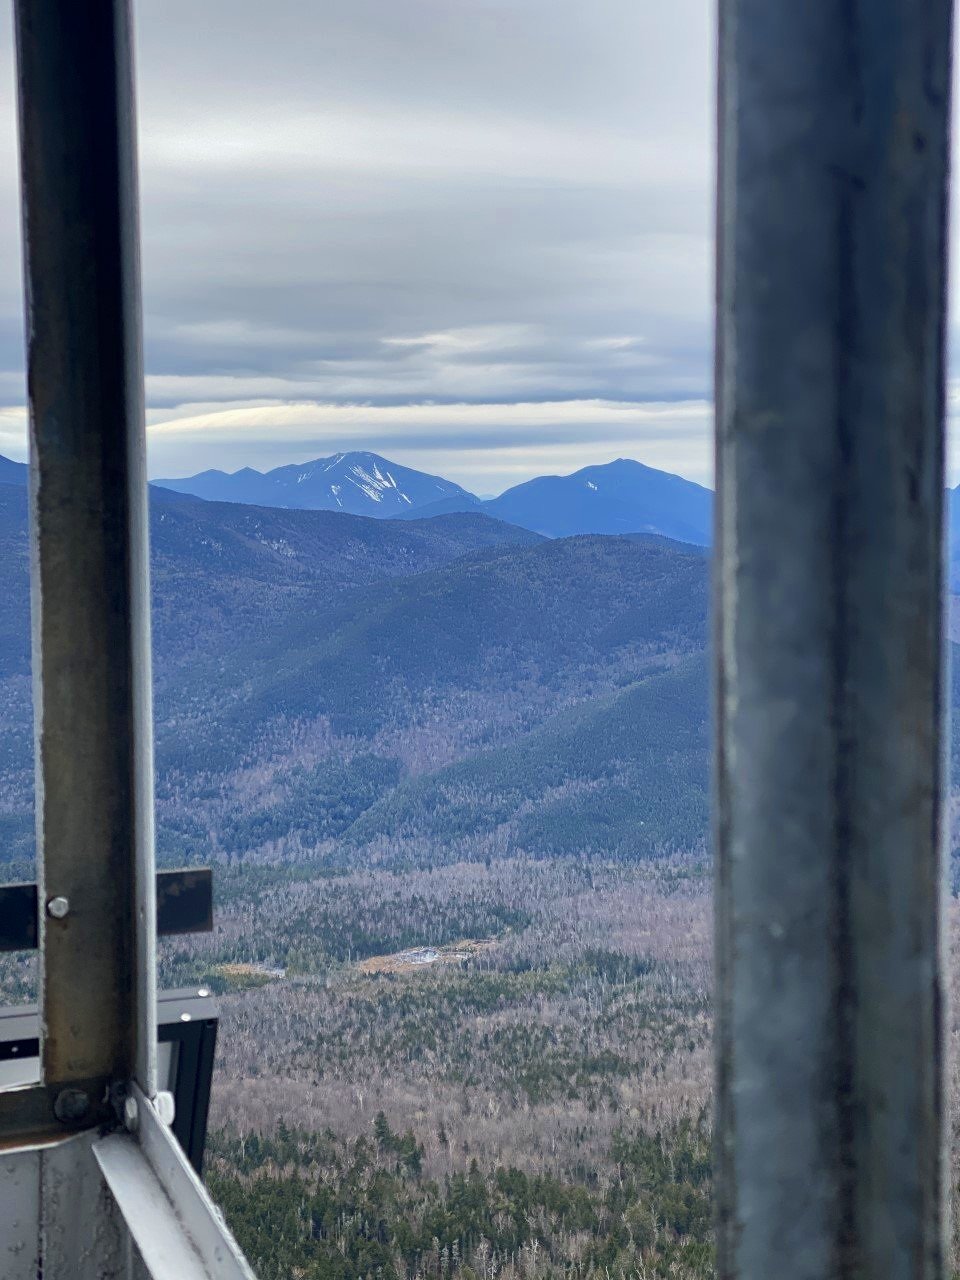
Maybe it was the solitude, or the fire tower, or even the fact that it was shoulder season, so all the foliage chasers sat this one out that day. Whatever it was, it sure felt good to end in this moment.

The hike up Hurricane Mountain offers incredible views from the summit, as well as from the fire tower.
My very straightforward route is on the left.
Are you ready for a winter challenge? Take on the Lake Placid 9 in the winter months to earn a special patch for the added difficulty of navigating winter.
Would you hike these nine mountains? Let me know!

Tips for Winter Hiking With Your Pup
Once I got a dog, I knew with the right measures, she’d be able to enjoy the outdoors too. Here is what works for us when we hit the trail:

The first thing people tell you when you move to New England is that winter is brutal. Obviously I didn’t grow up here, so I didn’t have the experience of shoveling for hours in the morning or having to walk to school in freezing temperatures. That might be why winter is such a beauty to me.
As someone who grew up without a single snowflake (except that one time Dallas turned into a winter wonderland), the winter season is a novelty to me each year. I keep wondering when I’ll turn bitter toward the season, but it hasn’t happened yet. Here’s why I think it hasn’t: I discovered winter activities.
Hiking is one of my favorite things to do, so I had to try it out in winter. Once I got a dog, I knew with the right measures, she’d be able to enjoy the outdoors too. Here is what works for us when we hit the trail:
Tip 1: Know your dog’s capabilities.
You know your pet best and know what they can handle. I never underestimate a dog’s ability given that most love being in the wild (and I’ve seen a Dachshund hike the same mountains my Aussie does), but obviously there are limits based on breed and size.
From a young age, my pup was conditioned to the trails. At three and four months she was trained on short, local hikes with little to no elevation gain. Slowly, she worked her way up. She can crush any mountain and elevation gain. It didn’t come as a surprise when she started to take on 4,000 footers in New Hampshire and New York. But we definitely didn’t venture off on one before we knew she was ready.
If you don’t have the White Mountains in your backyard, there are still ways for you to mimic an intense hike without the massive peaks. Here’s how:
Find a long trail, ideally with decent elevation gain. You can add difficulty in three ways: (1) do the trail twice (or more), (2) add a backpack to your dog’s back with water bottles inside, and (3) hike in various weather conditions or seasons.

Tip 2: Pick an appropriate hike.
Whether you’re starting off hiking with your dog, or you and your dog are more seasoned out there, the hike you pick is the most important decision you’ll make that day. If you aren’t capable of carrying your dog, or know that with their fur (or lack there of), they’ll be cold, pick a shorter hike where you can stay in control.
Of course you can never be too prepared for the mountains, but you can always aim to expect the unexpected.

Tip 3: Pack these necessities.
Even though dogs are wild animals and thrive out on the trail smelling all the smells, there are still steps to take to ensure your pup’s well-being is taken care of. I pack the following items for my dog and consider them necessities:
Dog first aid kit
You never know what your pup may step on or get into, so it’s best to have a first aid kit handy in case of emergencies, which are more common in the winter.
Backpack for her to carry
I have this backpack for Koah and it’s adjustable to her body. She’s had it from a young age and we conditioned her with an empty backpack, then slowly added weight evenly for her. It’s very easy to put on her and has a piece to attach a leash!
This comes particularly in handy for long, winter hikes when energy is expended and dogs need water and food. The perk of winter hiking is that there is usually a plethora of snow for dogs to eat to keep their bodies hydrated.
Collapsible food and water bowls
These foldable bowls are an absolute must. They are easy to wash and very lightweight. Tip: If your pup is picky, try to help the adjustment to these bowls by using them at home too. They are also great for travel!
Two towels
I don’t know about your dog, but it feels like mine actively seeks every opportunity on a hike to bring back as much dirt and mud as possible into my newly vacuumed car. If that sounds familiar, bring one towel for the post-hike mess. I love that my dog enjoys herself on a hike, but I try to clean
Dog food and treats
My dog rarely eats during a hike, so even though I pack food for her, she usually opts out. I bring treats to maintain training on the trail and provide her fuel in a more efficient way since she doesn’t eat on a hike otherwise.
Waste bags
Part of leaving no trace in the woods is picking up your pup’s waste. Always keep an extra bag or two on you (or in your pup’s pack).
Leash
As much as I love letting Koah run free in the woods, most trails require dogs to be leashed. Keep this in mind when passing other hikers on the trail.
Personalized collar
Like I said before, expect the unexpected. You never know if your dog may get lost, or get loose from your leash. I purchased this collar and personalized it with my dog’s name and my phone number in case she ever gets away from me. Again, it has never happened to me, but it’s best to plan ahead.

Are you ready to take on the trails with your pup this winter? If you don’t have a furry friend, but still want to tackle the mountains in winter, explore my recommendations for gear below!

4 Tips for Taking the Best Foliage Photos in New England
In the last five autumns I’ve spent chasing the foliage in New England and upstate New York, I’ve come up with a handful of tips through…
When I moved to New England, I didn’t know what I was getting myself into with seasons. In Texas, we’re either in summer or a chillier version of summer. What I wasn’t ready for is just how stunning fall can be. Contrastly, it can also be very difficult to decipher how to photograph such beautiful scenes.
In the last five autumns I’ve spent chasing the foliage in New England and upstate New York, I’ve come up with a handful of tips through long drives, failed hikes, and hidden gems of how to find the best photos of foliage. My pictures below are from the Adirondacks, which isn’t technically New England as it’s in New York, but given the proximity to the other mountains I frequent, the foliage timing and tips are very similar.
Here are my tips for how to take the best fall foliage photos in the Northeast:
1. If the weather is gloomy, it’s still worth making the trip.

The rain stopped when I reached the summit of Baxter Mountain and the clouds were sweeping through the layers and layers of mountains.
I used to only hike in what I considered ideal weather conditions. It had to be a sunny or clear sky, or absolutely no chance of rain. You wouldn’t catch me hiking in the rain. Wet socks, potentially wet camera gear – not my idea of a good time.
Last weekend, I was eager to get back to the Adirondacks. The only setback was a 100% chance of showers from when I arrived late Friday night to when I was leaving Sunday afternoon. I could’ve canceled. I could’ve stayed in western Massachusetts and shifted gears.
Instead, north I drove. Rainy weather has a unique way of bringing out foliage. It’s the weather of autumn and I’m embracing it this year, instead of turning away from it. Rain brings moodiness to the mountains with low moving clouds. I’m gravitating more toward this moodiness over bluebird days because you can’t plan for this scenery. It just happens because you went out and took a chance.

A cloudy day when the clouds break to let the sunlight in makes for one of my favorite views.
2. Hike lower elevations.
You don’t need to pick a 16-mile, 2,000 foot elevation gain hike to see the foliage. A drive through Lake Placid will easily give you the fall vibes! I highly recommend finding short hikes in the area you want to explore. Often times, they may not be as popular as most people are chasing a hiking list of the high peaks.
If you’re looking at the White Mountains, find a hike in the Lakes region or a less popular hike like Welch and Dickey. Shorter hikes often have parking more available as hikers head in and out at a faster pace. If you’re looking at the Adirondacks, the Lake Placid 9 (9 peaks around Lake Placid) are definitely worthwhile.

When I say hike low, I mean you don’t need to aim for 4,000 footers. Unless you want to! I decided to chase the foliage this year, and not the high peaks for autumn views.

Aerial views provided by reaching the summit of Baxter Mountain.
Don’t be fooled at these lower elevation hikes. The gain is still sweat-breaking! On some of the Lake Placid 9 hikes, you’re gaining 700-800 feet in a mile. Impressive for a 2-3 mile roundtrip hike.

Incredible views after a short hike up Mt. Van Hoevenberg.
3. Pull over when you see a worthwhile view.
There are so many incredible spots around the mountains to pull over safely and snap a photo. Think: rivers, trees, and small towns. Two weekends ago, as I was driving from Lake Placid to Wilmington, I saw a fishing spot that looked scenic.

A beautiful view of Whiteface Mountain from a parking spot at a fishing spot.
I pulled over next to a few fishermen, headed down the bank, and snapped a few shots of falls with foliage galore.

Lake Placid added a new lookout point along Mirror Lake. I stopped when I saw this view while driving by.
4. Don’t expect the perfect shot.
Most photographers edit their photos with fancy programs, so don’t go in thinking you’ll have an incredible aerial view of a mountain lake from a summit. Professional photographers are very good at their jobs – and editing is part of that!
The weather during fall is also very unpredictable. Even if the forecast calls for clouds, you may end up with constant downpour. If it calls for rain, you might get sunburnt because the sun will come out. You never know what you’re going to get – so get out there and be prepared!
Autumn is the perfect season for those moody mountain pictures. In these last couple trips, I’m more and more welcoming of clouds and rainy weather!

A rainy day led to an opening of the skies at the summit of Big Crow mountain.
Last weekend, I planned to call it quits early because of the nonstop rain. Instead, I tied my laces and headed up one of the Lake Placid 9 in Keene, New York. The rain had miraculously ceased and from the skies the clouds parted. I was enamored with foliage views for miles. And mountains immersed in the clouds. Had I just headed home early, I would’ve missed this view.
It wasn’t planned. It wasn’t the view I had seen when researching this hike. To me, it’s the perfect shot to remember the awesome feeling of a new experience hiking solo in new places.

Do you go leaf peeping? What tips would you offer someone trying to see all that foliage has to offer?

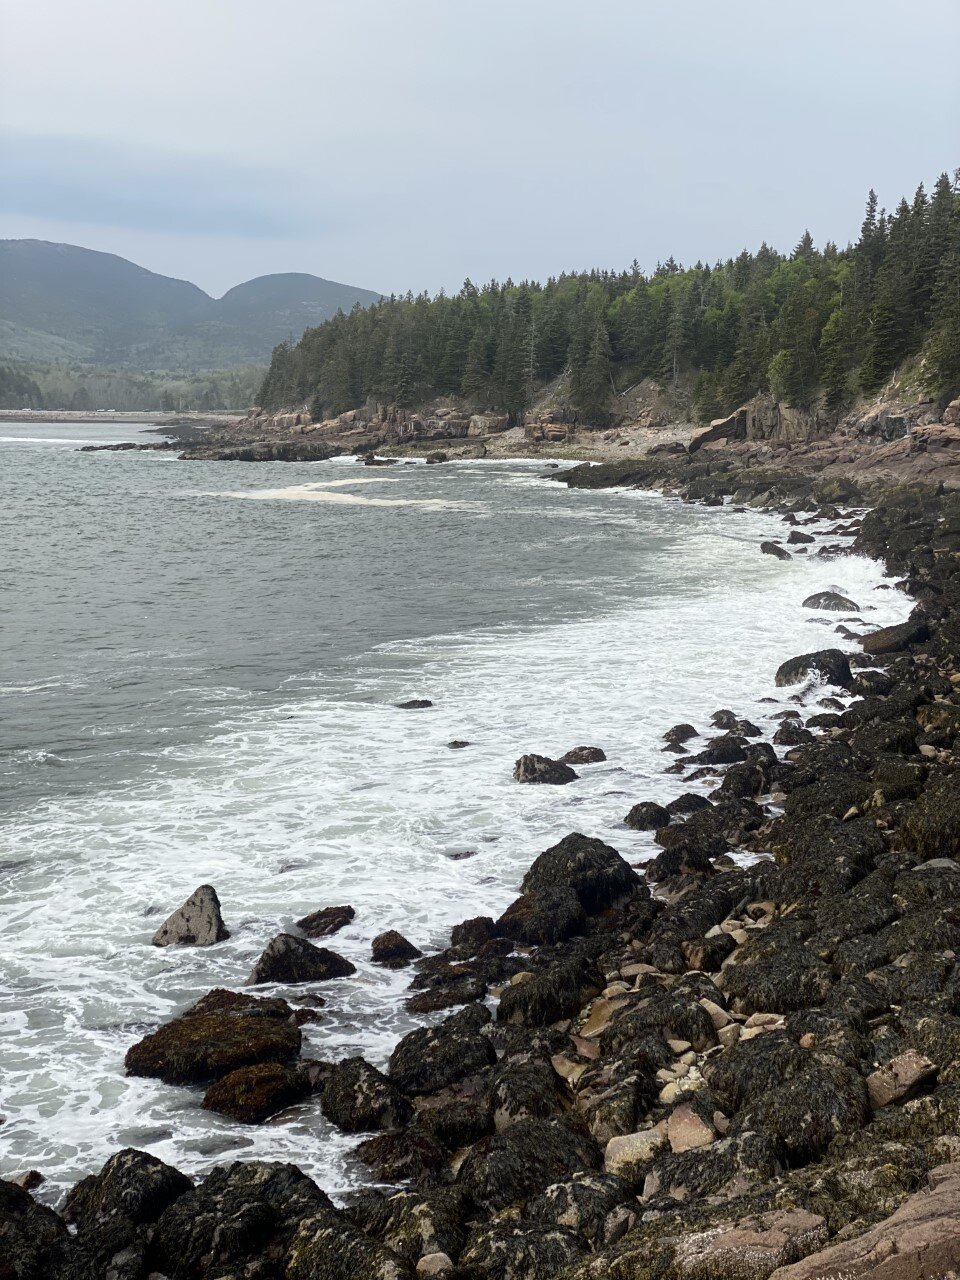
Everything You Need to See in Acadia National Park, Maine
Here’s everything you need to see and do in a weekend in Maine’s (and really, the Northeast’s) gem:
Ah, Acadia National Park — where the mountains meet the ocean. Truly, the best of both worlds.
Five years ago, I told myself I’d never run another half marathon unless it was somewhere scenic. It’s not too much to ask for to need great views when you’re running for more than two hours, right? As a result, when I came across a race in Acadia National Park, I thought to myself, this is exactly the place I would run a long race in. And so, I signed up.

I camped with a few friends on park grounds, spent the night gazing at the stars on rocks with the Atlantic breeze chilling my face. I rose the next day, ran for what felt like forever (turns out it’s a hilly course), and experienced Acadia for a brief moment.
Fast forward five years and it felt like time to revisit this spot. We stayed at a KOA (my go-to stay spot for adventures) minutes from Bar Harbor and the park. My first visit, despite running so many miles through the park, didn’t really result in me truly experiencing the park. This time around, we had an agenda full of Acadia adventures to enjoy.
New Englanders are at a slight disadvantage with the National Park system with Acadia being the only national park in the area, but a major advantage is that it’s within driving distance! For us in Western Mass, this drive is about five hours. Not rough at all considering the Adirondacks are a little over a four hour drive and I consider that a day trip sometimes.
If you find yourself looking for local adventure, or wanting to experience the beauty of coastal Maine, Acadia should move up to the top of your travel list.
Here’s everything you need to see and do in a weekend in Maine’s (and really, the Northeast’s) gem:
Hikes

Beech Mountain
A short, somewhat rocky hike up to a fire tower with stunning views of Echo Lake and nearby peaks. The total hike is a little over a mile. I suggest hiking clockwise for the best views on this loop (along the .4 mi of the trail). You can make it about halfway up the fire tower for a better birds-eye-view. On your way down on the loop, the views get even better. I highly recommend this hike in the afternoon on a sunny day. It’s dog-friendly as well!

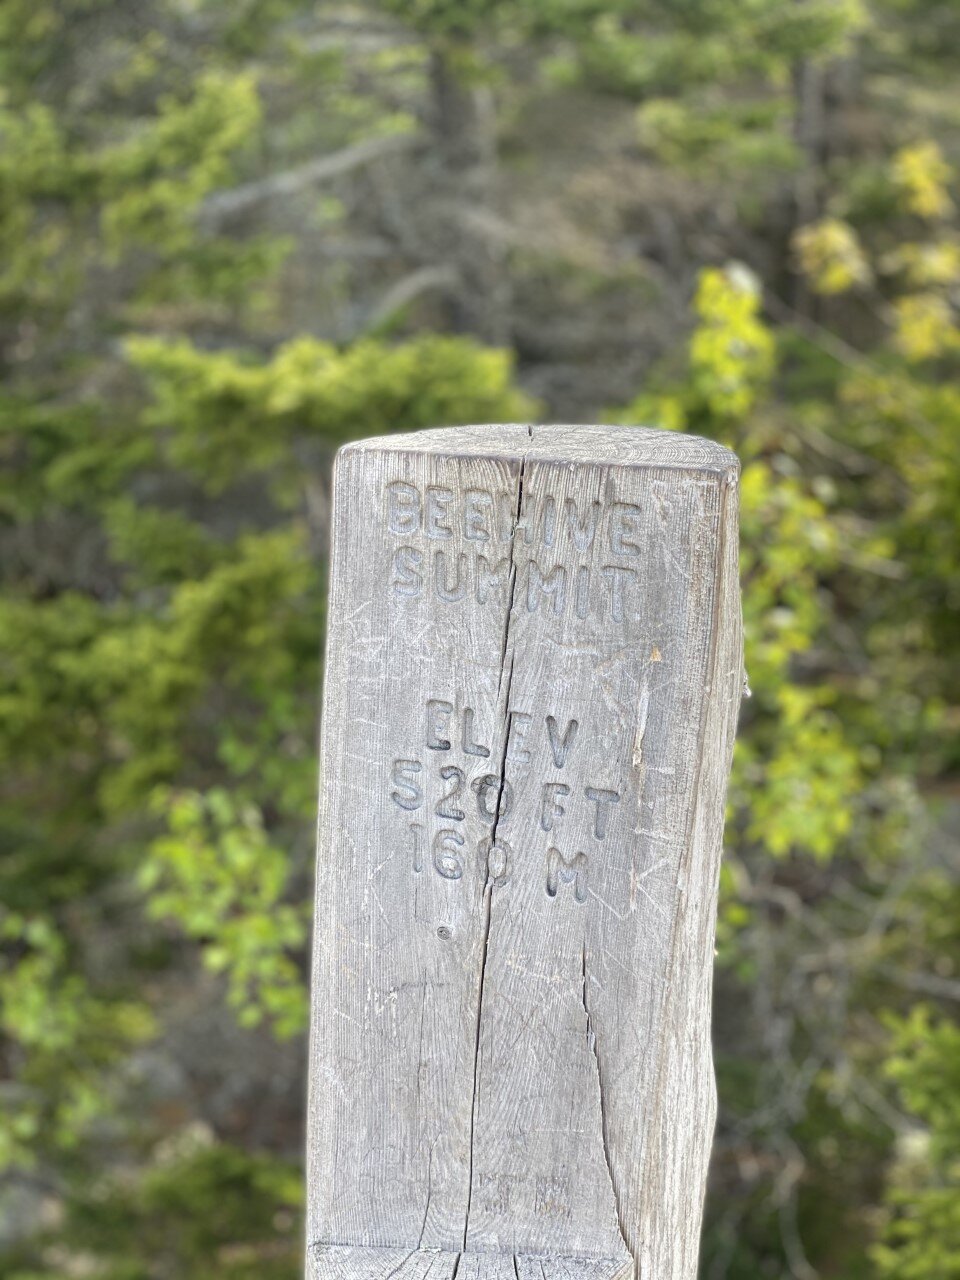
Beehive Mountain
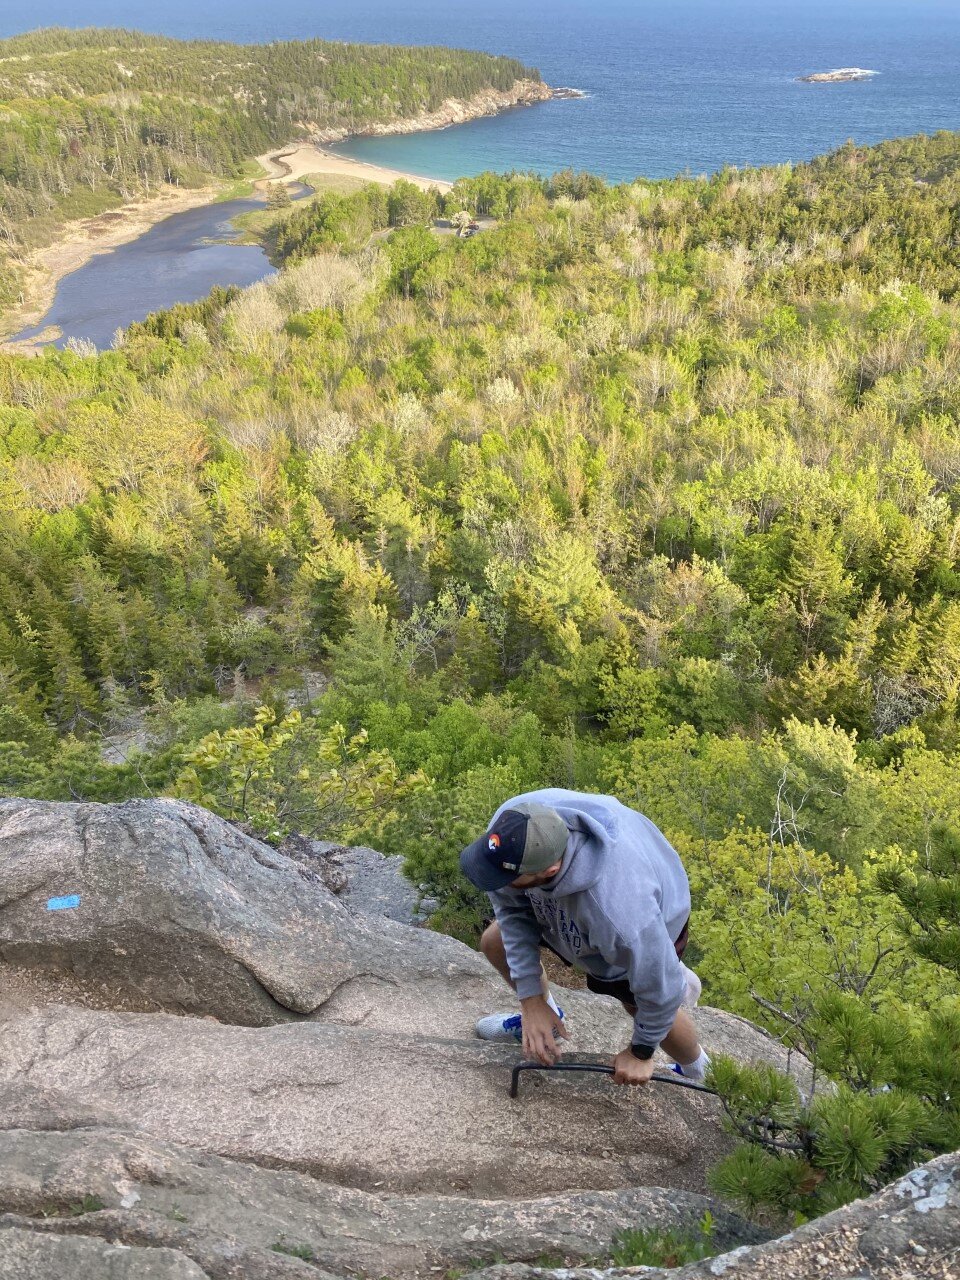
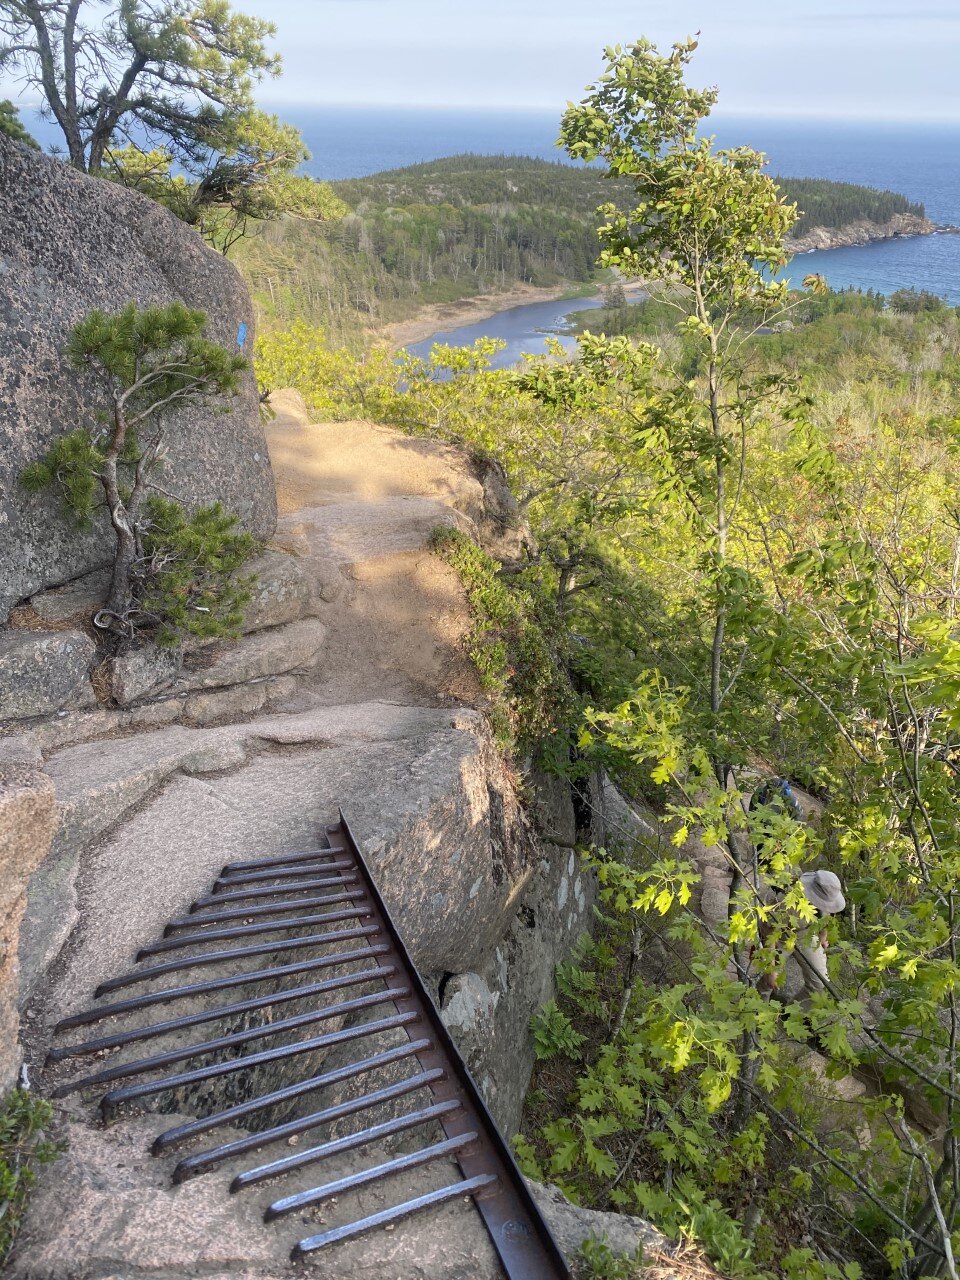
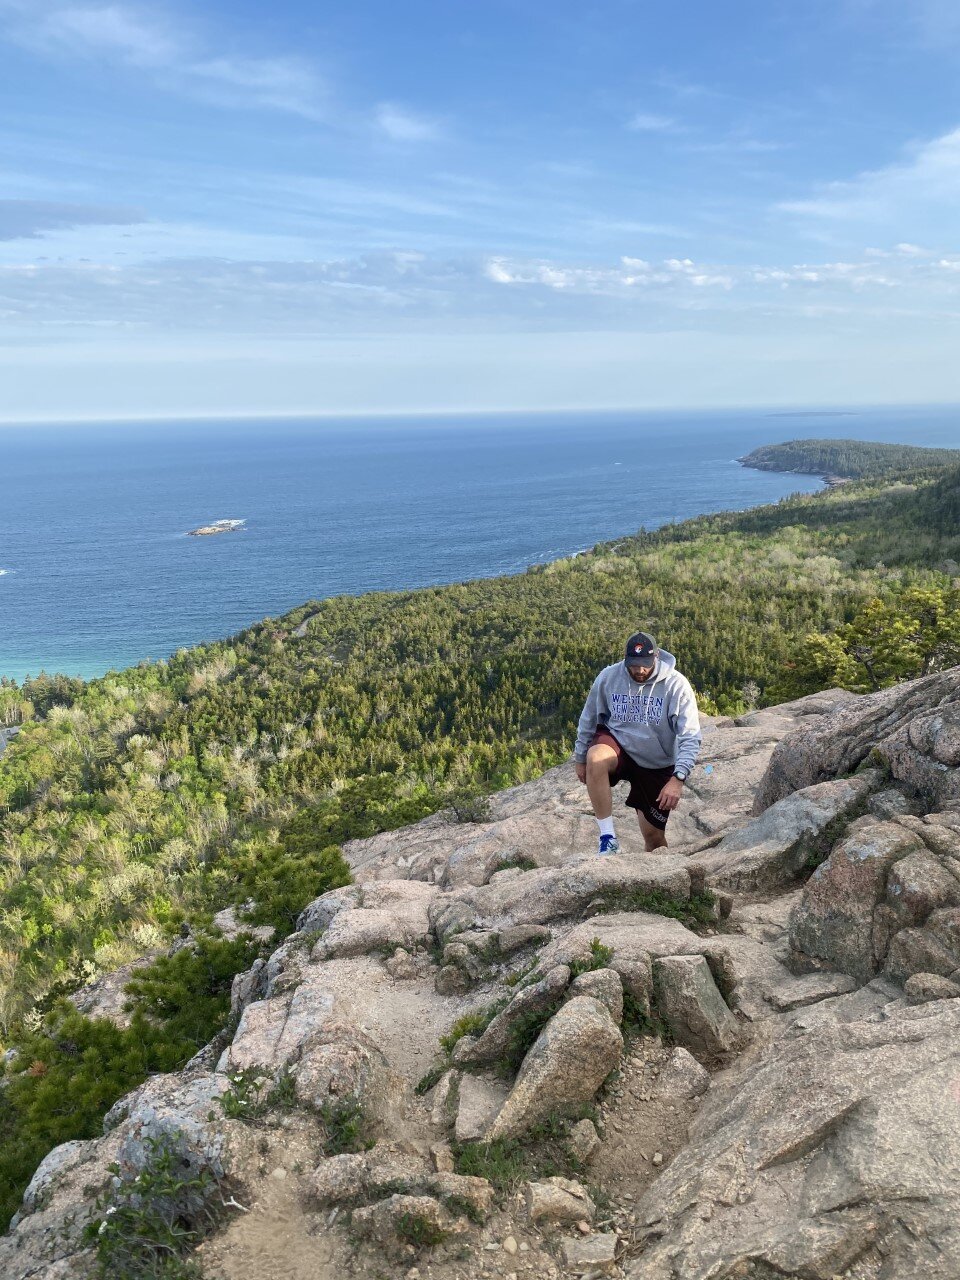
The Beehive trail has been at the top of list. I hike often, so anytime there is a little diversity in the type of terrain or trail, I jump at the opportunity to climb it. Beehive is particularly unique because of its steep incline involving rungs. I soaked it all in. One moment you’re walking along a rocky, dirt path staring up at the summit, and the next you’re climbing up rungs with your hands and gazing at the ocean and sandy beach below. Again, I’m a big fan of intriguing trails.
If you’re afraid of heights, I’d take this trail slow. It’s totally doable for all ages and completely worth it. Once you soak up the beach views, head up to the summit and immerse yourself in Norwegian-like greenery and islands. I felt like I was somewhere far away, a feeling I solemn get in New England, or the U.S. for that matter.
Precipice Trail
This trail sounds epic. More rungs, more incline, more steep drops - it’s my kind of adventure. You climb about 1,000 feet in under a mile. Unfortunately, both of my visits to Acadia have been in May and June, which is prime time for peregrine falcon nesting. This trail is often closed during late spring to summer for this reason. All the more reason for me to visit Acadia again one day in autumn!
Experiences:
View sunset at Bass Harbor Head Lighthouse.
Arrive an hour early to get a scenic spot on the rocks. Parking here is also limited. Bring a rain jacket as the waves enjoy crashing the rocks, thereby soaking you by default. Watch as the colors in the sky unfold before your eyes in vibrant orange and red hues.

Drive the 27-mile Park Loop road.
Stop along the way for hidden gems and solitude in spots like the ones below.

Watch the U.S.’s first sunrise at Cadillac Mountain. You need reservations for the busy summer months due to limited parking, so you’ll need to book a vehicle reservation to snag one of these coveted spots. If you’ve worked up an appetite since you woke up before 4 AM for this experience, head into Bar Harbor for breakfast at Jeannie’s Great Maine Breakfast. Always get a grilled blueberry muffin. Especially when in Maine.


Is Acadia on your list of places to explore? What are you most excited to see or do?

A Guide to Hawai’i Volcanoes National Park

My 32nd national park!
I knew the least about Big Island prior to visiting. All I knew was that Volcanoes National Park resided there, and so I needed to visit. That’s the beauty of wanting to achieve a list. Sometimes, in order to cross a place off, you find unexpected beauty. We stayed in this beautiful Airbnb off the grid right outside the park immersed in the rainforest. I highly recommend it if you’re planning to spend time at Volcanoes!
We headed into the park our first night, headlamps in tow. I usually try to limit my night explorations in unknown places, but seeing this park at nighttime is an absolute must.

The lava glow at Volcanoes National Park.
We drove into the park near the Kīlauea Visitor Center to explore the Kīlauea Overlook. The parking lot was nearly empty on this mid-April evening, and we walked the minute up to the overlook. We weren’t entirely prepared for what we were about to see, or in this instance, not see.
When researching this park, I knew an eruption occurred a few months earlier in December, and I was hoping to catch a glimpse of lava up close. I wanted the feel the radiating warmth of the lava against my skin, but instead I only felt the cool air bringing my body to a chill. If you make it out to this park at night, bring a jacket. Or two.
When we walked up to the Kīlauea Overlook, a hazy reddish hue like a gentle brushstroke of acrylic paint just touching the canvas for the first time caught our eye. “That’s it?” My friend remarked.
Instead of lava flow, we were met with lava glow. The glow appeared a deep orange and red blend on camera. A rarity for the picture to be more astounding than the image in reality. Below is the daytime view.
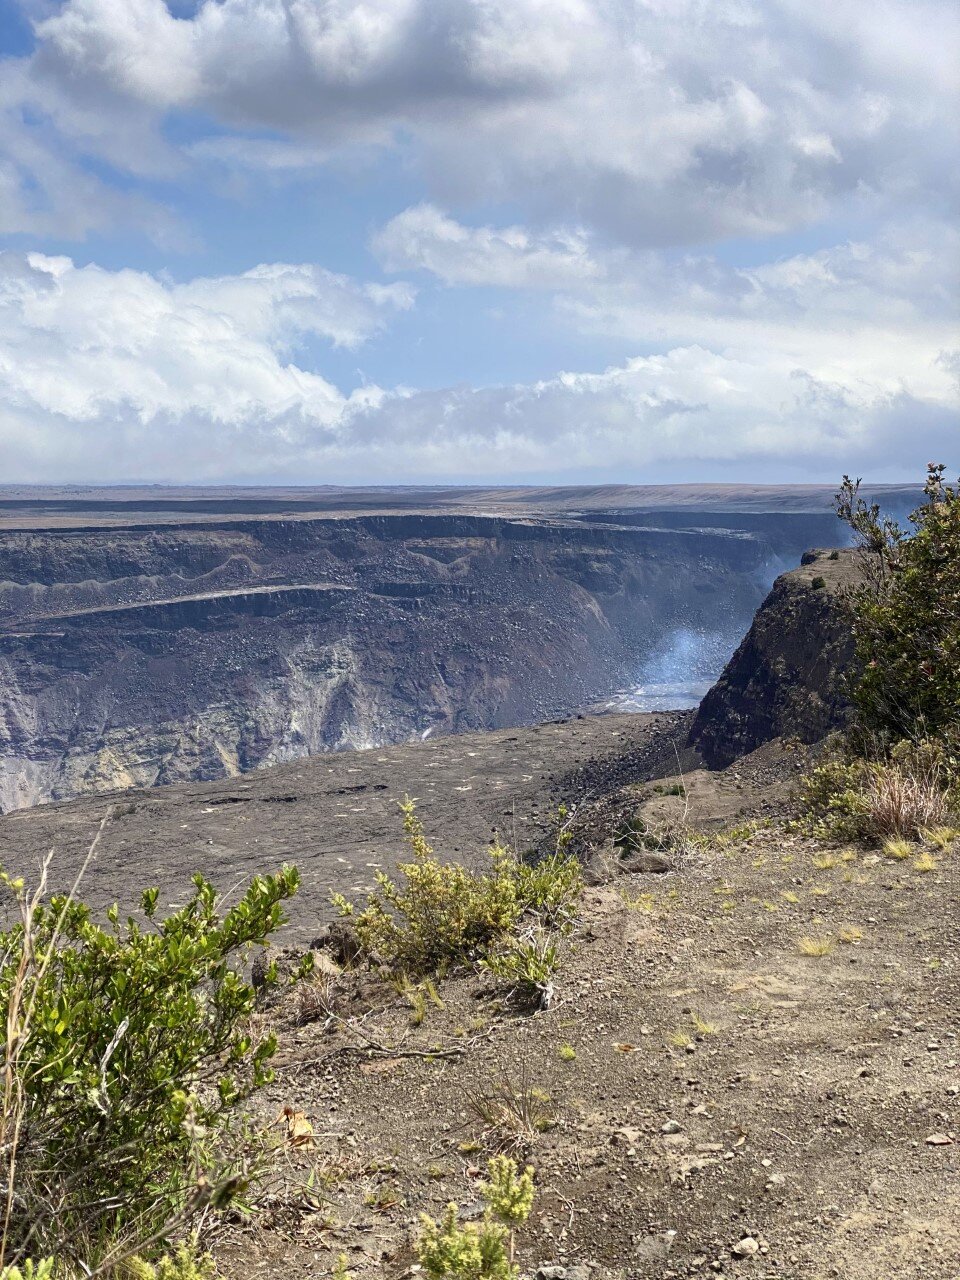
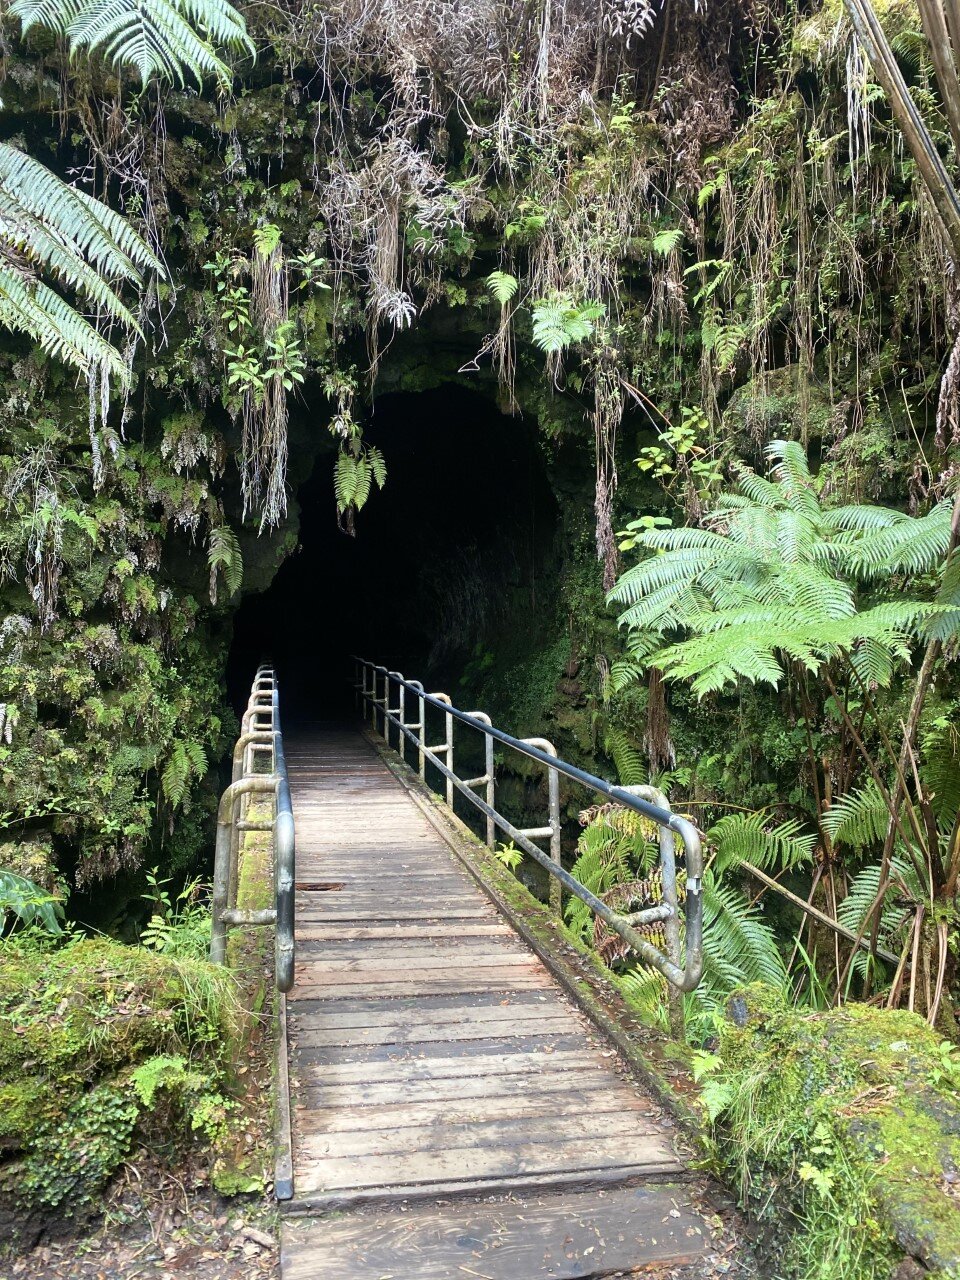
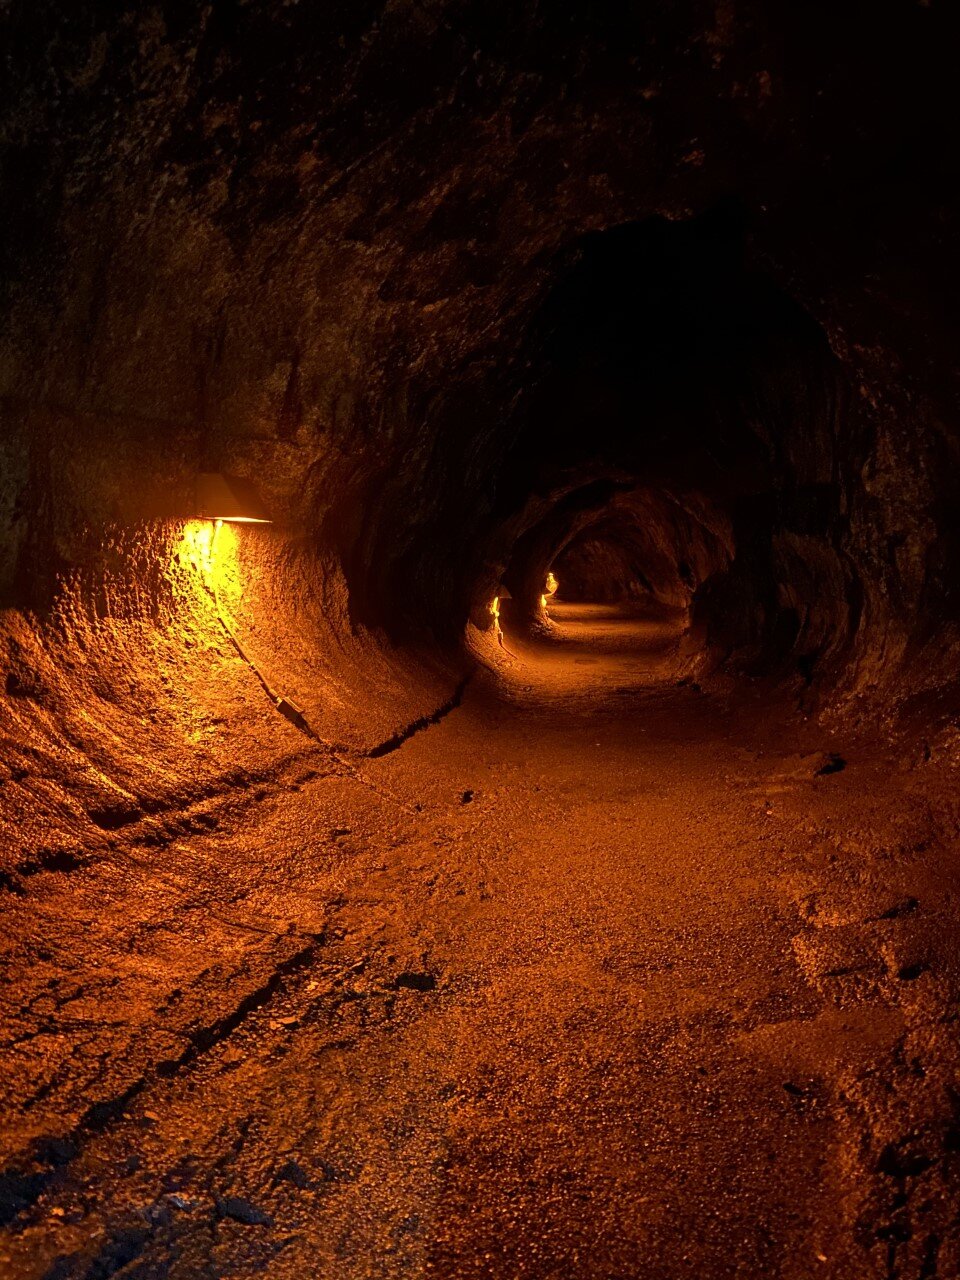
We explored the park in more depth the following day. We discovered another viewpoint at Volcano House that would be neat to see under a starry sky. We walked along the crater rim. Truthfully, I thought there would be hiking in this area, but all the sidewalks are very accessible and were all .2 or .3 miles of walking. Once we felt we had seen the crater enough, we drove onward to the Thurston lava tube. Another short traverse led us through a scenic rainforest and into a lit cave. At night, the lights are off if you want the full cave experience.

Across the street from the lava tube is a beautiful short trail as well with vistas of a crater floor you can actually hike down into and on!
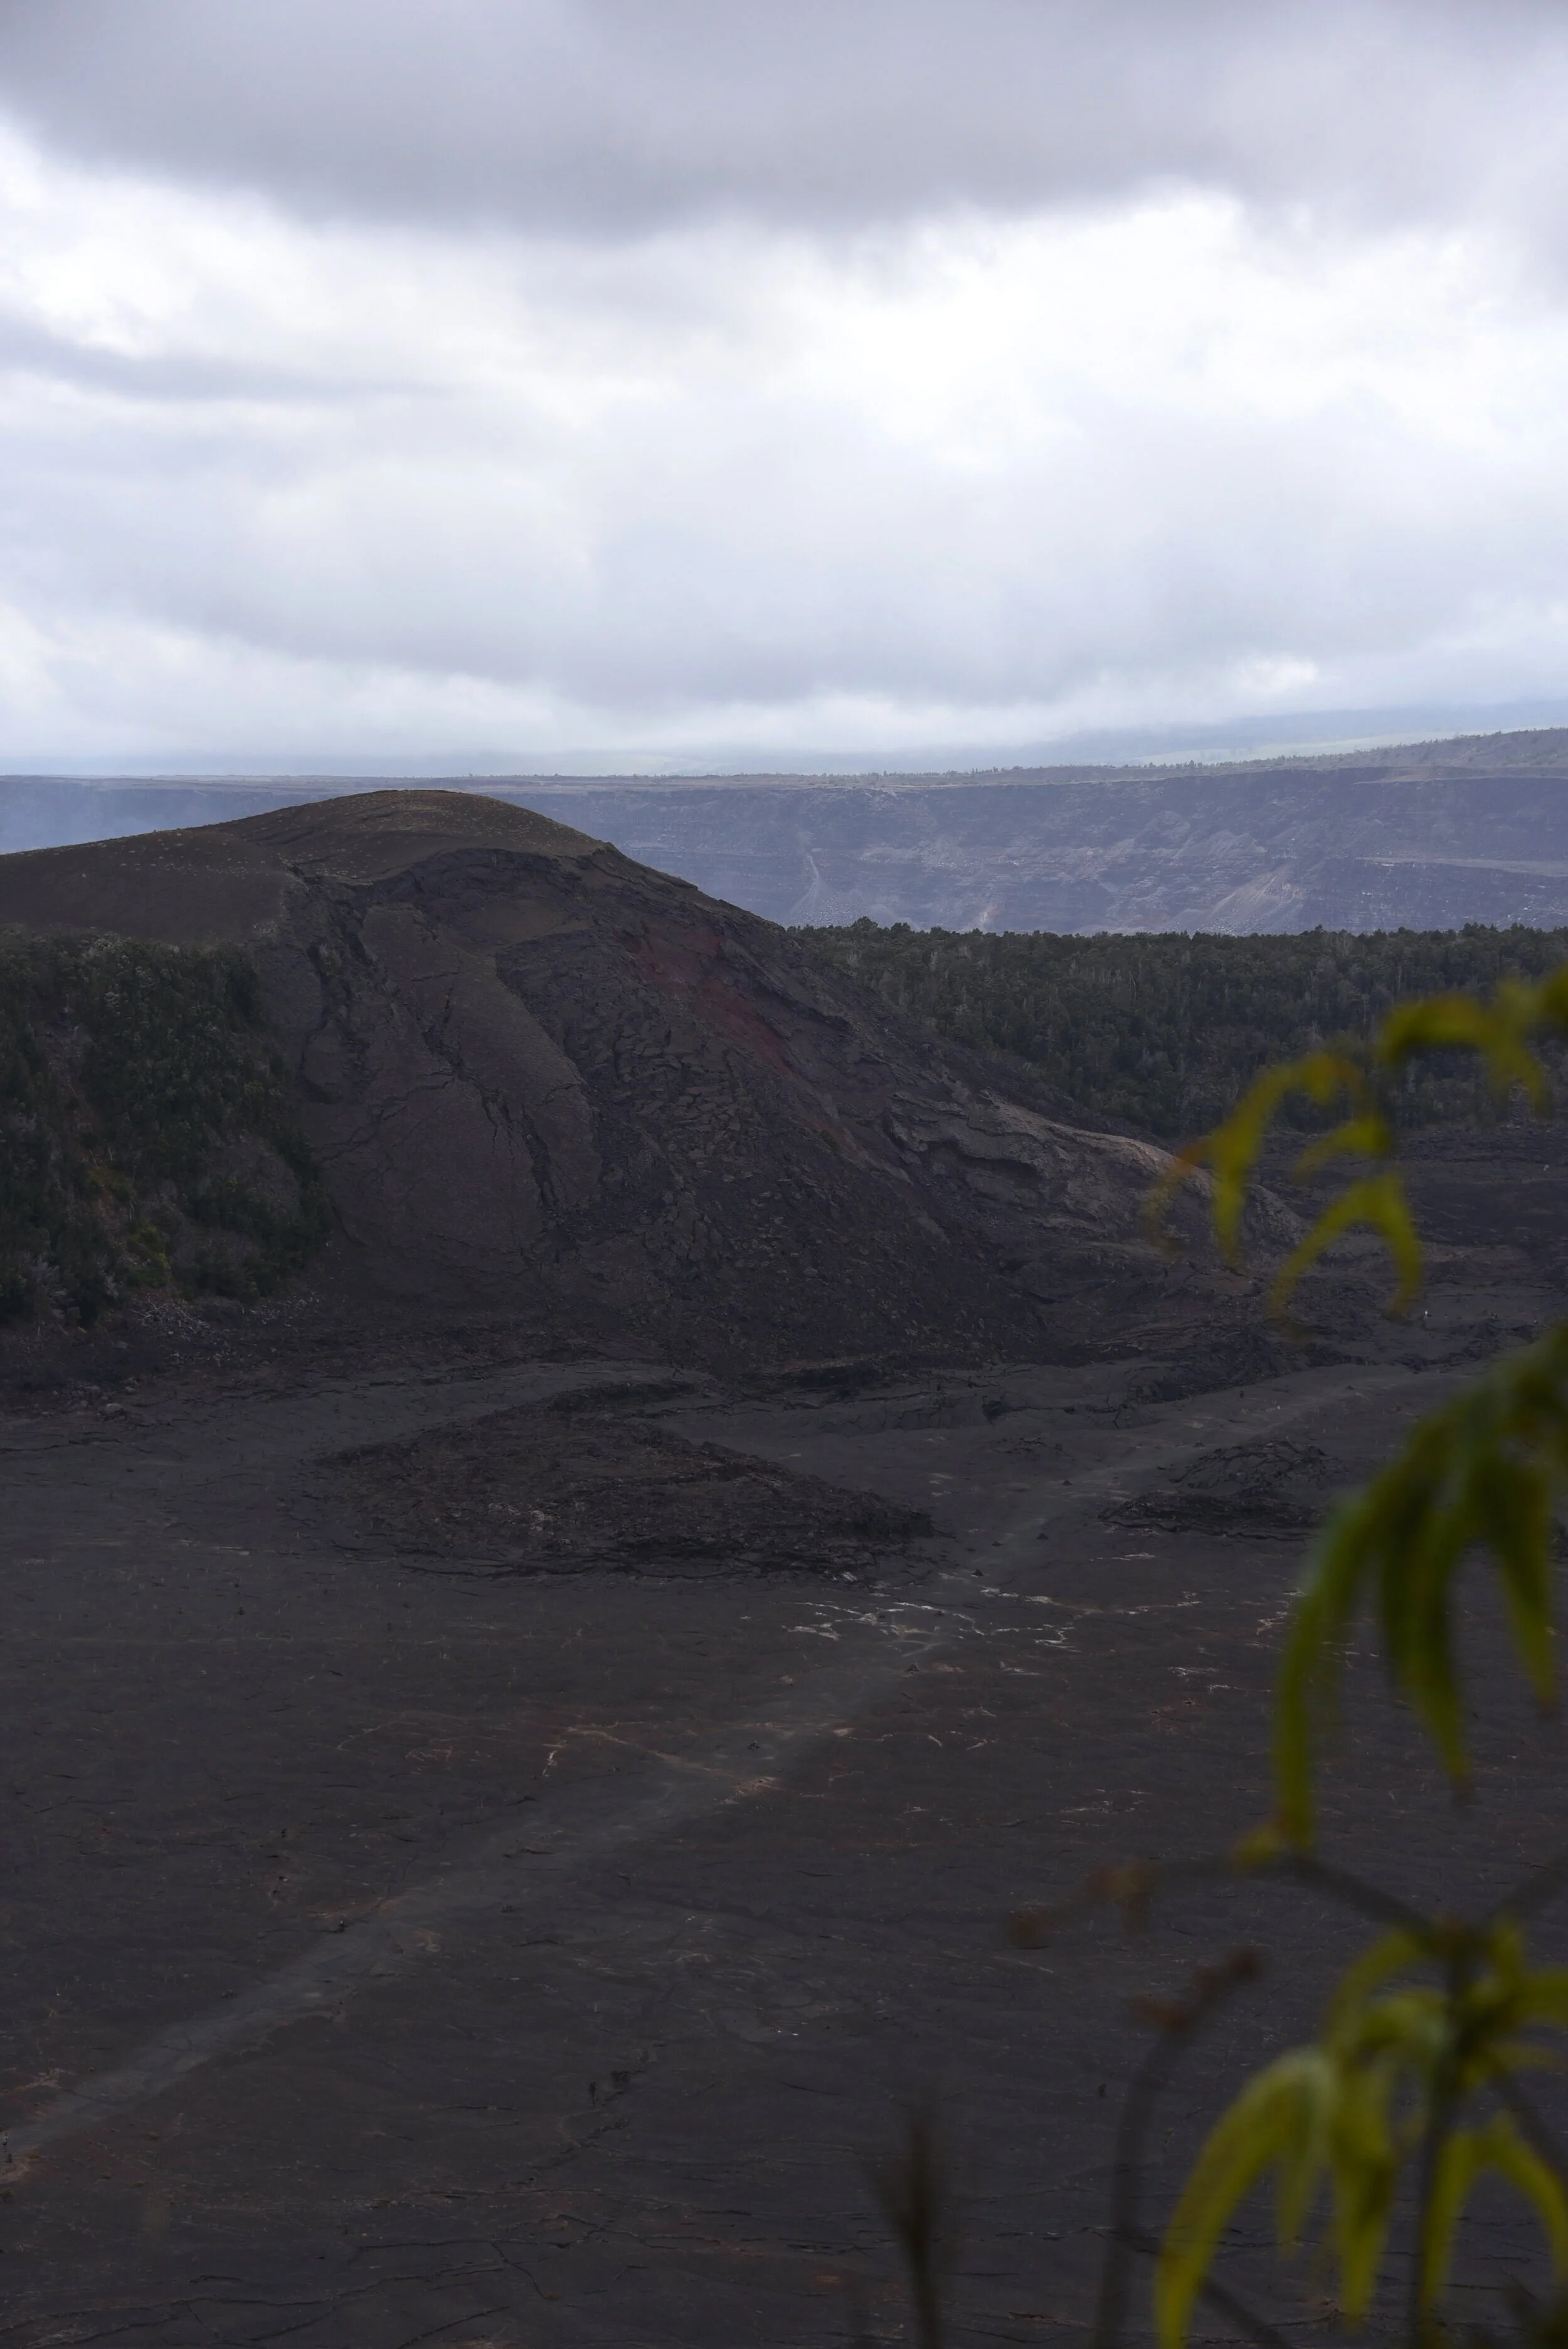
If I come back to Volcanoes one day, I would love to walk across the crater floor at the Kīlauea Iki Crater Overlook. It’s a 400 foot descent and a little over 3 miles of hiking down. The birds-eye-view is above.
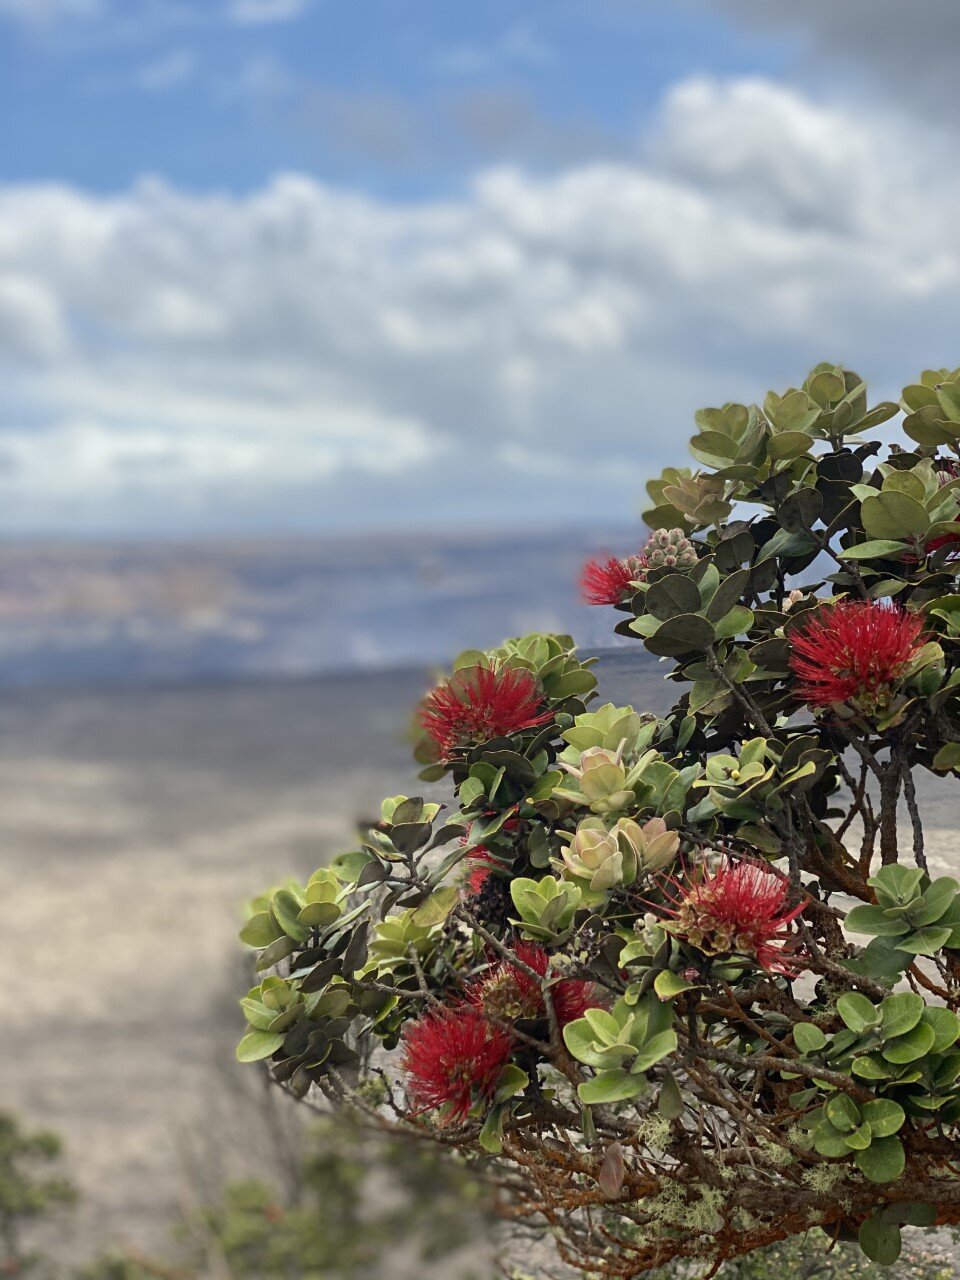
We hopped back in the car and headed down the Chain of Craters Road – a road lined with lava rock. The final destination on this road would lead us to the ocean. I love variety in a national park and like Olympic in Washington, Volcanoes provided us with desolate, dark lands contrasted a few miles away with the glimmering ocean.
A .6 mile out-and-back along a road led us to Cliffs of Moher, Ireland views. Also known as the Hōlei Sea Arch on the Big Island. The arch formed from waves slowly eroding it, which is neat to consider it is constantly changing. This little ocean visit was a highlight of the park for me particularly because of the road to get down to it, and eventually, back up.

Hōlei Sea Arch at Volcanoes National Park
Our final adventure led us to the summit of Mauna Kea, one of Hawaii’s largest volcanoes. From its base underwater to the peak, it’s over 33,500 feet, meaning it’s taller than Mt. Everest (if you count what is submerged in water). Pretty neat, right?
There is an observatory 13,803′ feet up to watch the sunset from. We made it up 9,000 feet where we were met with this worrisome sign (the eerie fog didn’t help) and a guard along the road.

And to think, we were just by the coast with the ocean breeze.
We drove from sea level to this point in about an hour and a half, so the sign makes sense. The remainder of the road can only be traveled with AWD, and most rental car companies won’t cover the damage from this road specifically.
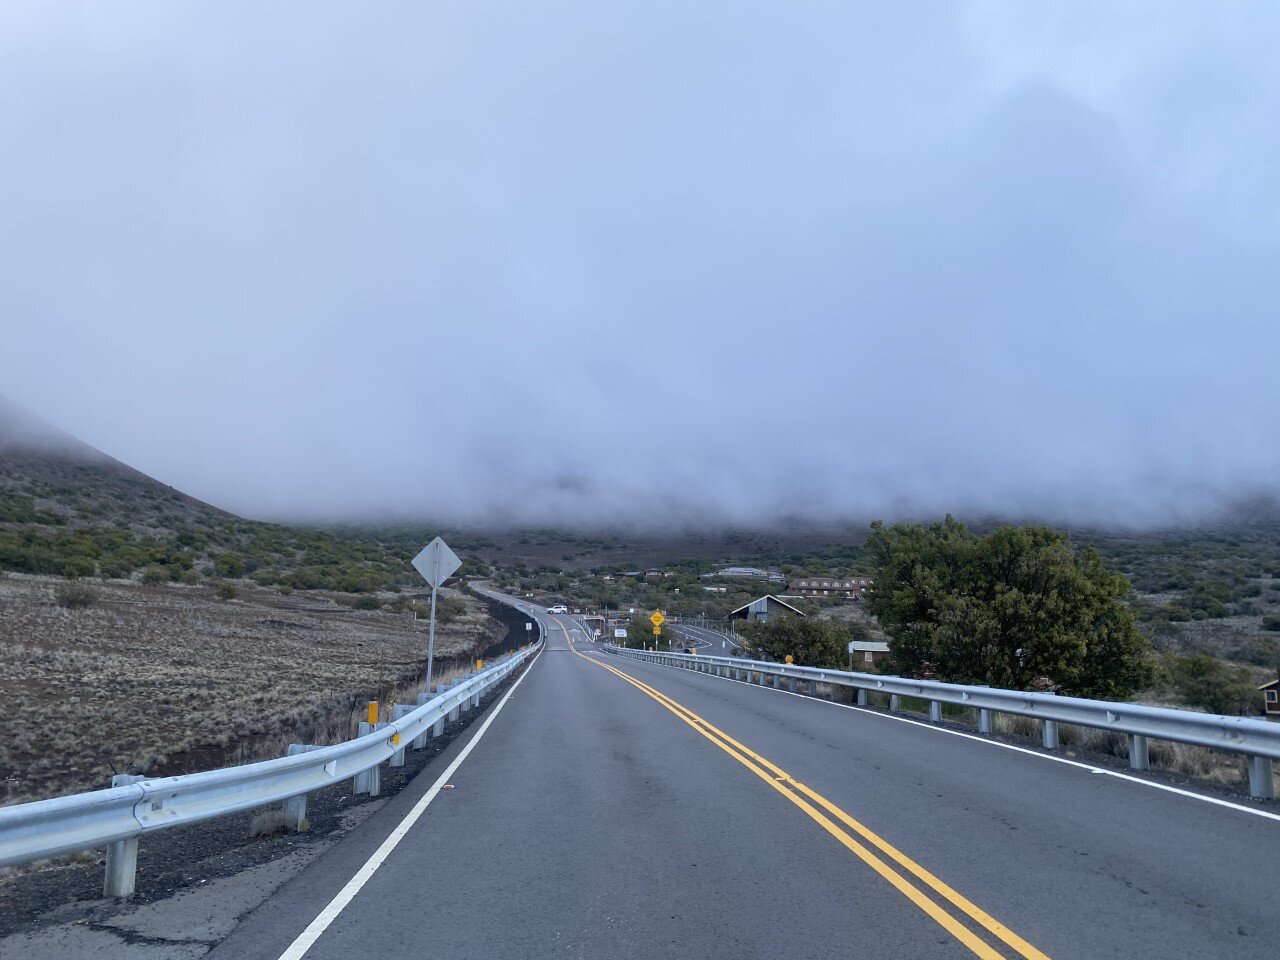
The ominous road that leads to the guard checking if you have AWD or not.
So here’s the sunset from our little spot 9,000 feet up in the sky.

Our sunset above the clouds, but still a few thousand feet below the summit.
Did you have Volcanoes National Park on your list of places to visit? What part of the park can you not wait to explore one day?

Three Must Visit Lakes in the Grand Tetons
When we first planned out our trip to Grand Teton National Park, I was stoked to find out there were several short hikes. From taking a gander at Jenny Lake, to short walks, you are bound to enjoy your time in the Tetons no matter how you spend your time.
The best part? The Tetons also have an incredible bike path (very few national parks do) that takes you from Jackson Hole into and throughout the park. The bike path is paved and lengthy, ending at Jenny Lake. You can also continue along roadside. We were thrilled.

We parked inside the park and biked from there. We brought our own bikes, but there are several places in town to rent from. If cycling isn’t your thing, you can also explore these scenic lakes by foot or by car.

Check out the three lakes I recommend spending your Teton time at:
Taggart & Bradley Lake
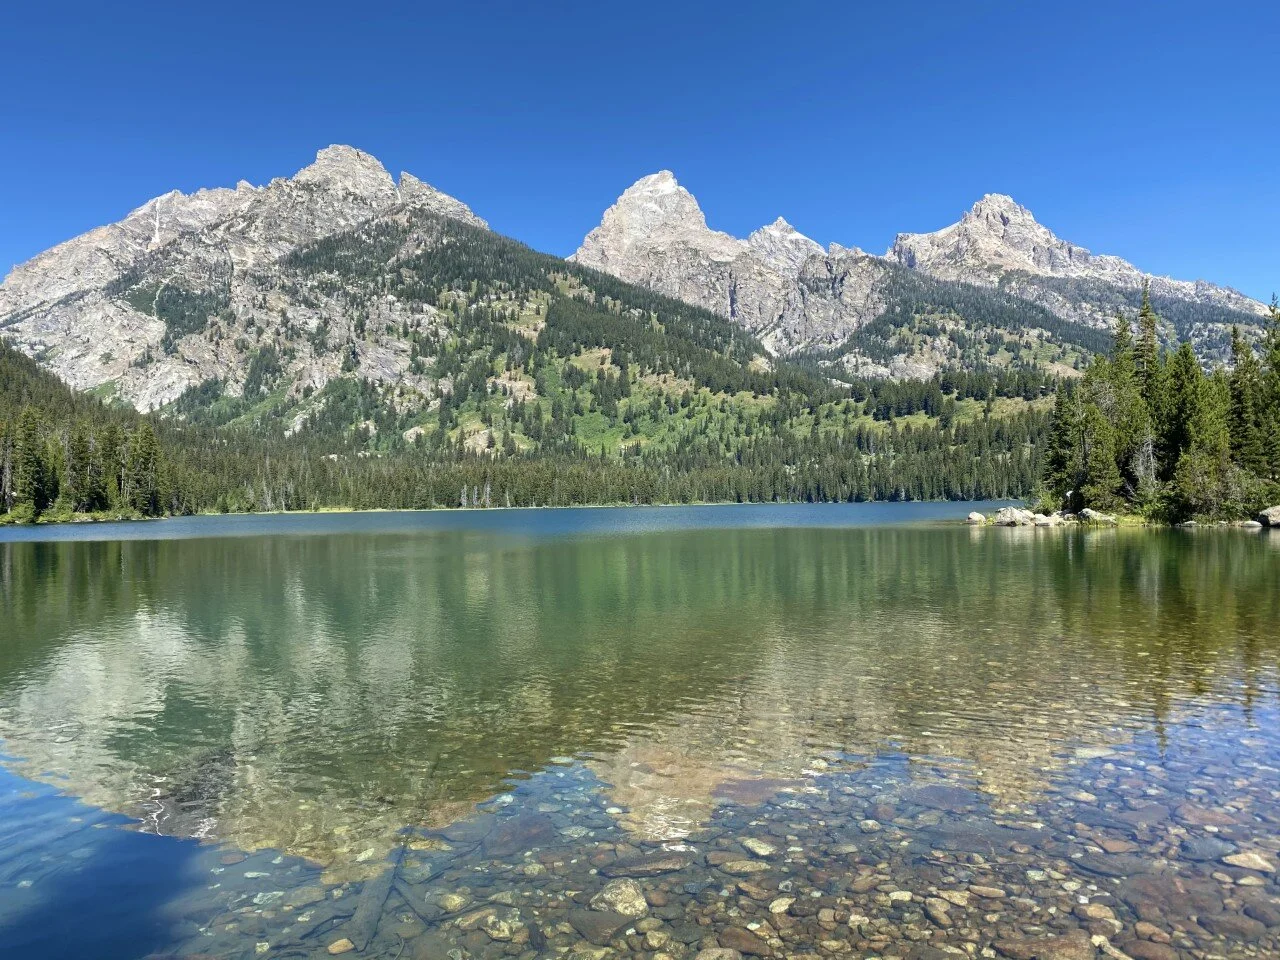
Taggart and Bradley lake are everything you imagine about the Tetons and more. As soon as you park at the trailhead, you are greeted with inspiring views of the Tetons. Just the trailhead parking lot alone is a sight to take in. Arrive early because this parking lot caters to hikers of all types: those who are tackling the grands, those who are going for a leisure stroll, and those who needed a quick pee stop.
We scored the last available parking spot at the Taggart Lake Trailhead (only a few miles in from the national park entrance) and began our hike to Taggart Lake. At a little over two miles, while gazing almost entirely at the Tetons above, we reached Taggart Lake.

Another 1.5 miles on the trail led us to Bradley Lake, which was easy to miss at the junction. This lake was less crowded, and just as stunning as Taggart. A little over two miles led us to complete the loop at around 5.5 miles and 500 feet elevation gain total.

Jackson Lake
This national park is quite large, but we were determined to see as much of it as we possibly could. From hiking to a couple lakes, to biking alongside the road, we also explored the northern part of the park by car. This drive brought us to Jackson Lake, where the summer blue sky seamlessly blended into the shimmering crystal waters.

I could stare at this view forever. It’s the perfect spot to eat your packed lunch, stop for a break, or simply relax. Plenty of viewpoints to pull over for with ample parking to take in this dreamy view.
What’s your preferred way to see the lakes - bike, hike, or drive up to the view?

Best Day Hike in Glacier National Park
Glacier is Montana’s gem. Truly. From the summer wildflower fields to the grazing wildlife, to the glaciers. Oh my goodness the glaciers! I left part of my heart in Glacier and I cannot wait to go back.
With initial plans to hike to the Grinnell Glacier, only to find out the night before that that part of the park was closed (summer 2020), we swiftly searched our NPS map for other hikes. The maps that the park service provides are jampacked with information about wildlife need-to-knows, safety measures to take, and hikes to explore. I highly recommend grabbing a map when you arrive (or check out GNP’s breakdown by regions of the park here).
Turns out, Grinnell Glacier can also be reached from the skies. Lucky me! Instead of reaching the glacier from the ground-level, we’d be hiking up to the lookout spot surrounded by the peaks. In hindsight, part of the park’s closure worked out in our favor because I never would have experienced this trail otherwise.
We set out early in the morning. Early in Glacier summers means 3:30 or 4am with the peak tourism. You would think a park in the furthest part of Montana would be kept as a hidden secret, but alas, the secret’s out. Glacier is a gem no one wants to miss out on.
With only one road to the trail’s access point, we quickly found ourselves in traffic. Shuttles that usually run throughout the park were shut off. Parking was full at Logan Pass, but we were fortunate to snag a spot half a mile away alongside the road in a designated parking spot.

Hiking along the Highline Trail…
Moments later, we embarked on the Highline Trail and I kid you not, every step had mountainscape views. Wildflowers and even some wildlife (deer, marmots, and mountain goats) along the trail as well. My first experience with a marmot is one I’ll never forget. As soon as I set my eyes on this adorable, sunbathing creature, a screech was let out that sounded like someone was being attacked. Turns out this adorable little thing has a fiery side to him. We quickly hiked on.

Even if you only have a couple hours to spare, hiking the Highline Trail is completely worth it. We gave it the day to see the glacier, so we made our way up the majority of the hike’s ascent to the Grinnell Glacier Overlook. The sign lies to you when it says .6 miles away. Trust me.


Closer to a mile of what felt like an endless uphill, we reached shimmering, aqua blue waters outlined by ice. It looked surreal.

With time to spare, we decided to make our way to the Granite Park Chalet, not too far from the start of the ascent to the glacier overlook. Glacier originally had over ten chalets built to mimic the vibe of Switzerland – ultimately, to promote tourism. Why go to Switzerland, when you can have it all right here in Montana? Sadly, various situations led to many of them no longer standing. The Granite Park Chalet is one of two remaining in the backcountry.

The views from this chalet are phenomenal. The fact that this trail is extraordinarily stunning and leads you to a homey chalet just tops it. Bookings fill up swiftly, for good reason, so plan ahead if you’re hoping to snag a spot at this dreamy stay. We did an out-and-back from the chalet, adding up to 3,700 elevation gain in 18 miles of trekking.
The Granite Park Chalet also has a campground below it, not too far away. It’s the perfect entry into the backcountry if that’s your thing. My heart was completely full after this hike. If you only have a day to devote to hiking, this is your trail for a taste of all the delights that Glacier offers.


How to Plan Your Trip to Yellowstone National Park

Driving east through Wyoming would never give you the impression that it is home to one of the U.S.’s most fascinating and largest national parks: Yellowstone. It’s where Montana’s forest green meets Wyoming’s Wild West. Western Wyoming, on the other hand, looks much like the Wild West in your head, solely missing the tumbleweed rolling slowly across the one-lane “highway.”
Needless to say, western Wyoming was one of those long stretches of road where you aren’t sure if your car will make it on your current tank of gas before you see another gas station (or any sign of life, really). If I haven’t convinced you yet to visit Wyoming, just wait. When you reach the little pocket of northwestern Wyoming, you’ll feel transported to another world. Seriously, Yellowstone felt otherworldly.
We spent a couple days in the park absorbing as many geysers, hot springs, and wildlife viewing as possible. We spent a great amount of time driving from destination to destination. It felt like navigating through an IKEA with all of the stops on the map that we wanted to explore.
Check out the map below from the National Park Service and you’ll see what I mean. There are miles upon miles between each destination region– almost like the kingdoms at Disney World, except it’s more like nature’s amusement park. Summer in Yellowstone feels similarly to a summer trip to Disney World – crazy crowds (and cars) everywhere.

We split up the park into sections to take on to get the most out of our days. With summer travel plans coming into fruition and you find adding the northwestern pocket of Wyoming on your list, here’s how to make the most of Wyoming’s Wild West.
Divide the park into these three sections to see all the fascinating beauty Yellowstone has to offer:

1. Canyon Village
Canyon Village contains the Grand Canyon. Not to be confused with the Grand Canyon down in Arizona. Also for East Coasters, this is not to be confused with the Grand Canyon of the East in Letchworth State Park in New York.
Mt. Washburn was on our list to hike in the Canyon Village area, but its location put it right in the middle of a road construction project. If that’s the case for you, it’s still worth exploring this section of the park. Places to see: The Grand Canyon of Yellowstone, Artist Point, and the accompanying Falls (Lower and Upper).
These scenic viewpoints are all very short, well-marked trails that work for all types of hikers. A bonus if you’re heading back south is Hayden Valley.
Bring your binoculars because wildlife love the vastness of this valley, especially when dusk starts to set in. If you forget about this tip, you’ll see loads of cars parked alongside the road to remind you to keep your eyes peeled.


2. Old Faithful and West Thumb/Grant Village
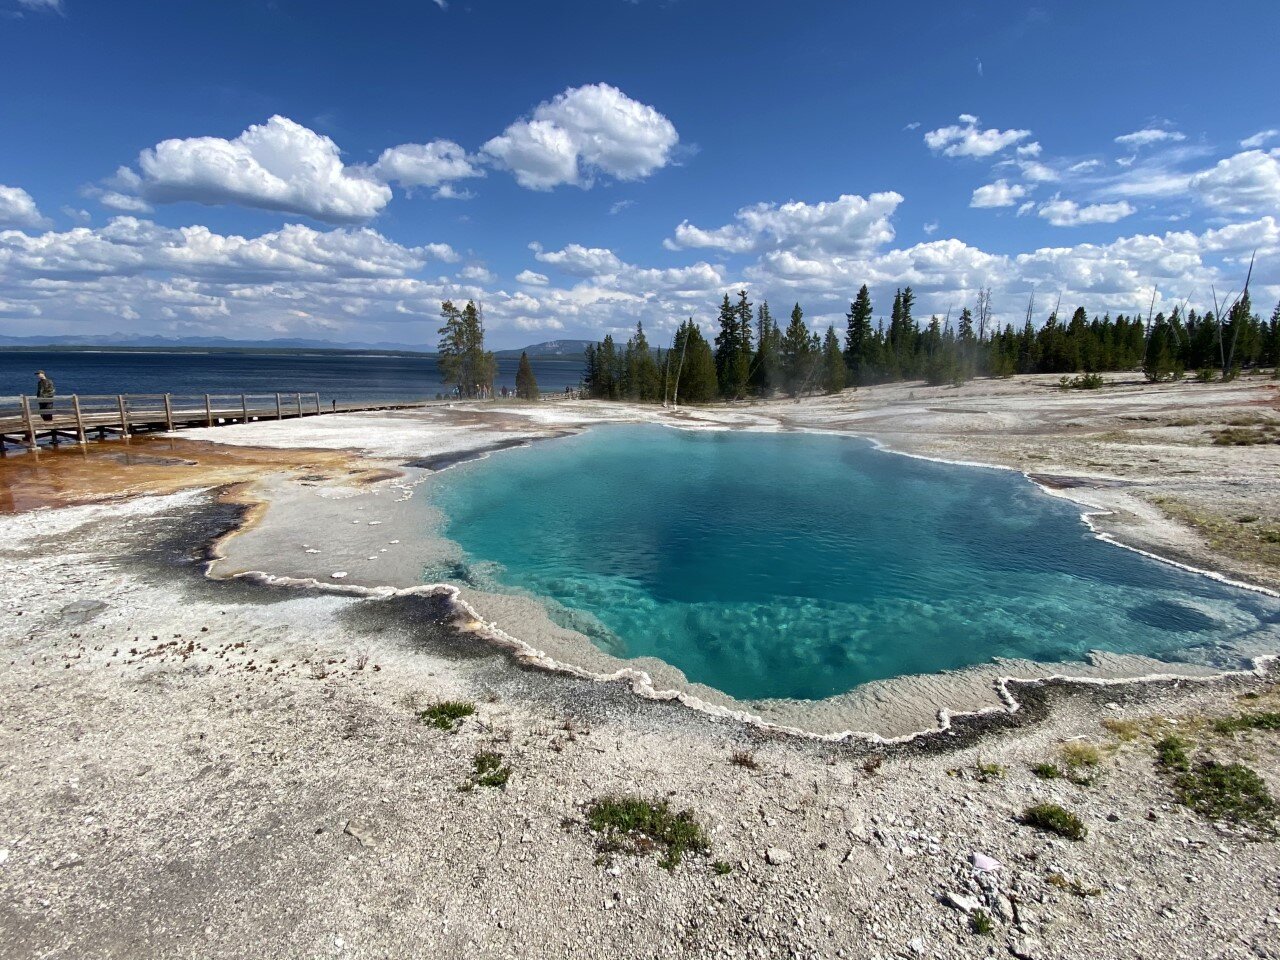
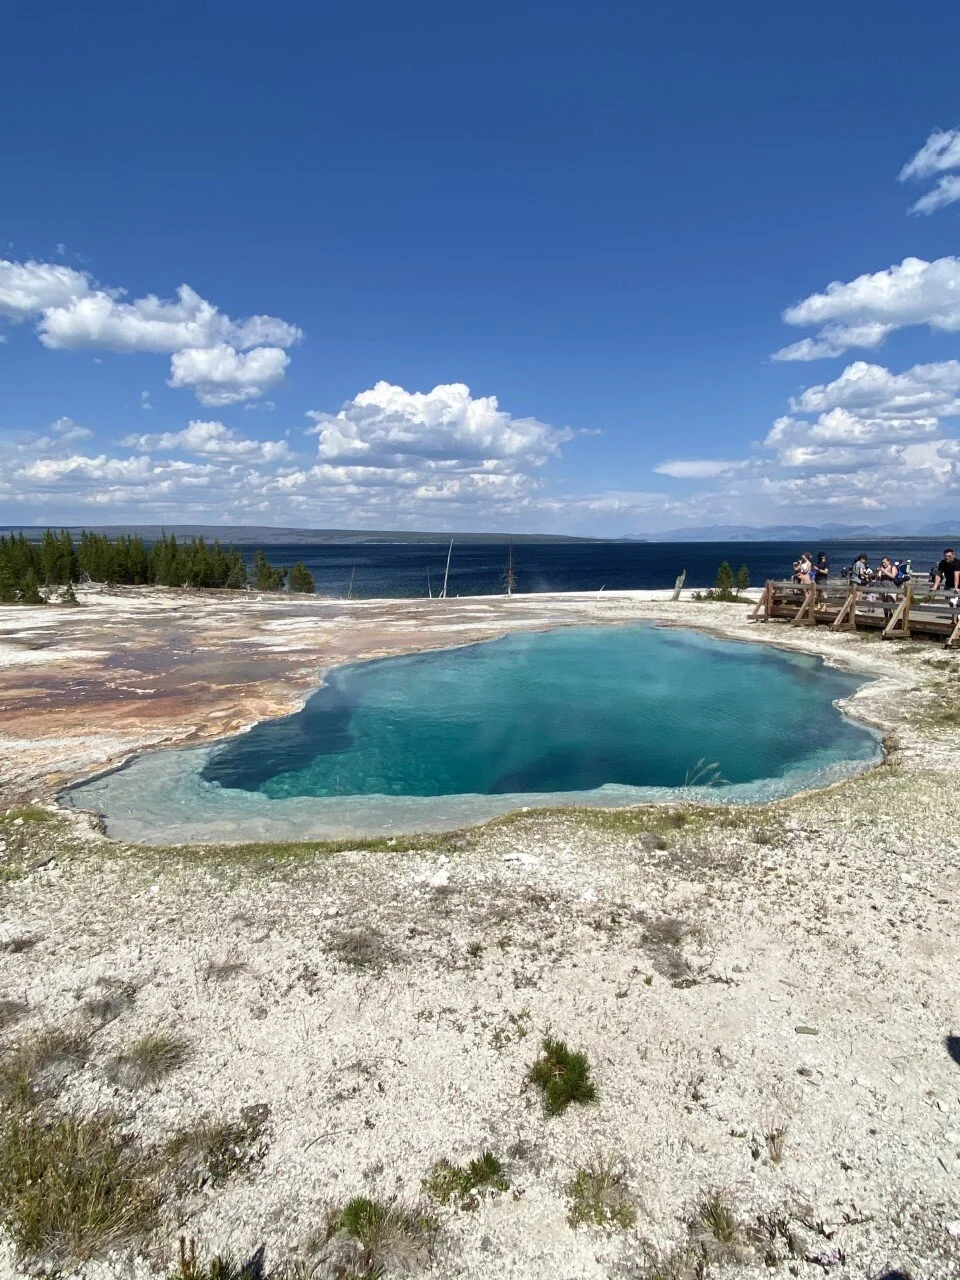
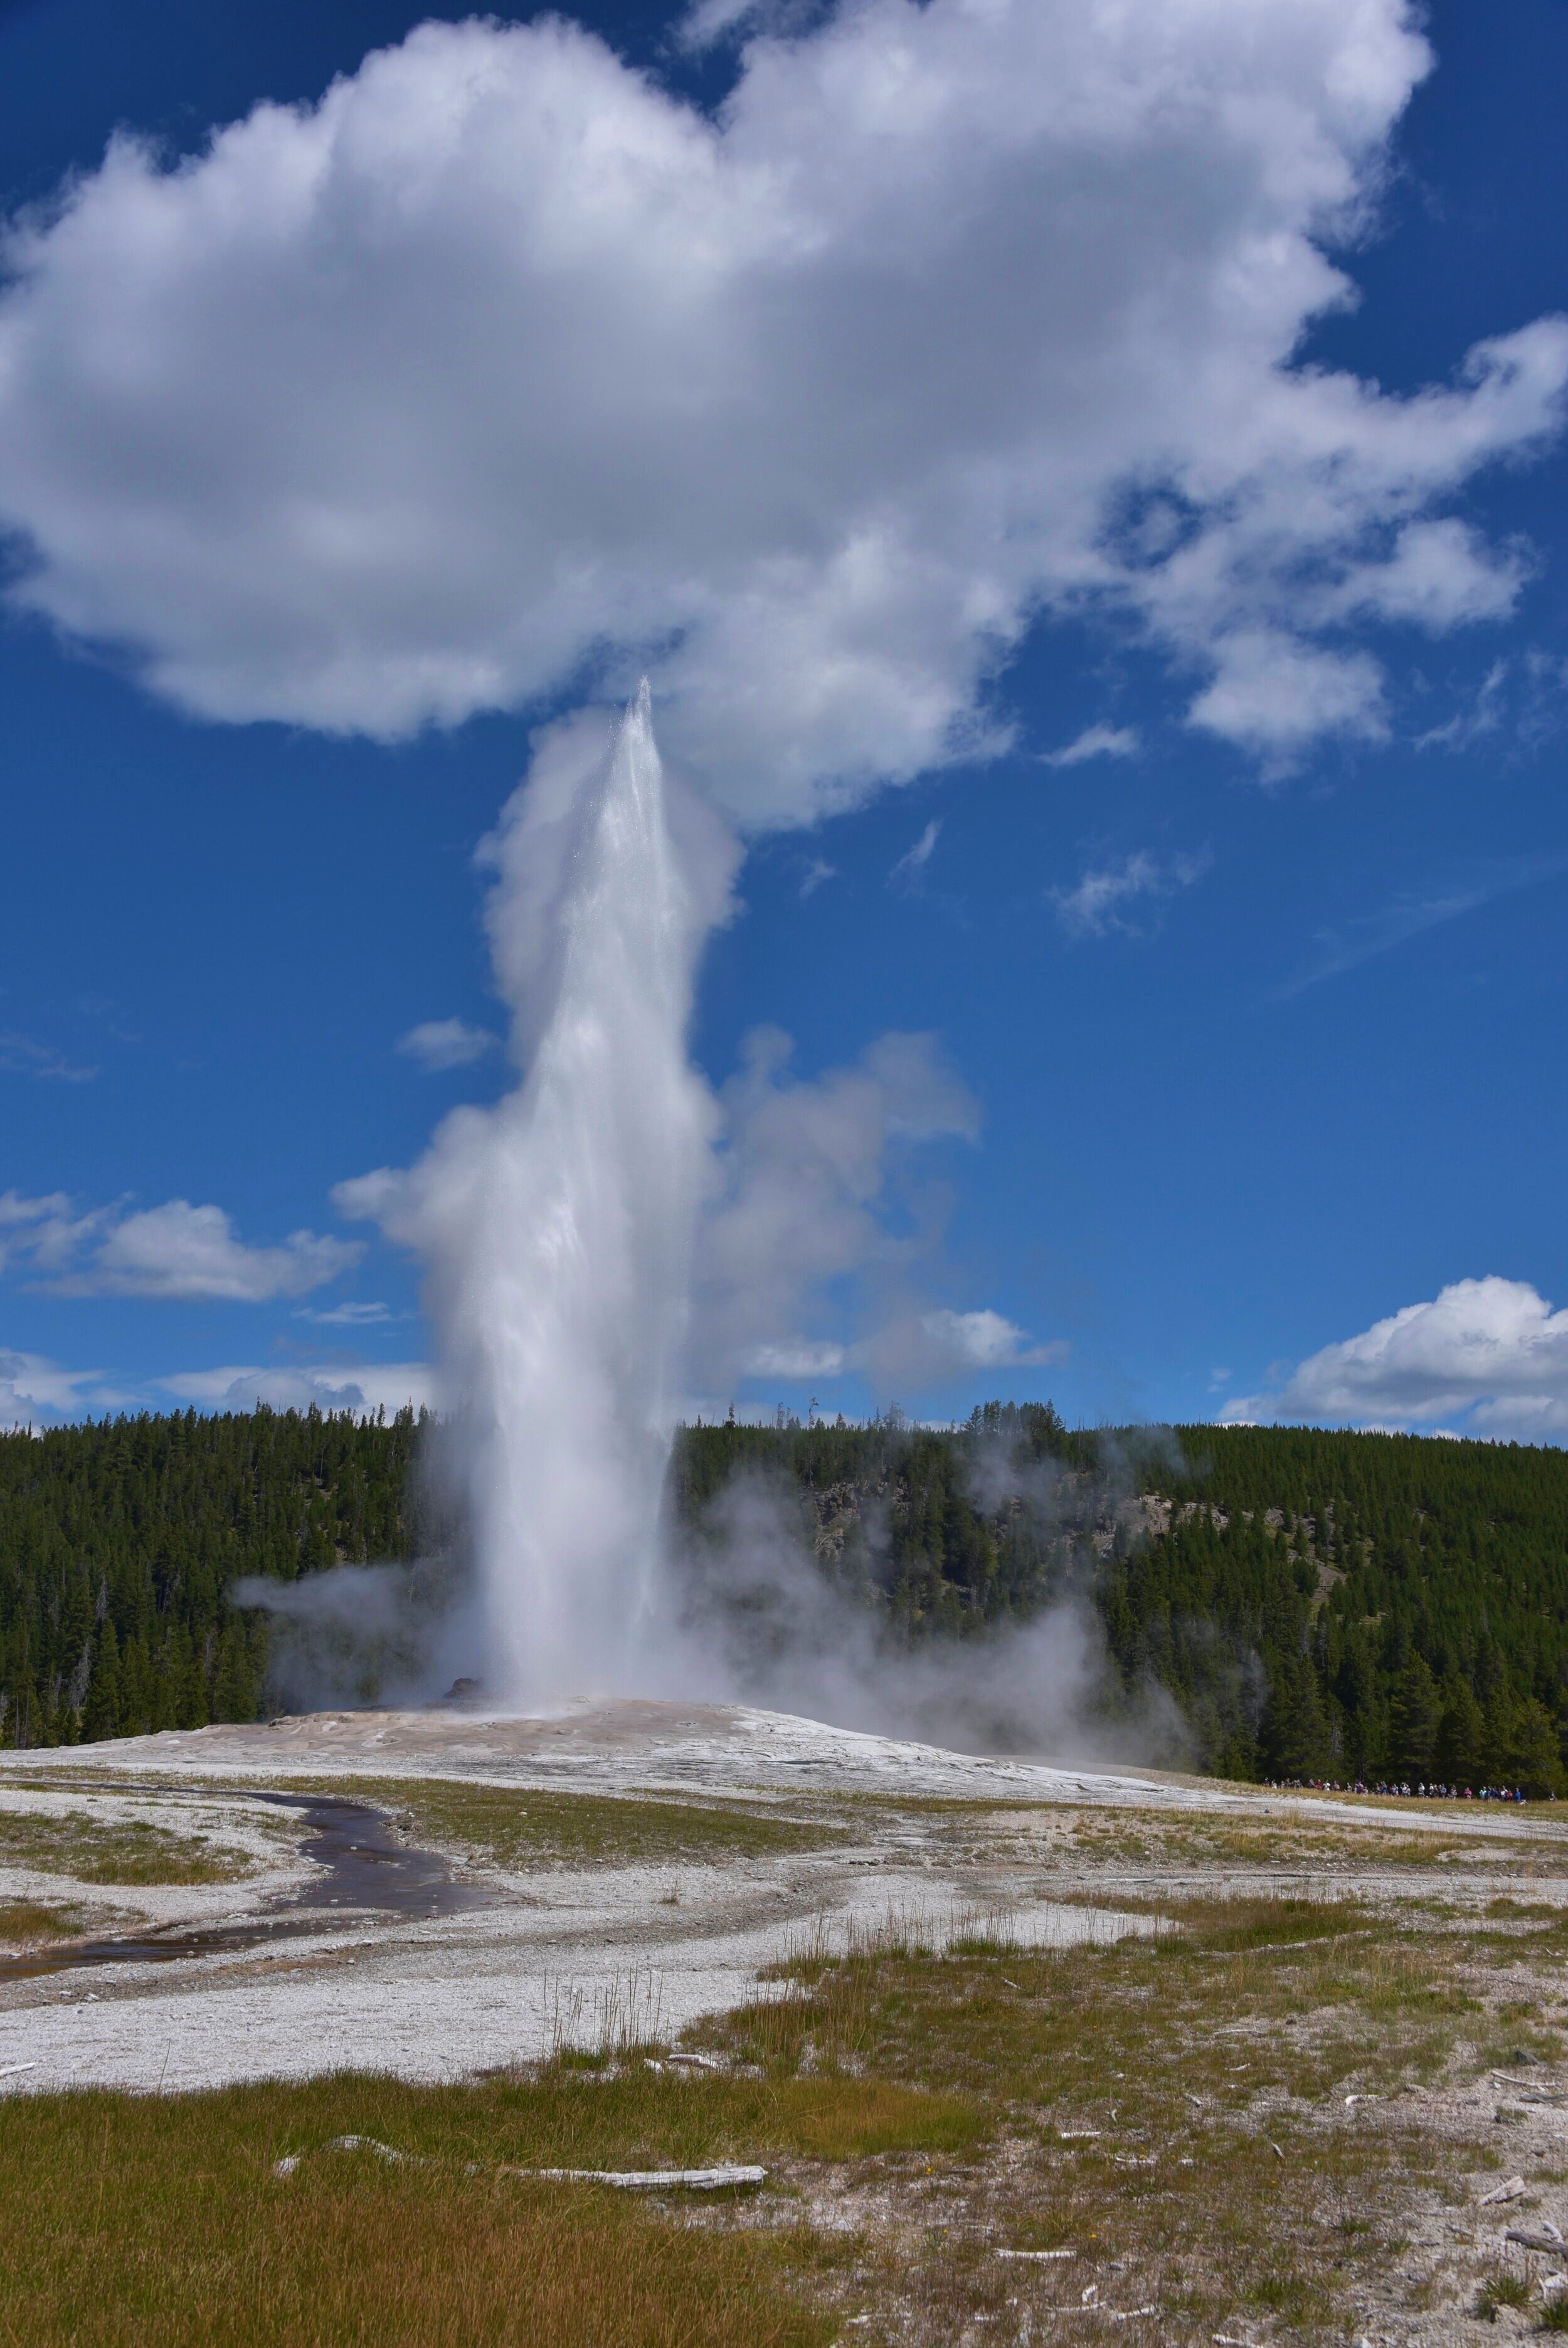
With our map in hand, we embarked on a self-guided geyser tour through the heart of Yellowstone National Park. We spent a day going from geyser to geyser. We made our way first to Old Faithful — given that it’s the most popular (and named appropriately). The park gets the timing of this geyser narrowed down to a small window, so you won’t need to waste time waiting for it to erupt. It’s quite the spectacle.
After Old Faithful, we explored the Upper Geyser Basin, Lower Geyser Basin, Black Sand Basin, Biscuit Basin, and West Thumb Geyser Basin (pictured below. I told you – a great deal of geysers. Turns out, Yellowstone is home to over 10,000 geysers, hot springs, mud spots, and the sort. Each of these geyser basins takes about a half hour or less to walk around and explore.
The Grand Prismatic Spring was well worth the view. We gave this one a little more exploration time. Parking here was also limited, but spots opened up quickly as the walking loop to view the spring isn’t long.

3. Mammoth Hot Springs
This northern part of the park was way quieter, which might be why it was my absolute favorite. Like I said earlier, I’m a tourist, but I’m not a fan of hoards of tourists. I love the local feel (hard to come by in the heat of summer in America’s first national park).
The Mammoth Hot Springs Terraces are a small point on the large map. In a matter of steps, you are viewing jagged, salt-like walls with Montana in the north. I felt transported back to Peru’s salt mines in Maras with the coloring of the limestone in a desert-like landscape. This part of the park is also “near” Lamar Valley, another massive valley ideal for spotting wildlife. We ran into multiple bison jams here.
Is Yellowstone National Park on your list yet? What spot do you want to see the most?
Newcomers to Solo Hiking: 6 Perfect New Hampshire Hikes to Take on Alone
One of the perks of teaching is having the month of July off to travel. I spent one July a few summers ago living in southern New Hampshire with a friend. I was so pumped to live near the Whites, even though I had only hiked the Franconia Ridge a year earlier.
With my new proximity to the Whites, I set my sights on hiking. The only problem? My friend spent the summer working, so I was on my own. I had no problem traveling alone or exploring new places by myself, but hiking in unknown terrain with limited cell signal was not a habit of mine. How things would change in the coming years…
I didn’t hike a 4,000 footer once that summer. I was too afraid of the what if’s.
I look back now and regret how close I was to the mountains and how I didn’t take advantage of them. I did spend that July starting out what would later be a weekend regular: hiking alone in the Whites.
I researched short hikes that were clearly marked. I wanted to leave no room for error. Here are the hikes I did that summer (along with a few extras I did later on) that are ideal for first-time adventurers, low-on timers, beginner hikers, or short-on-hiking-pals trekkers:

1. West Rattlesnake Mountain
A 2-mile hike with a little less than 500 ft elevation gain. Beautiful any time of day or year with this view of Squam Lake.

2. Artist’s Bluff
Less than half a mile to this beautiful overlook in the heart of the Whites in Franconia Notch with a bit of a steep incline. I’ve been here a handful of times and the view never gets old.

3. Mt. Willard
Another fan favorite in Franconia Notch is this beautiful 3 mile, out-and-back trail. Perfect for all levels and a jaw-dropping view every time.

3. Mt. Willard (continued)
Same view, different season. A major perk of winter hiking is less hikers along the trail. I hiked Willard with a friend a couple years ago in negative temps and we only crossed paths with a set of hikers at the summit.

4. Welch-Dickey Loop
This was my first attempt at prepping for 4,000 footers. Welch-Dickey is a loop of a little over 4 miles with a little under 2,000 ft gain.
This was also my first experience with NH’s namesake as the granite state, which I experienced in rainy conditions. I wouldn’t recommend this hike in running shoes on a rainy day.

5. Mt. Major
Another under-5 mile hike loop outside the Whites with stunning views. This hike is pretty popular any time of year, so it’s ideal for new solo hikers.
6. Mt. Pierce
A 4,000 footer that you can totally handle. Though this wasn’t my first 4ker, it was the first one I hiked alone. I spent an April break in the mountains and Pierce was first on my list. Three miles up to the summit on a bluebird day led to me bag Eisenhower nearby in the same day, but Pierce alone is well worth the trek.
It is one of the NH 48 with a little over 2,000 ft elevation gain. The climb is well-paced and there are endless views of the presidentials at the summit, including good ol’ Washington.
Have you made it to any of these summits? Which ones do you plan to add to your list? Let me know if you’re going to tackle these summits soon.

Twins Zealand Bonds Traverse
You know those mornings you’re so eager to wake up to? The ones where you wake up moments before your alarm in utter anticipation? One Sunday, this past October, was exactly that kind of morning for me. We cooked a hearty breakfast before dawn and loaded our packs for our adventure to snag my final 8 peaks of the 48.

The Route
After looking at which peaks I had left, I stared at a map trying to decide the best way to go about bagging them all. We headed up to the Twins on the North Twin trail, starting the morning with a steep ascent. North Twin to South Twin to Zealand to West Bond, Bond, and Bondcliff. We did this as an out-and-back, but skipped West Bond and Zealand (outlined in red on the map) on the return trip.
Elevation map below for the traverse.


North and South Twin
We parked at the North Twin trailhead at sunrise and began the two mile walk before the big climb. About a mile in, I turned on the trail and found myself encountering a moose face-to-face. A full-fledged, antlers as wide as the trail, moose. I felt pure awe. And shock. We slowly stepped backwards, off the trail, and watched him continue his Sunday morning stroll until he was out of our eye view.
I’ve patiently waited for a moose sighting for five years. To the point where I hoped one would cross the road when I drive past moose crossing signs on highways. In hindsight, it’s probably for the best I didn’t have my first encounter in that situation. Multiple trips to Maine, countless to the Whites, and even a two-week cross-country road trip out to Big Sky country didn’t help me cross off this bucket list item. This hike was off to an incredible start and it was only the first two miles of the day.
North Twin’s summit was well worth the arduous climb. I finally understood why hikers say the Pemigewasset wilderness is a Whites’ gem. The solitude alone was dreamy. We had each summit from North Twin to the Bonds to ourselves (aside from the finale at Bondcliff).

Zealand to the Bonds
From North Twin, we faced a muddy mile to South Twin, followed by a detour to Zealand where we were met with three relentless greyjays. Zealand was a tough addition to this traverse because we did it out and back before we headed to the Bonds. All the better for our return to avoid detours.
West Bond was incredible, but I started to hesitate at finishing this traverse due to daylight escaping us swiftly with Bond and Bondcliff still left on the itinerary. I kept on with descent down to Bondcliff. Honestly the views were jaw-dropping (fitting as we dropped hundreds of feet in elevation that we’d have to climb back up to get home). The bittersweet joy I felt heading into my final peak was met with glances over my shoulder to see that massive drop we made.

Bondcliff lived up to its hype and I couldn’t have picked a better day, partner, or peak to finish with. I set out to hike to 48 in August 2018 when I hiked up Lincoln and Lafayette with my roommates. On that hike, one of them said she’d love to hike the 48 before moving. I had never heard of the 48 before then, but I’m so glad that seed was planted that day because a little over two years later, I became an NH 48 finisher.

A 22ish-mile, ~7,000 ft gain, 15-hour day ended in the darkness of the Pemi wilderness. I don’t love night hiking, but it did present the opportunity of witnessing a mountaintop sunset on South Twin that did not disappoint. There may be more night hikes in my future to see sights like that again.
Until next time in the Whites.